FableVision Learning Spotlight Blog
Categories
- Animation-ish 42
- Books 21
- Civics! 2
- Classroom Spotlight 17
- Conferences and Events 20
- Creative Educator 3
- Creativity 25
- Distance Learning 13
- Dot Day 22
- FabClassroom 28
- FabFriday 19
- FabMaker Studio 66
- FabMaker Studio Classroom 13
- FableFive 7
- FableVision Games 3
- Free Educator Resources 36
- HUTCH 1
- Home Activities 5
- In the Classroom 34
- In the News 11
- International Dot Day 23
- Ish 1
- Library 1
- Mapping the World by Heart 7
- Paul Reynolds 10
- Peter H. Reynolds 54
- Professional Development 9
- STEM/STEAM 20
- Storybook Academy 2
- Teacher Spotlight 14
- The Dot 17
- The North Star 2
- Words and Their Stories 1
- Zoombinis 3

Teacher Spotlight: Christine Eaves, Animation and Technological Innovation at Village School
This blog post was written by Patrick McDonagh & Adrienne Poon, FableVision Learning marketing interns.

Christine Eaves is the Innovation & Academic Technology Coordinator at Village School in Pacific Palisades, CA, where she designs curriculum to equip her students with skills to become lifelong learners and makers. She is using FableVision Learning’s Animation-ish to guide student inquiry, quickly connect STEAM educational concepts, and help kids create bravely.
“I sometimes have kids who are reluctant to begin because they don’t think they are great artists, and they’re embarrassed to try,” she says. “I remind them [students] that the program is called Animation-ish for a reason. It doesn’t have to be perfect. In fact, the less perfect it is, the more it usually ‘animates,’ and is even more fantastic. Kids are always surprised at how great their work turns out when they ignore their fears and just try.”
The FableVision Learning team connected to Christine to learn more about her school, the work her students are doing with Animation-ish, and how she incorporates STEAM concepts into projects.
1) How have you incorporated Animation-ish into your curriculum?

Over the years, I’ve tied Animation-ish lessons around lots of curricular areas. I sent Peter [H. Reynolds] some cool 2nd grade Advanced-ish projects last year, in which kids took Van Gogh's Starry Night as a background layer, and then animated it in a foreground layer.
I’ve also had students do animations about different science lessons in which cycles take place (life cycle, caterpillar to butterfly cycle, water cycle, seasons, etc.). Right now, my students are just learning how to use Animation-Ish, so they currently are just creating stories of their own design.
Soon, I’ll be starting an after-school class here at Village called Flipbook-it. In this class, students build a motorized device that runs a flipbook that the children create themselves, either with 24 frames of photography (or 5 seconds of video), or 24 frames of animation. Many of the kids use Animation-ish to create their Flipbookit content. We decorate the Flipbook-it housings as well, so it’s really quite a wonderful maker project.
2) Do you have any tips for teachers to introduce Animation-ish? How should they start?
I think I’m successful at Animation-ish because I actually use it myself. The more you use it, the better you can teach it. Start creating some of your lessons in Animation-ish. Export those to movies and put them on your teacher webpage. Add animations to your presentations for Open House or Back To School Night. Animate your own personal logo. There’s so many ways to gain experience before teaching your students. They’ll learn better if they truly see you as an expert.
3) How has Animation-Ish affected your students’ conceptual interpretation of design?
Creating an animation is more than just being able to draw something others will recognize and appreciate. The animation artist has to first think of a story, or come up with a cycle or sequence of events that they want to animate. Then, they have to think about HOW they will achieve that animation ... There’s a lot of preparation and thought involving animation creation prior to getting started. I like seeing my students plan out their work and then get started.
4) Can you describe a memorable moment in the classroom using Animation-ish?
My second graders recently learned how to use the tablets and Animation-Ish for the first time. I had them try the tablets on the desks first. Then, when they seemed comfortable, I asked them to try holding the tablet against their chest or in their laps to see if it felt more natural drawing from that angle. One of my students was so comfortable with the tablet in his lap, that he put his feet up on another chair, leaned back, and just drew. He looked so cute like that and so at-ease. I told him he looked like a professional artist who’s been doing that for years. Later, I heard him tell a classmate that he was a professional. I liked his confidence and I liked that he believed me.

5) Can you share tips and tricks for getting students excited about animation?
In my experience, it’s not hard to get students excited about something that I’m truly excited about. We all would prefer to learn from teachers who love what they’re teaching … I’m lucky that I teach a field that changes all the time. It never gets stale and my lessons always feel new to my students and to me, even when I’ve taught them for years.
I think that brings a natural enthusiasm that’s easy to create and maintain … I’m lucky to have a job that really makes me feel fulfilled at the end of every school day and I can honestly say that I truly love what I do because it lets me be my best self. My school sees the value in having teachers with varied skills and talents, and we try to help children discover that they are the same way.
Get Involved
Already creating your own Animation-ish masterpieces? Share your work on social media with #AnimationIsh and send us a message at info@fablevisionlearning.com if you want to be featured in a blog post too!
But Wait, There's More!
Want to learn more about Animation-ish? Fill out the contact form below and a FableVision Team member will get back to you.

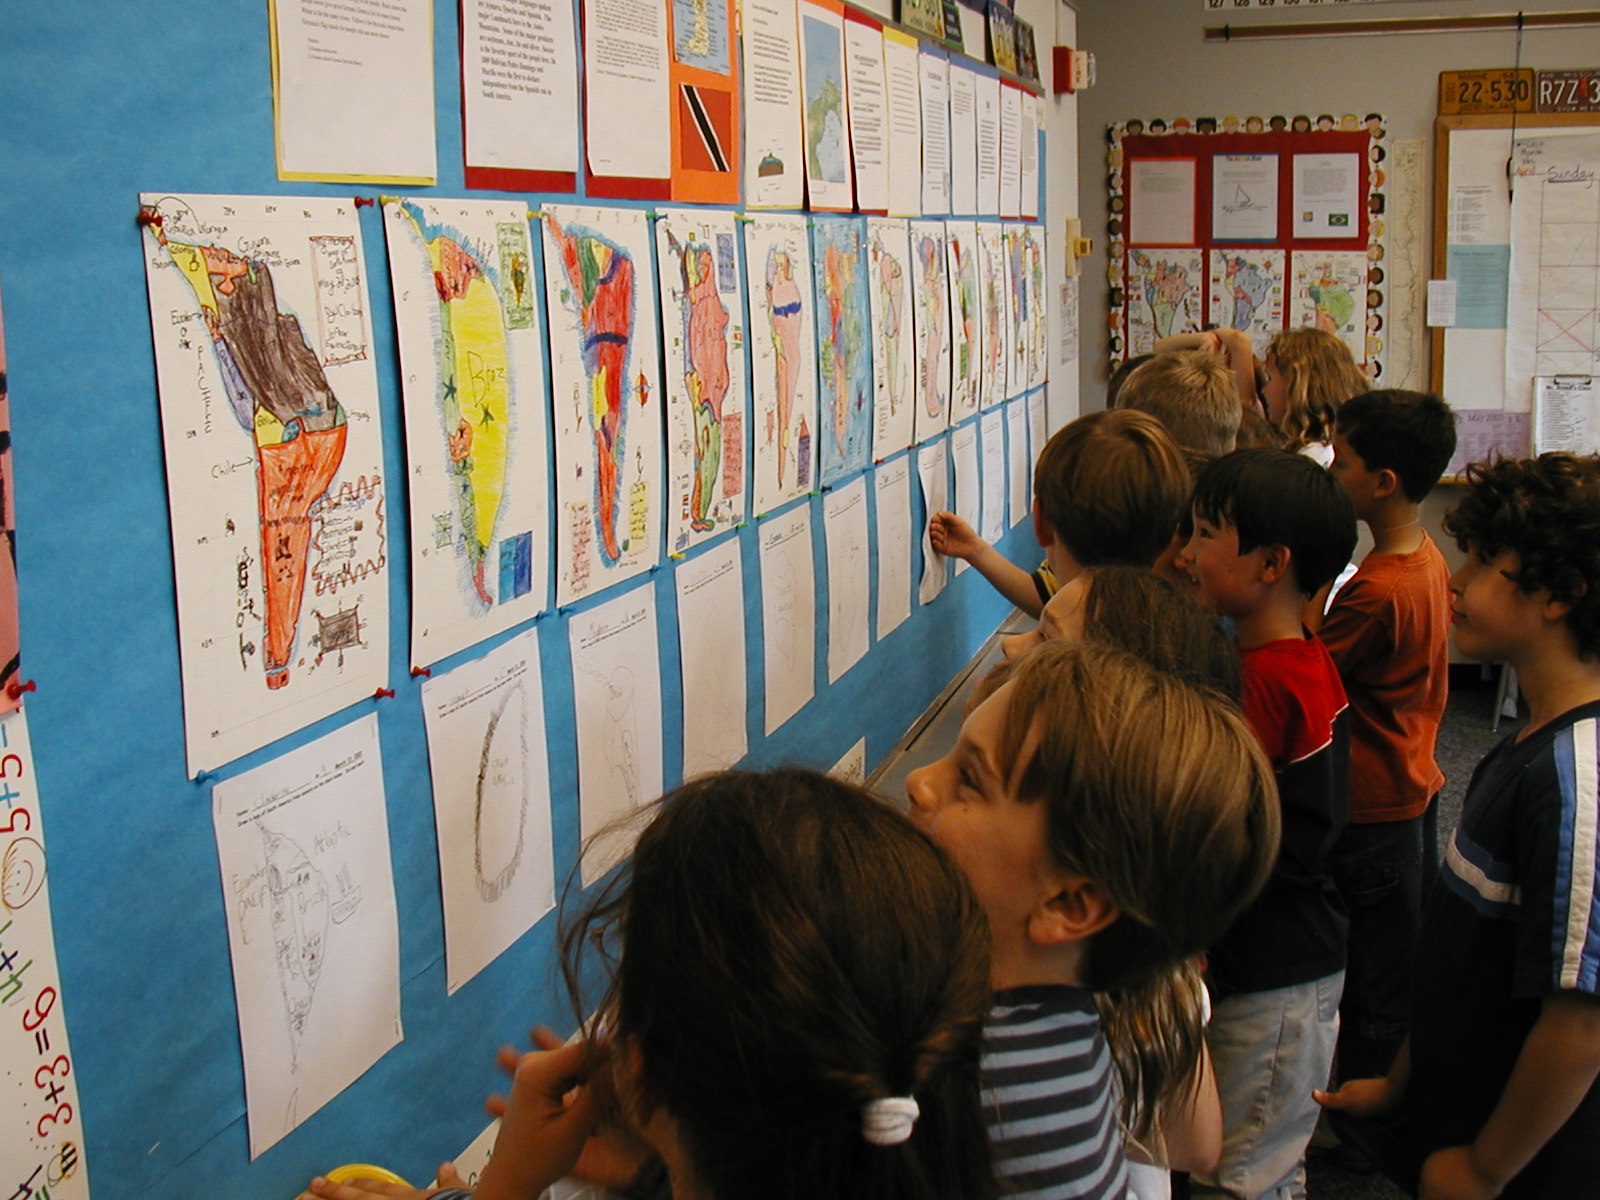
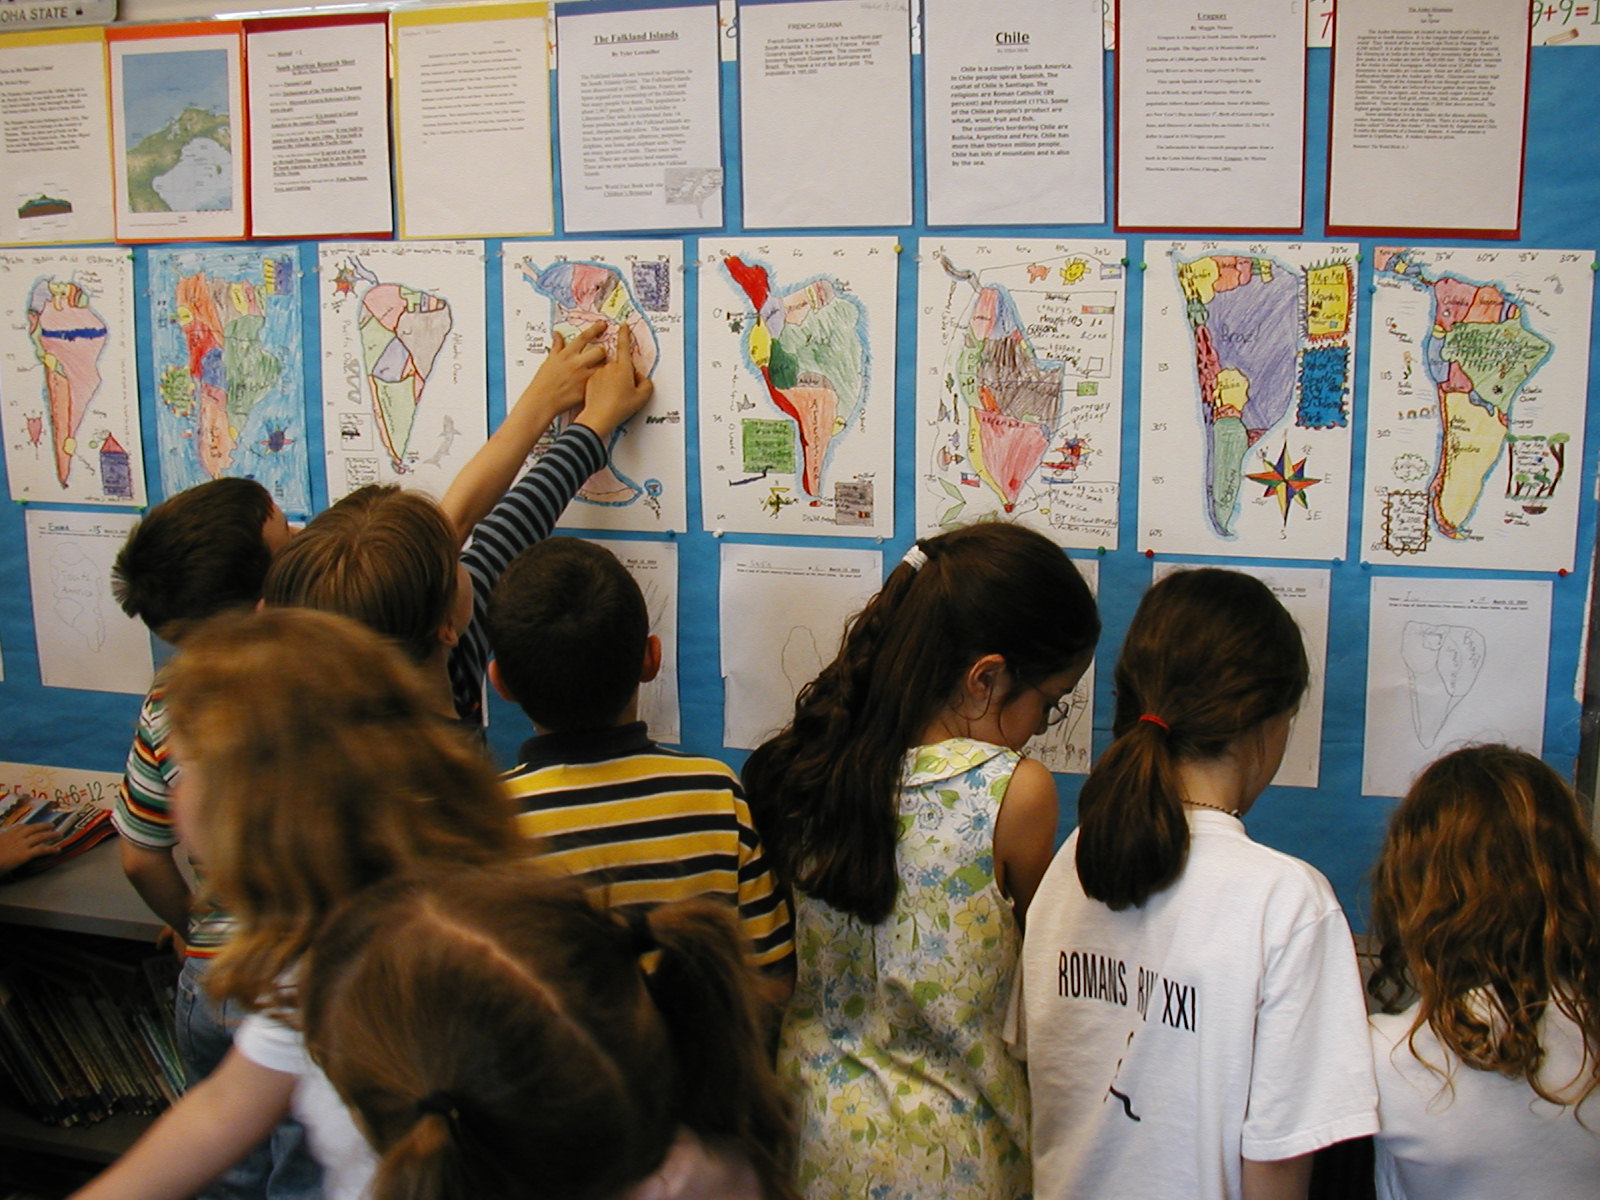
Mapping the World by Heart Teacher Spotlight: Jessie Jung
This week’s FableVision Learning Teacher Spotlight was written by Jessie Jung, a teacher at Andrews Academy. For the past eight-years she has intermediate social studies.
“Teaching in an independent school affords a lot of curricular freedom, and our social studies program is ever evolving,” she explains. “We have chronologically organized our topics to span from the Age of Exploration in second grade all the way to the Civil Rights Movement in fifth grade. We have also worked to align our geographical studies with these concepts.”
In this post, Jessie shares a bit about how she uses David Smith's Mapping the World by Heart in the classroom and offers a few tips on how to get started.

How were you introduced to Mapping the World by Heart?
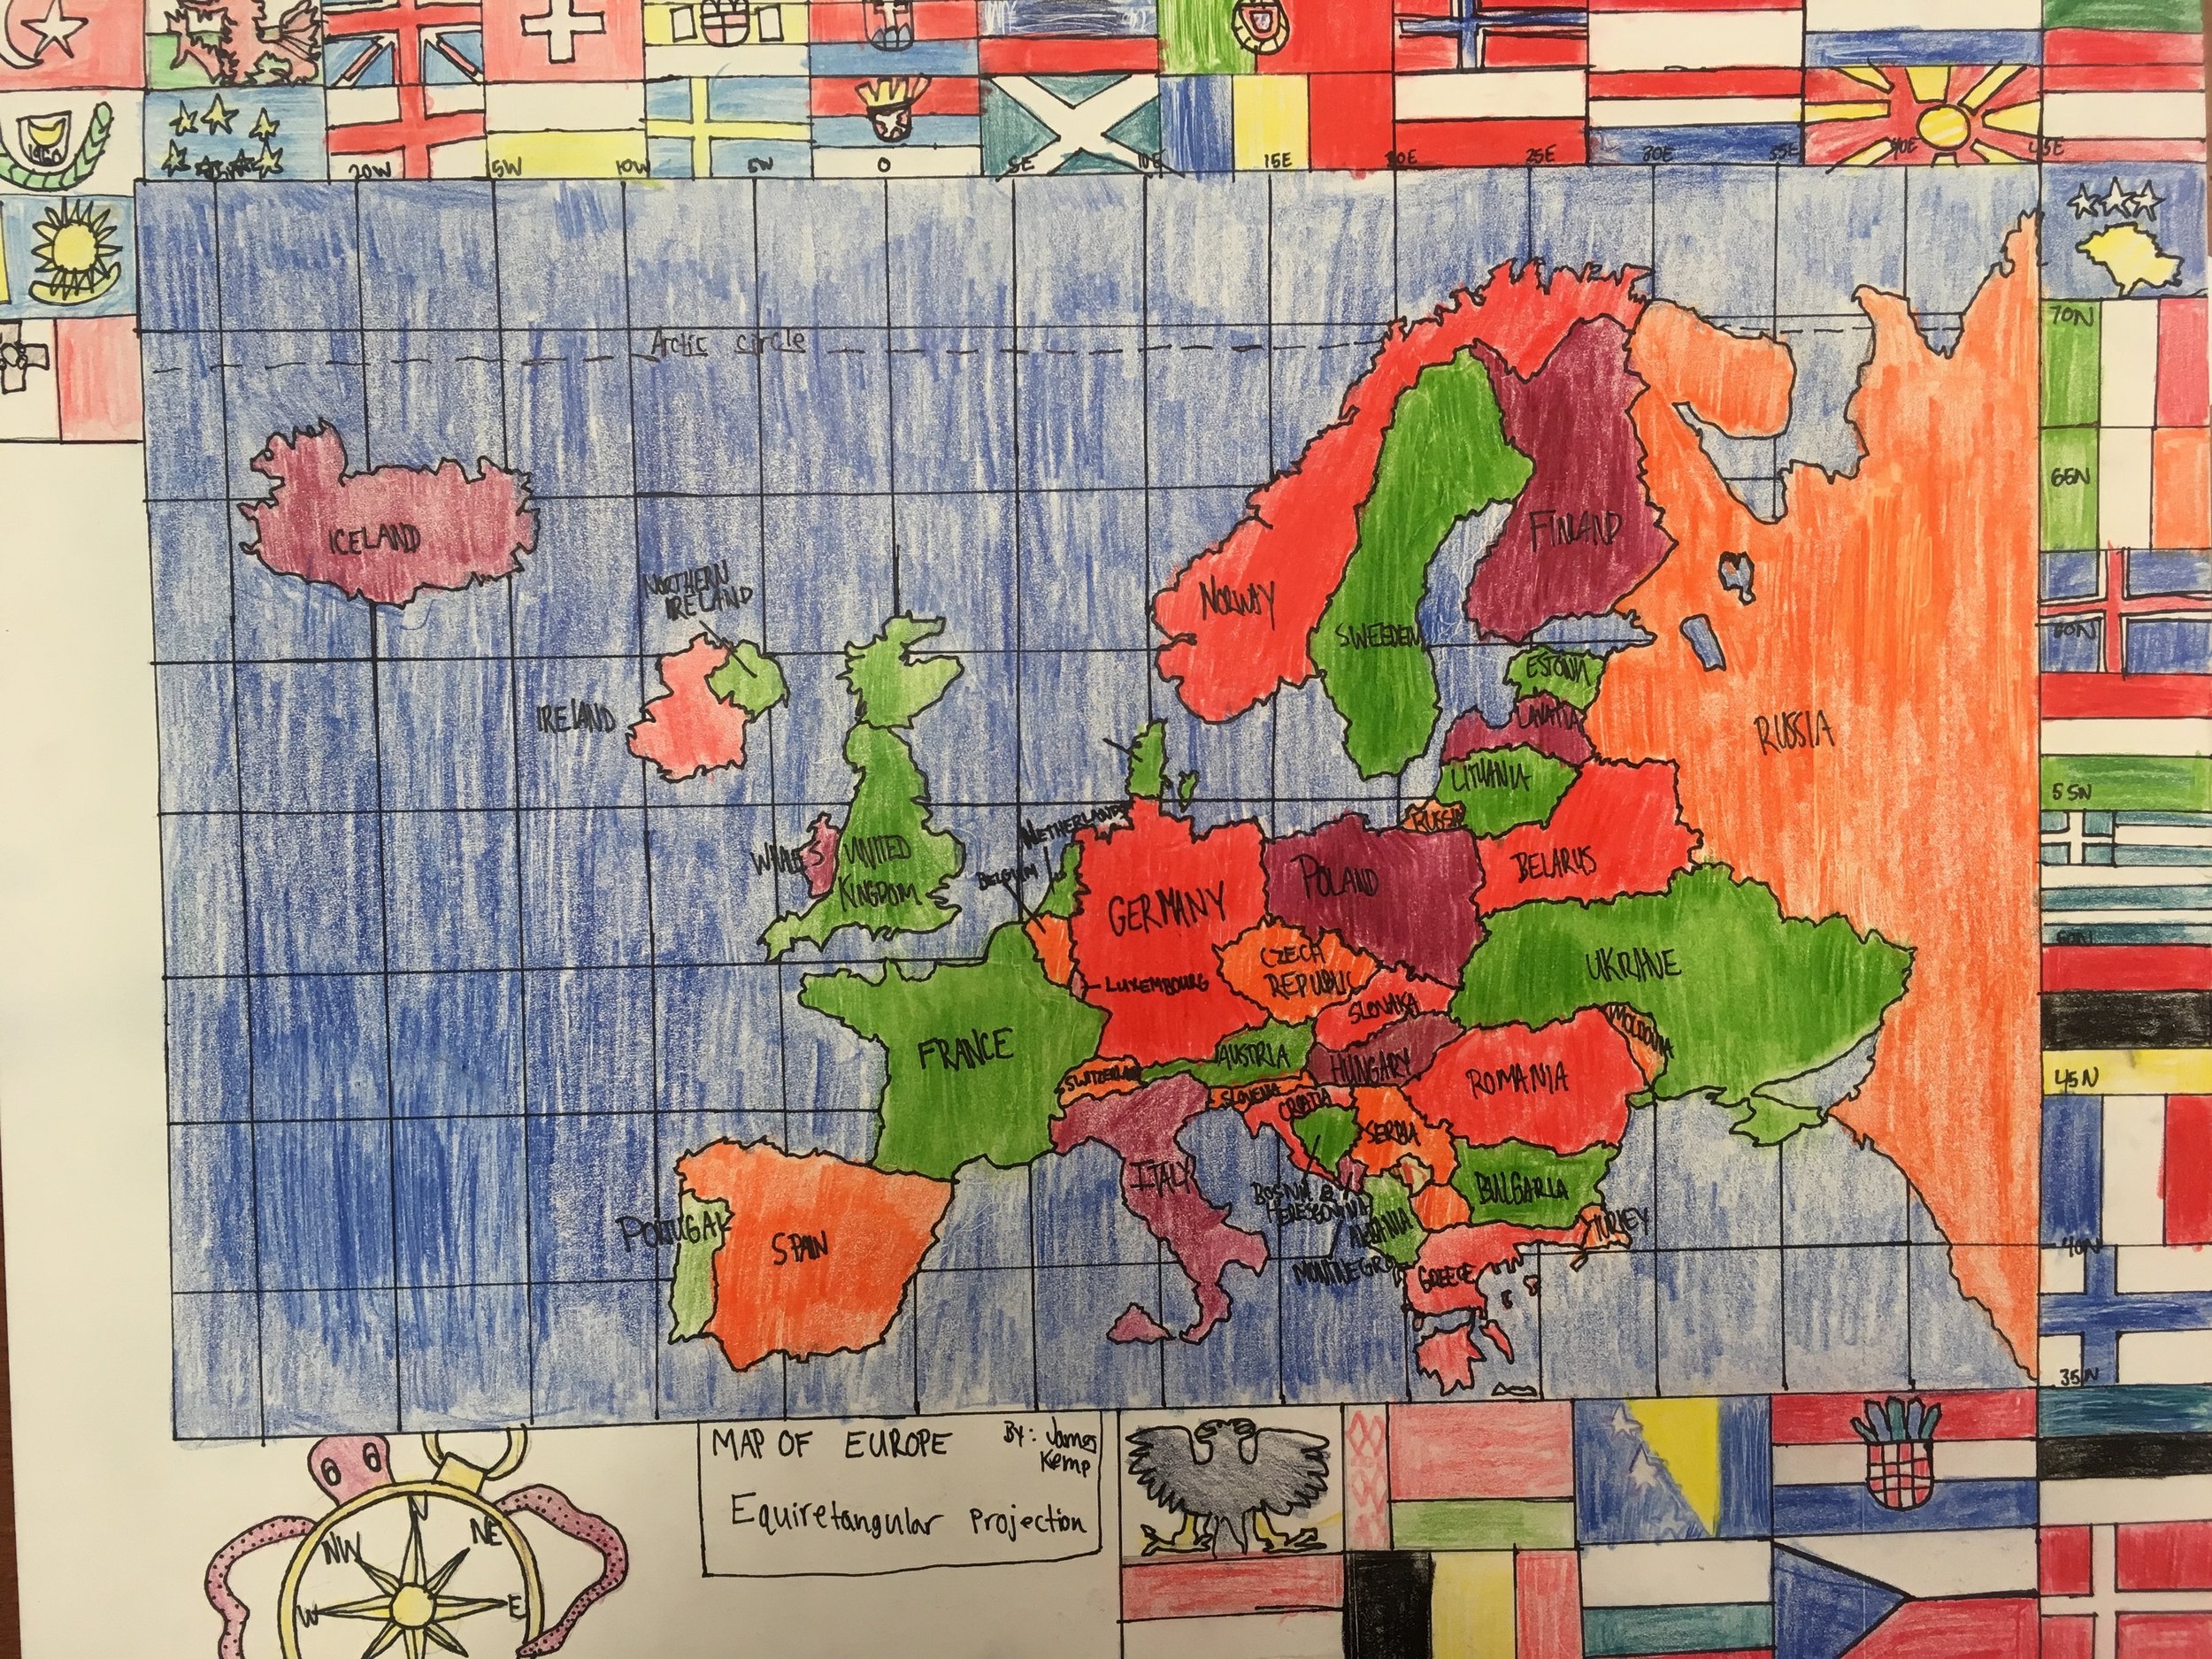
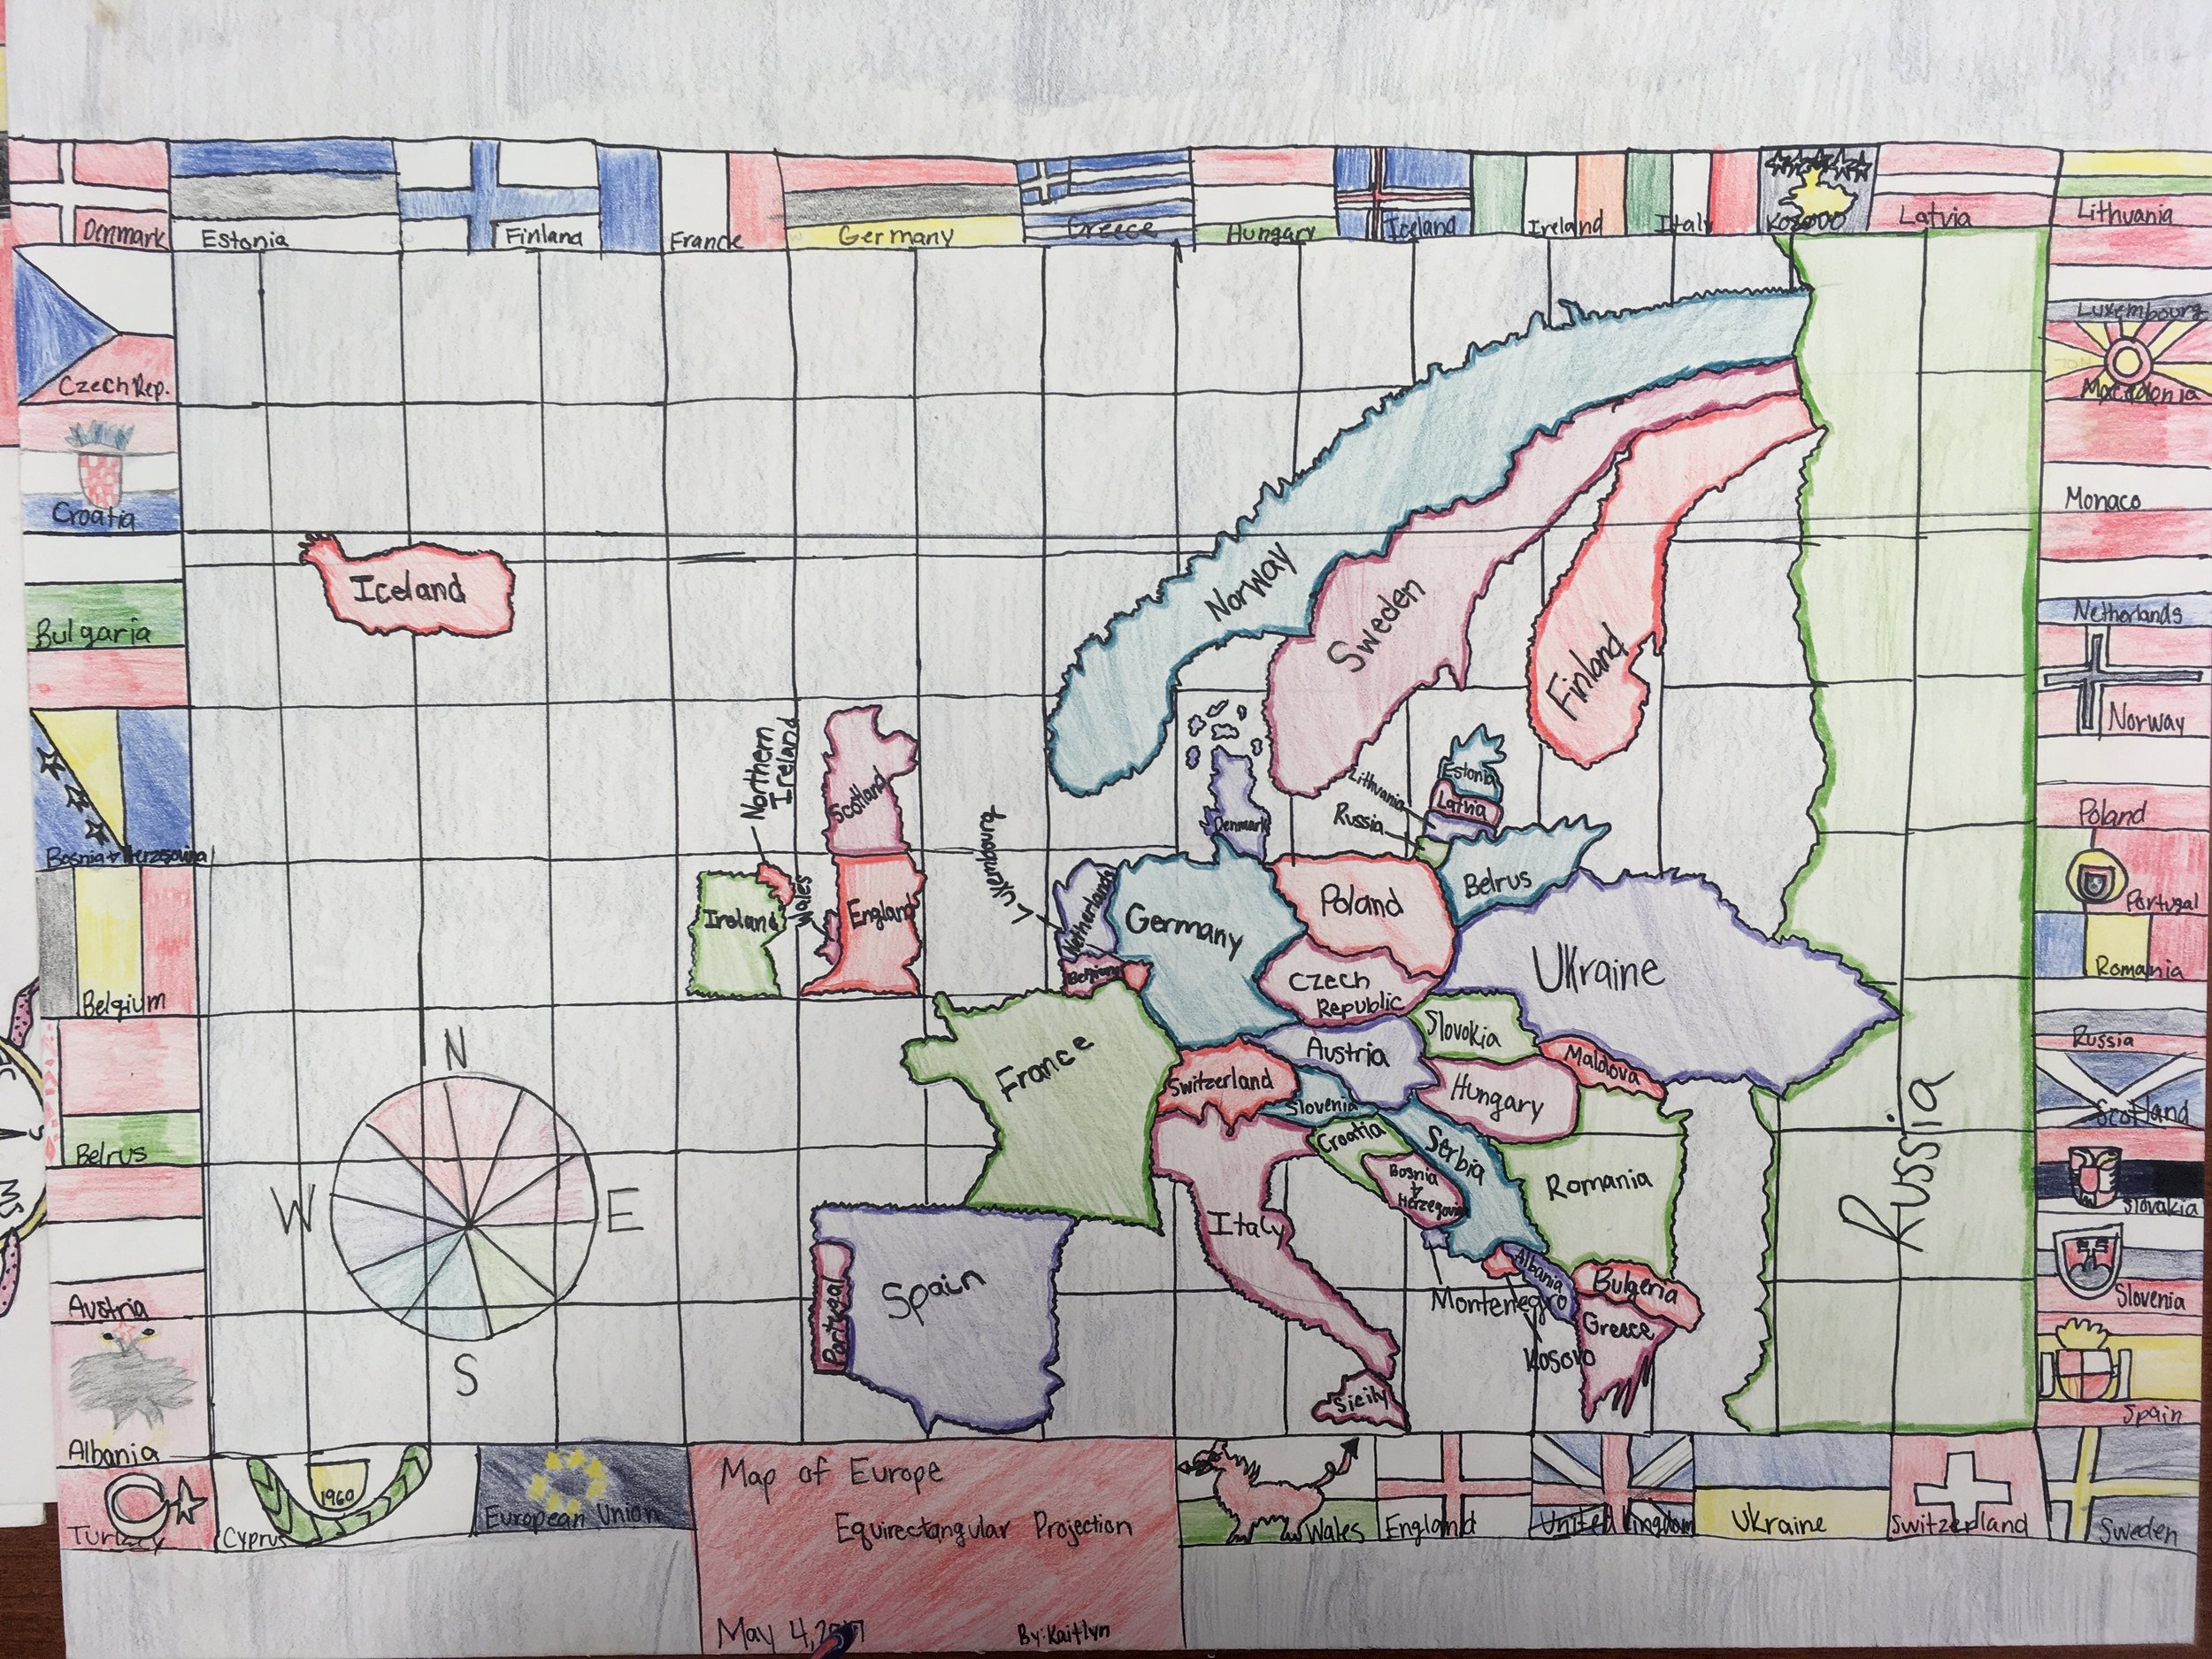
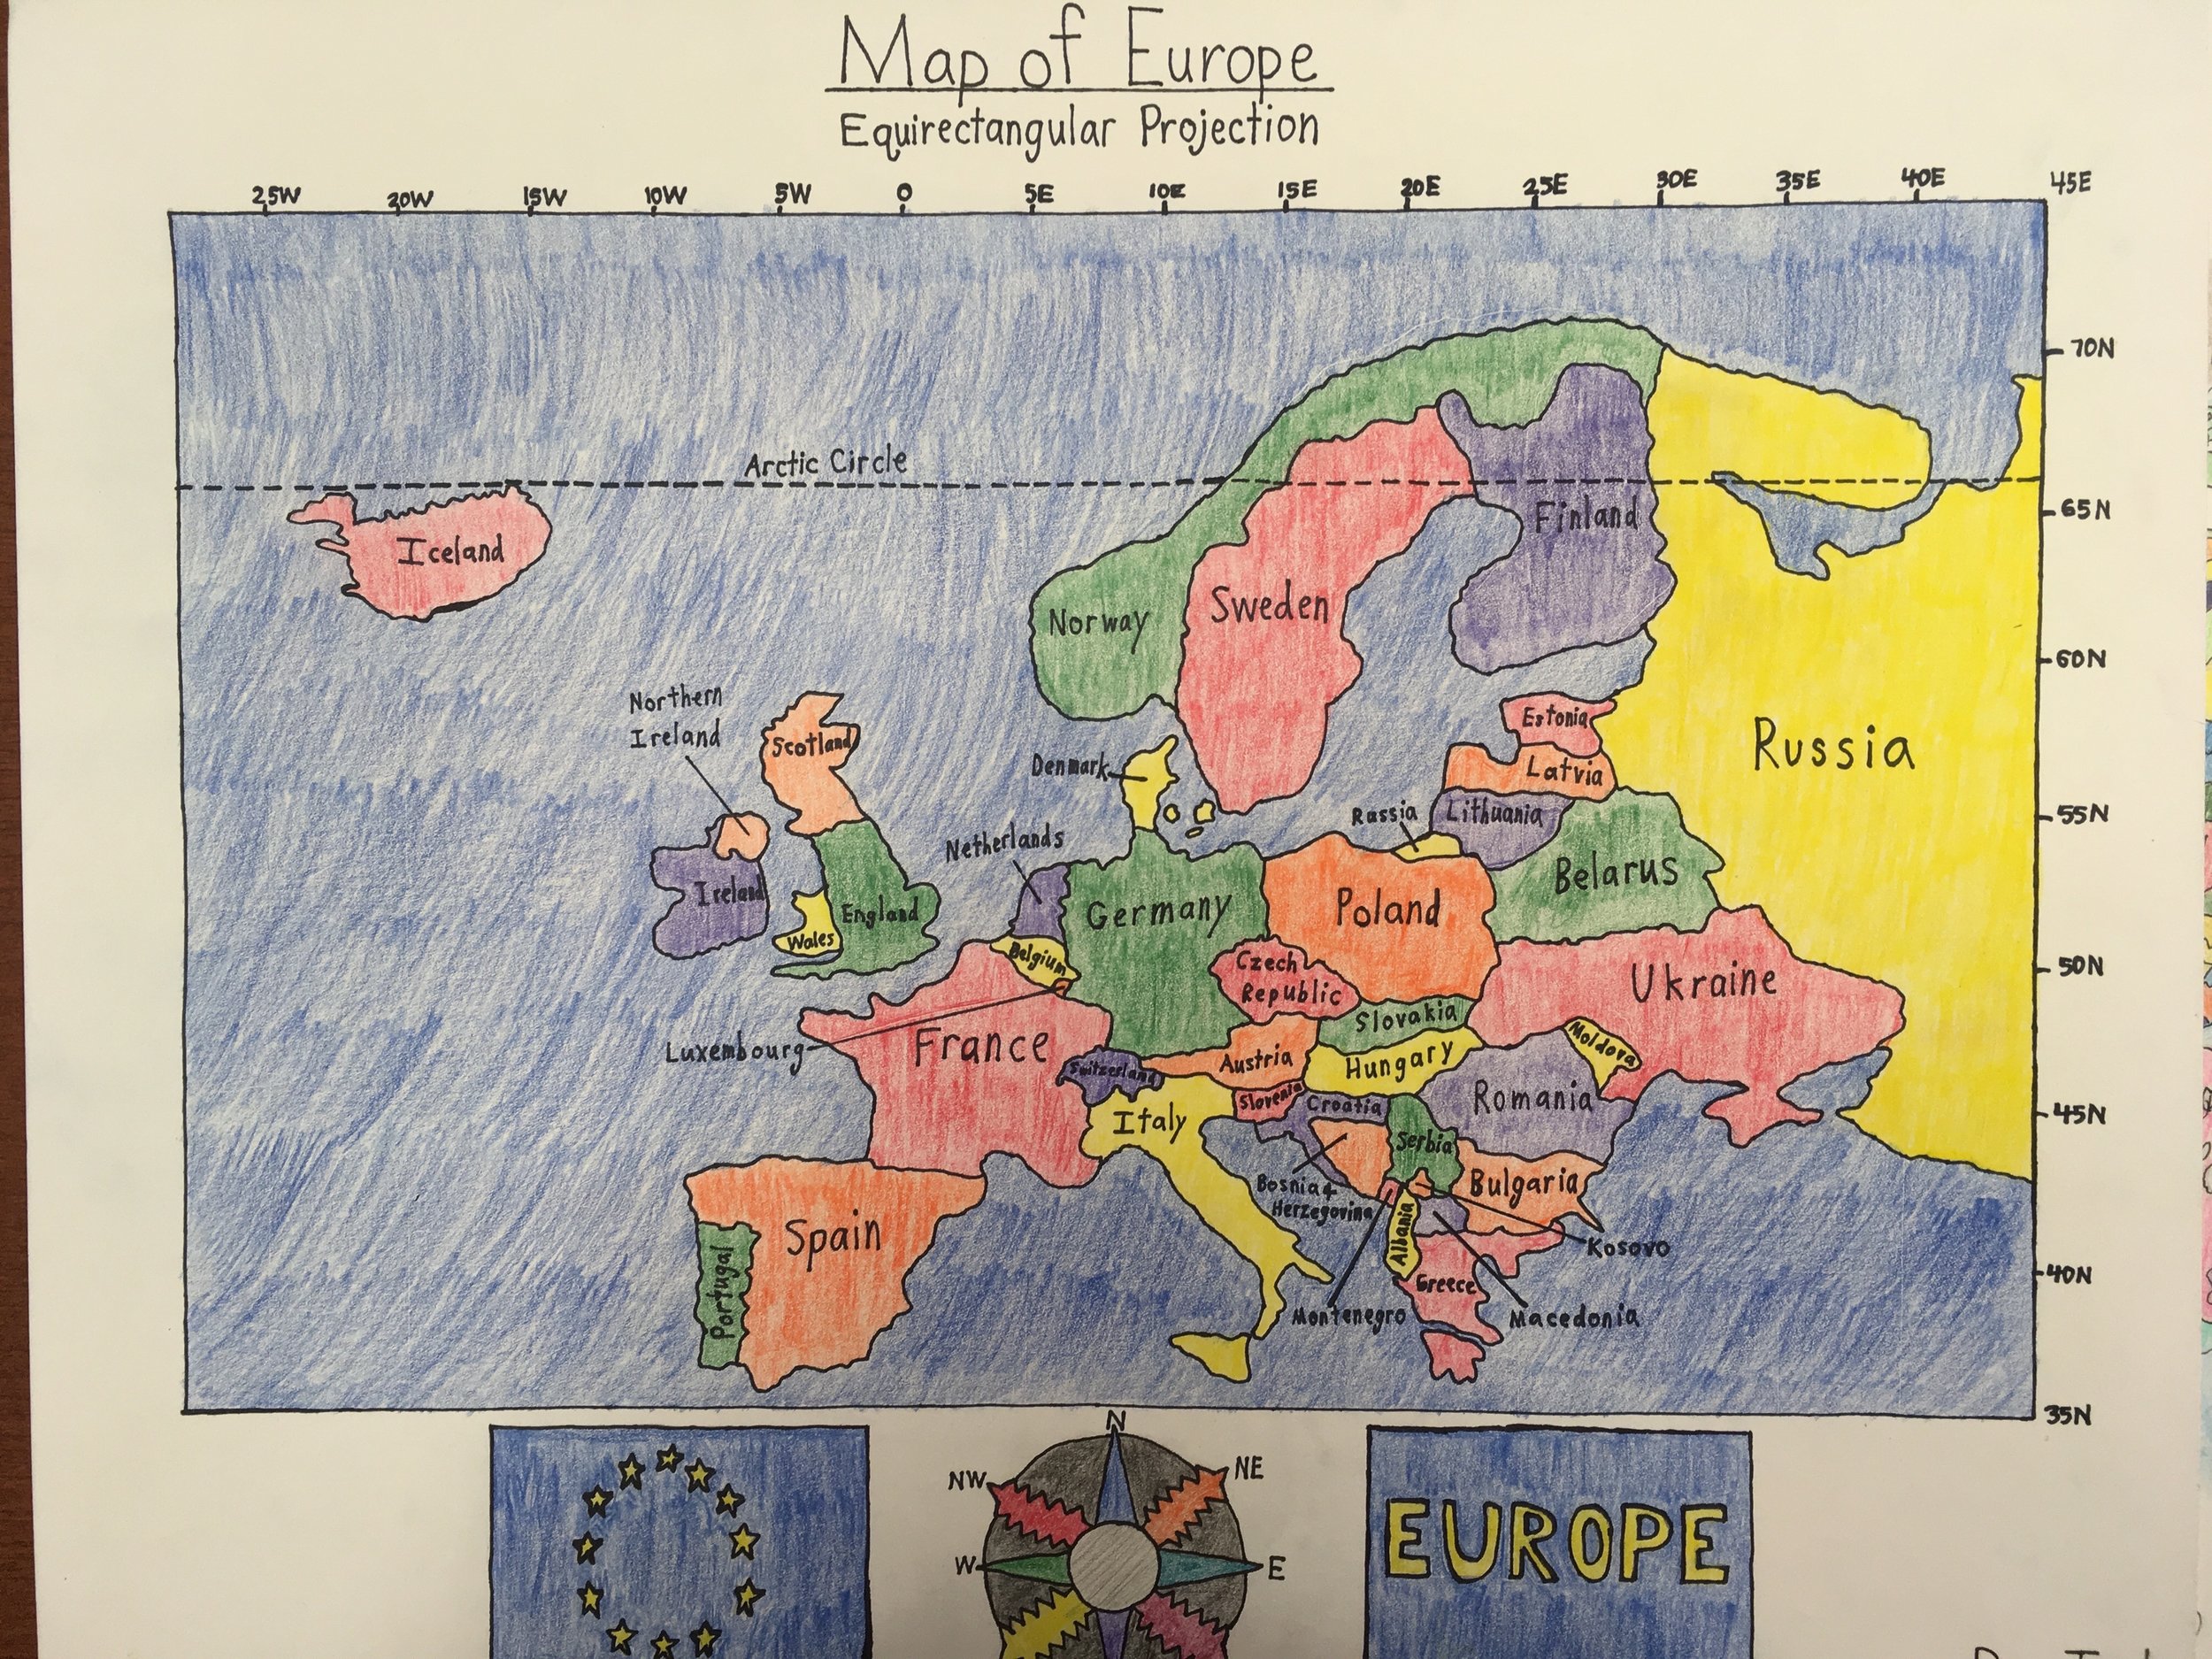
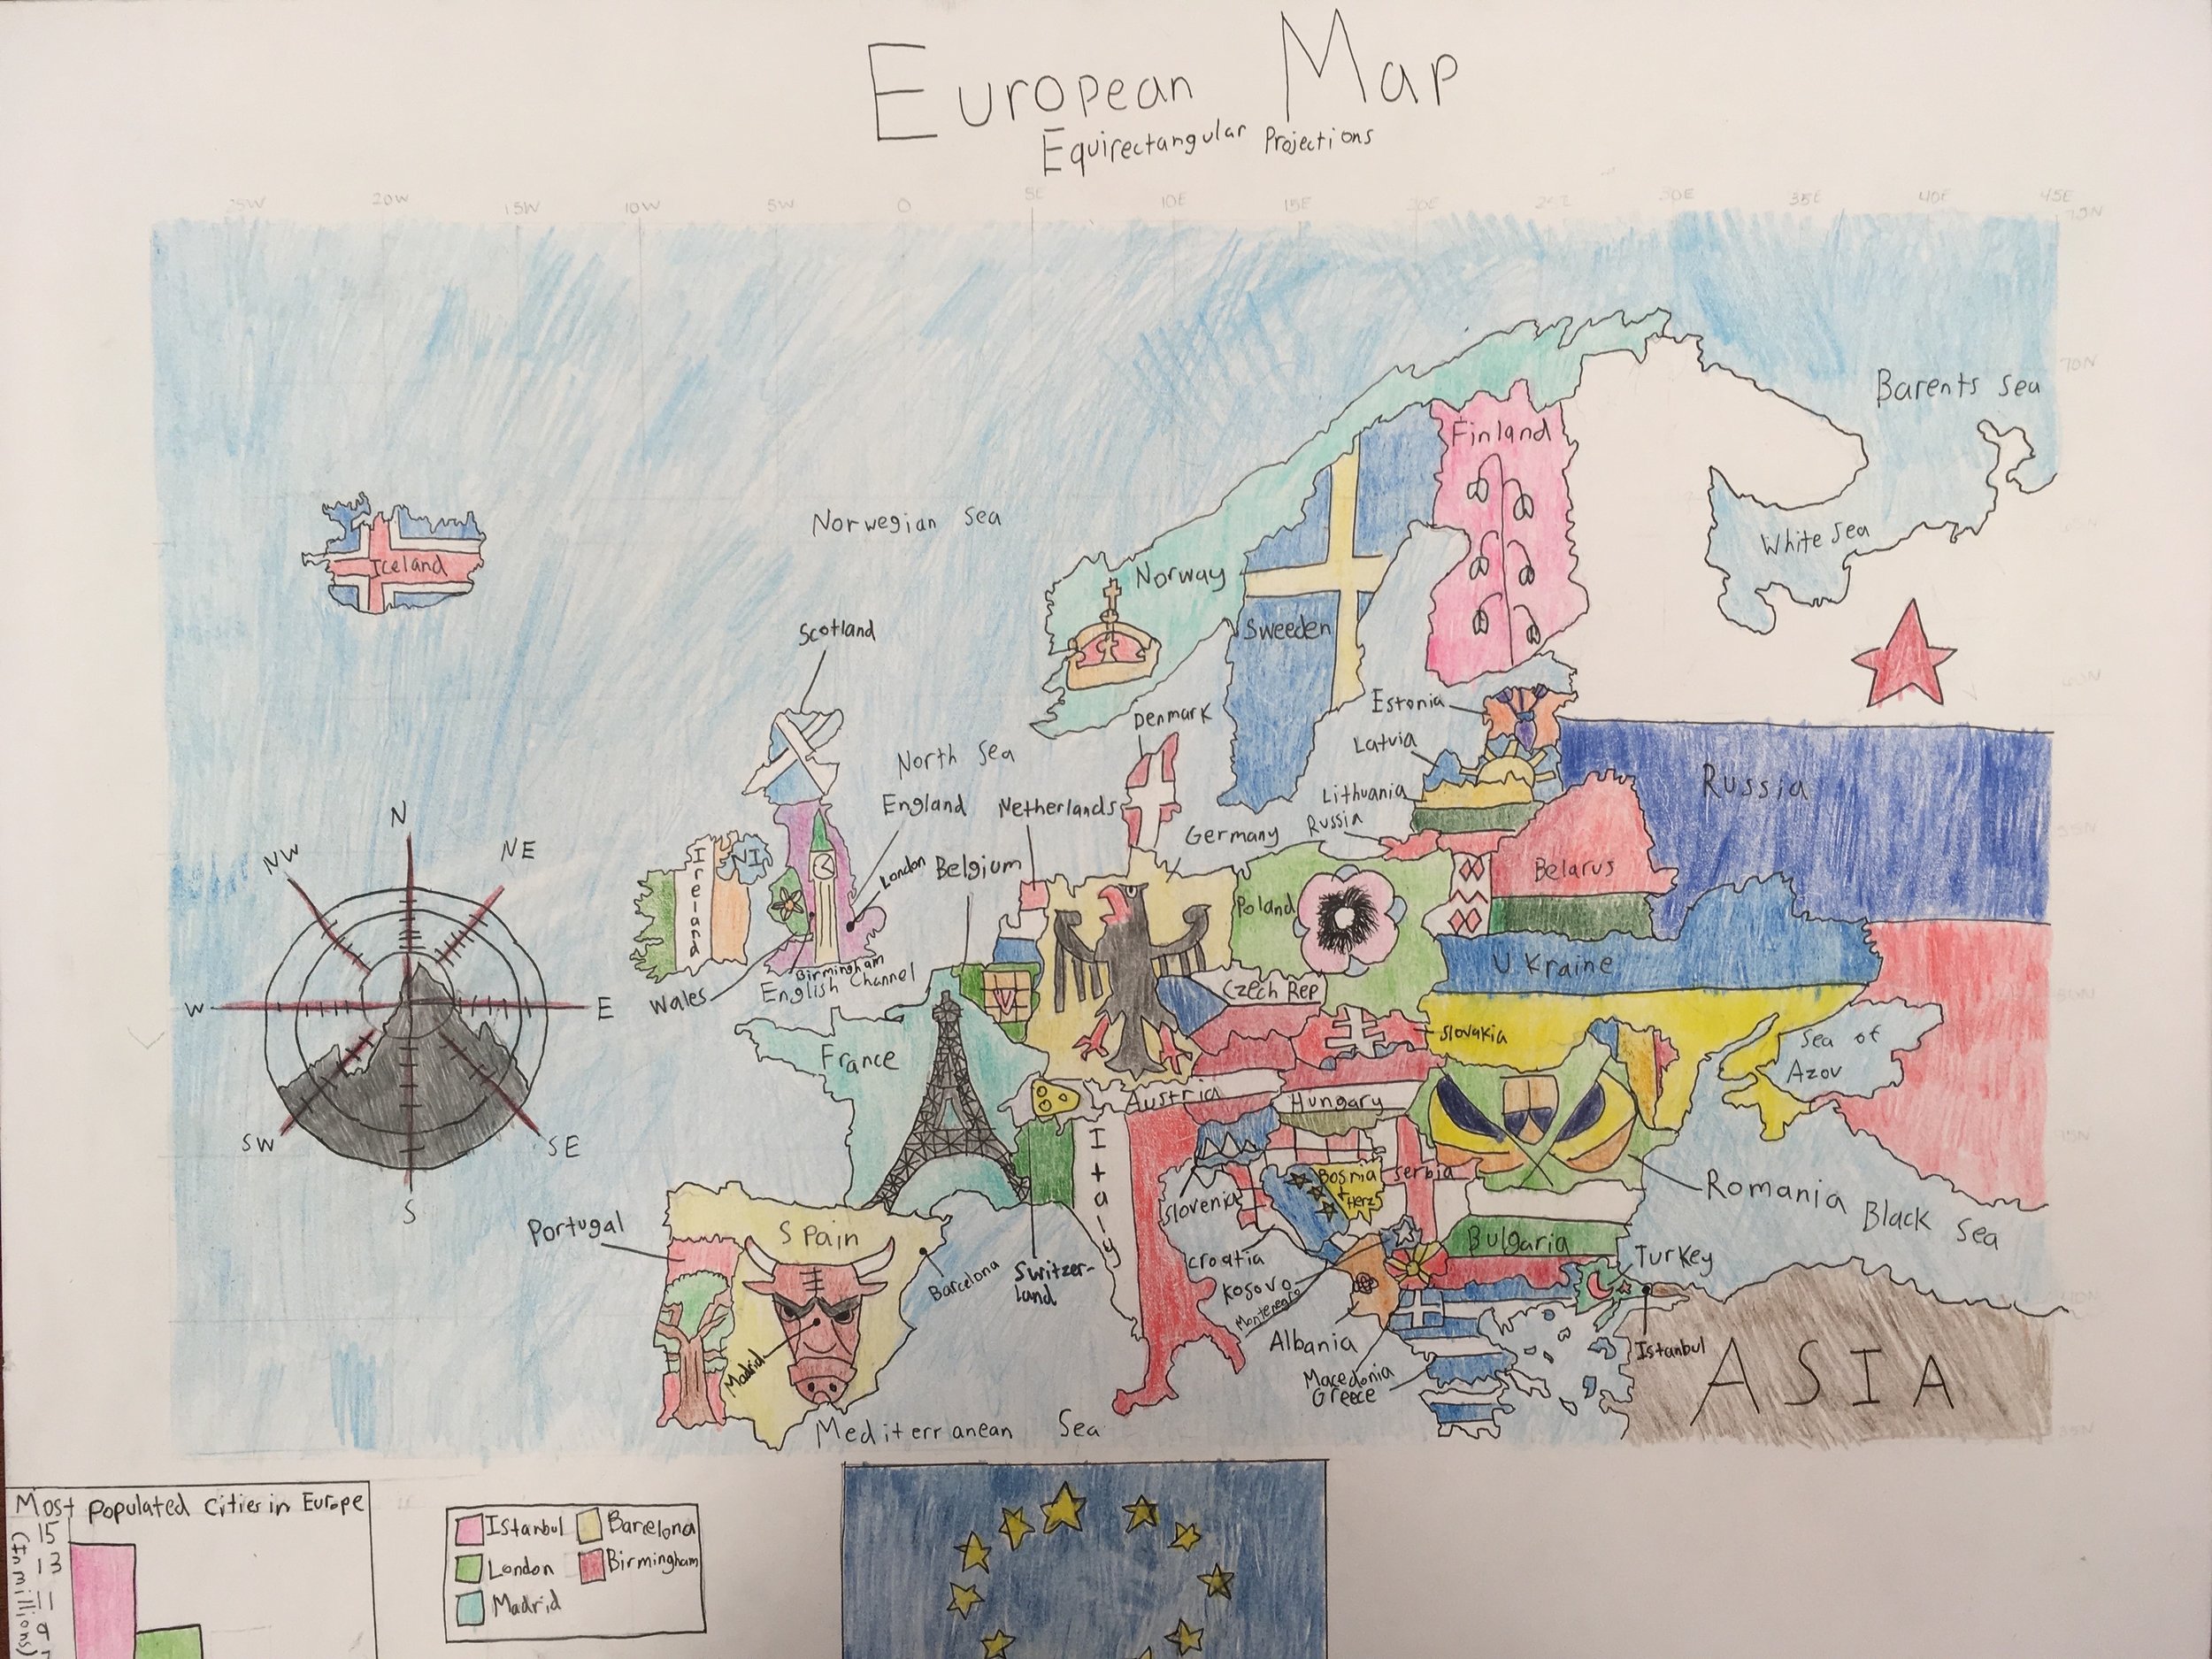
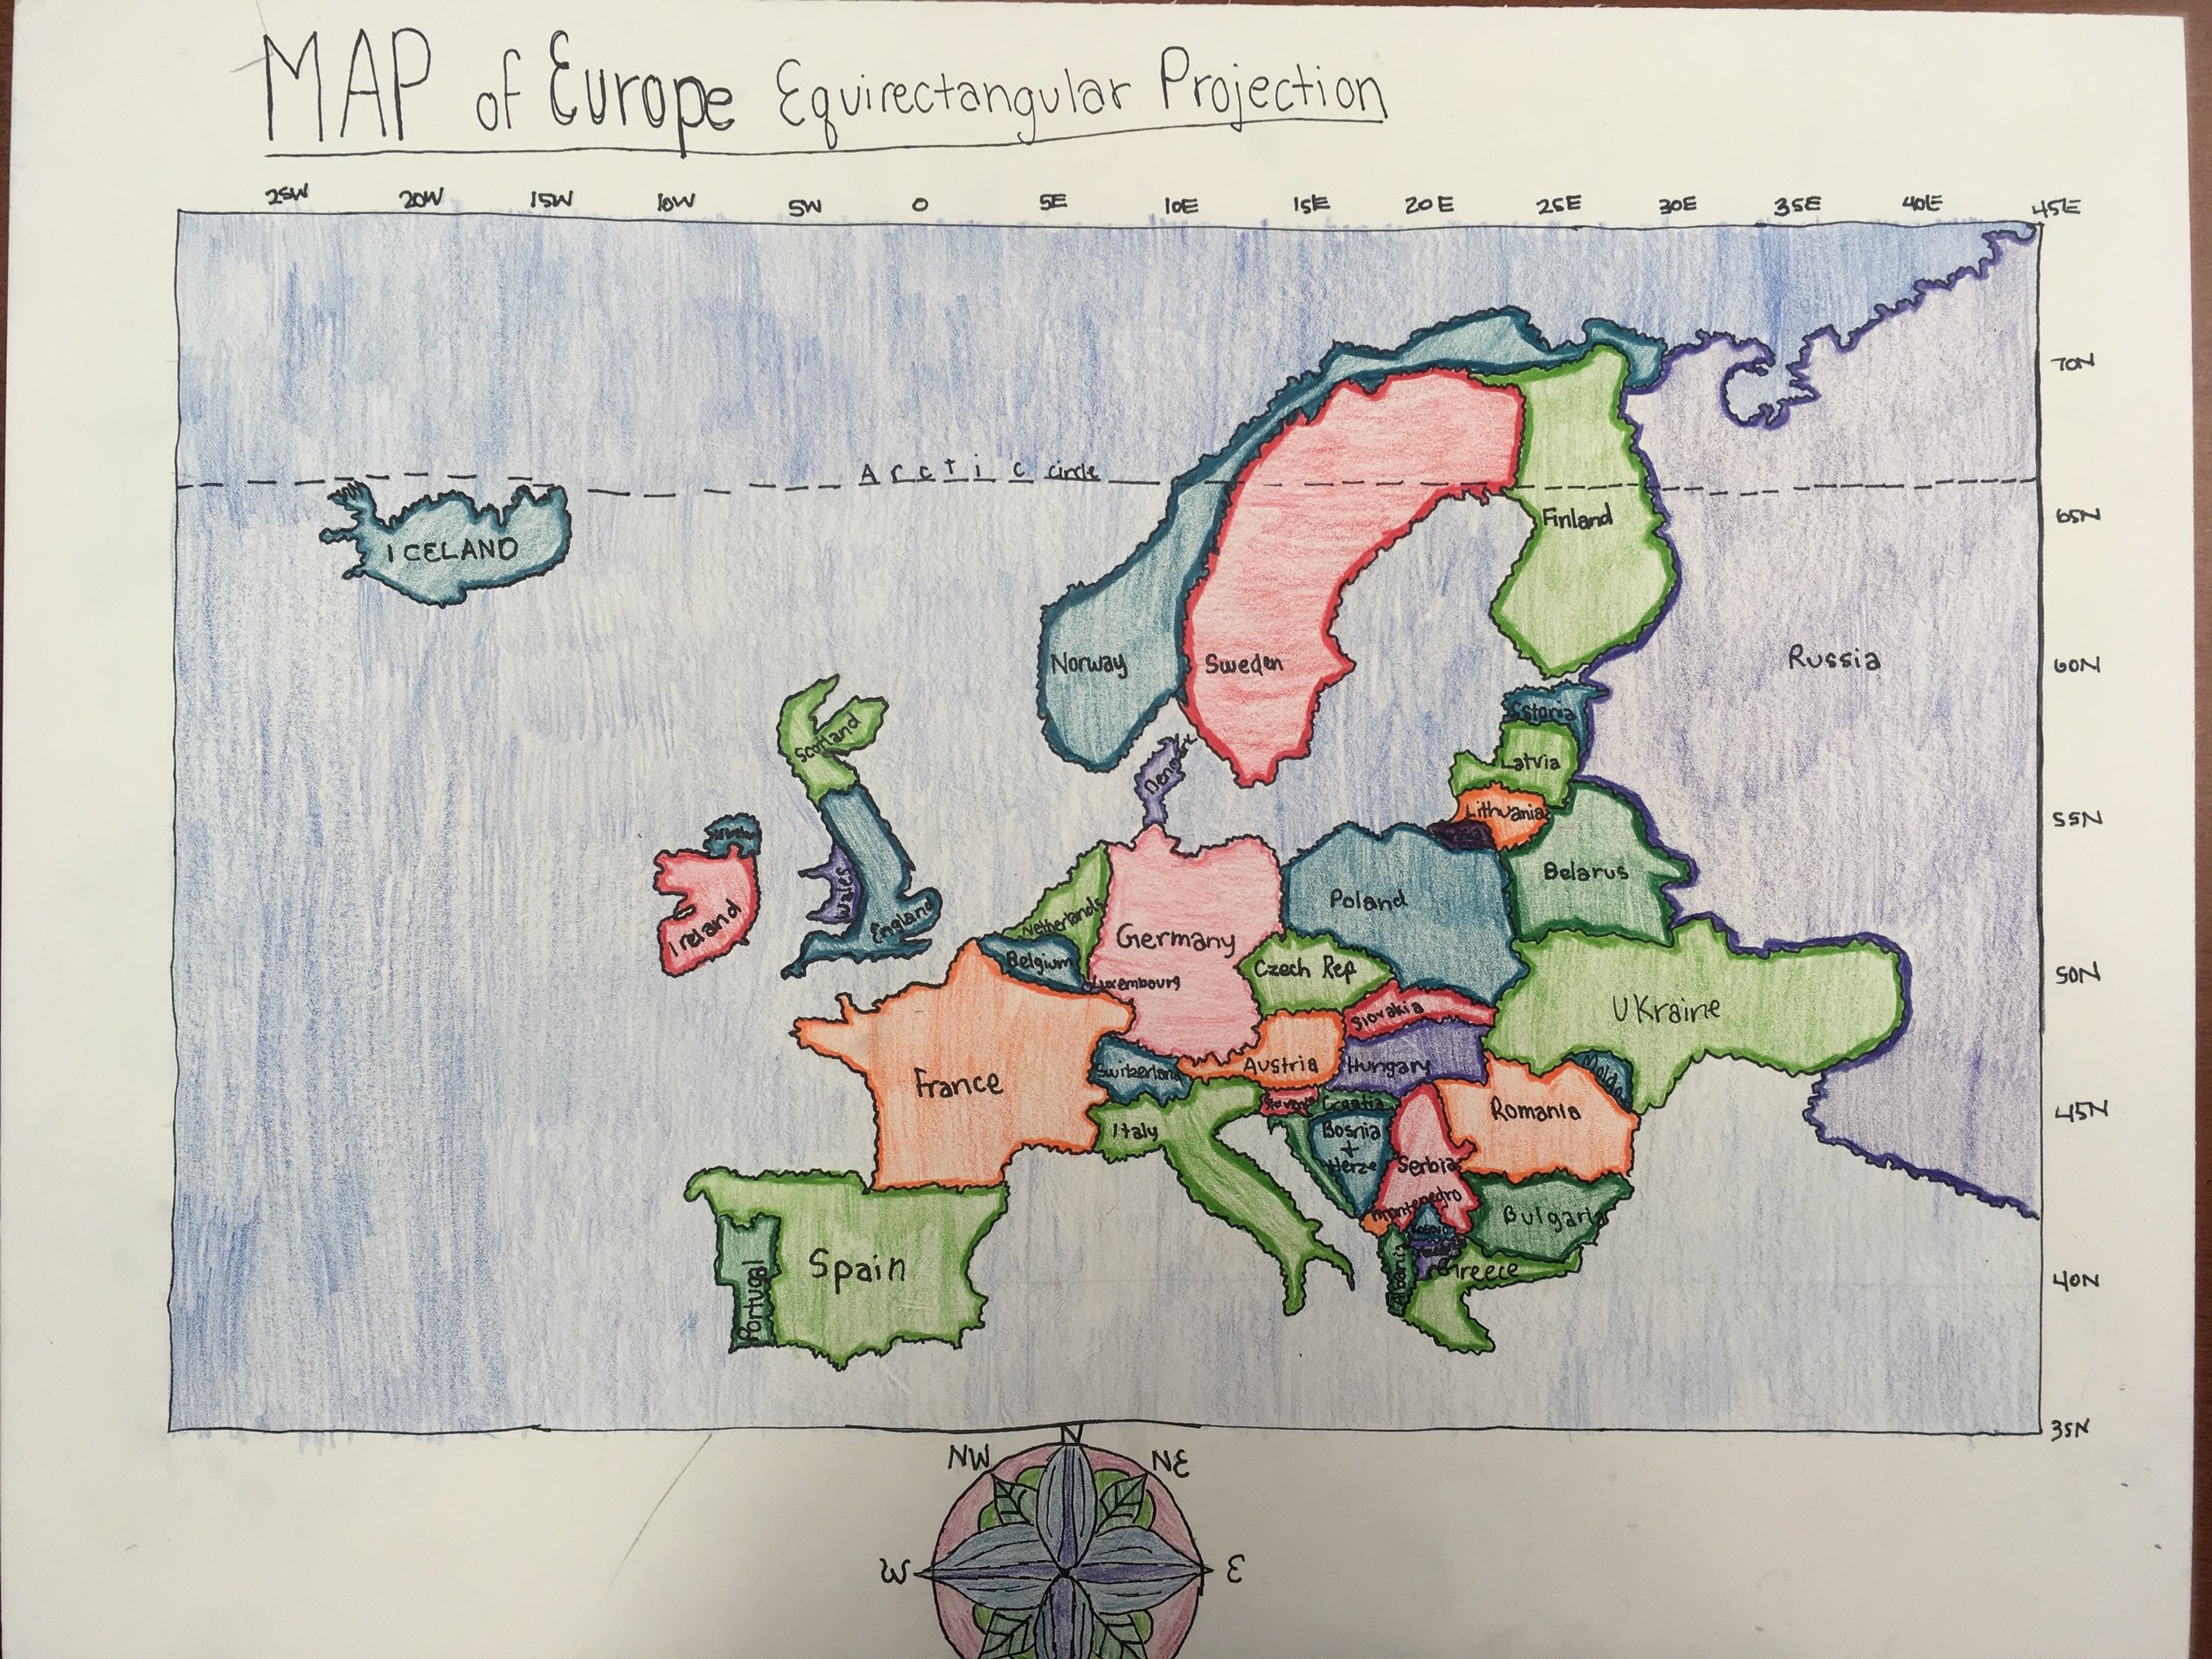
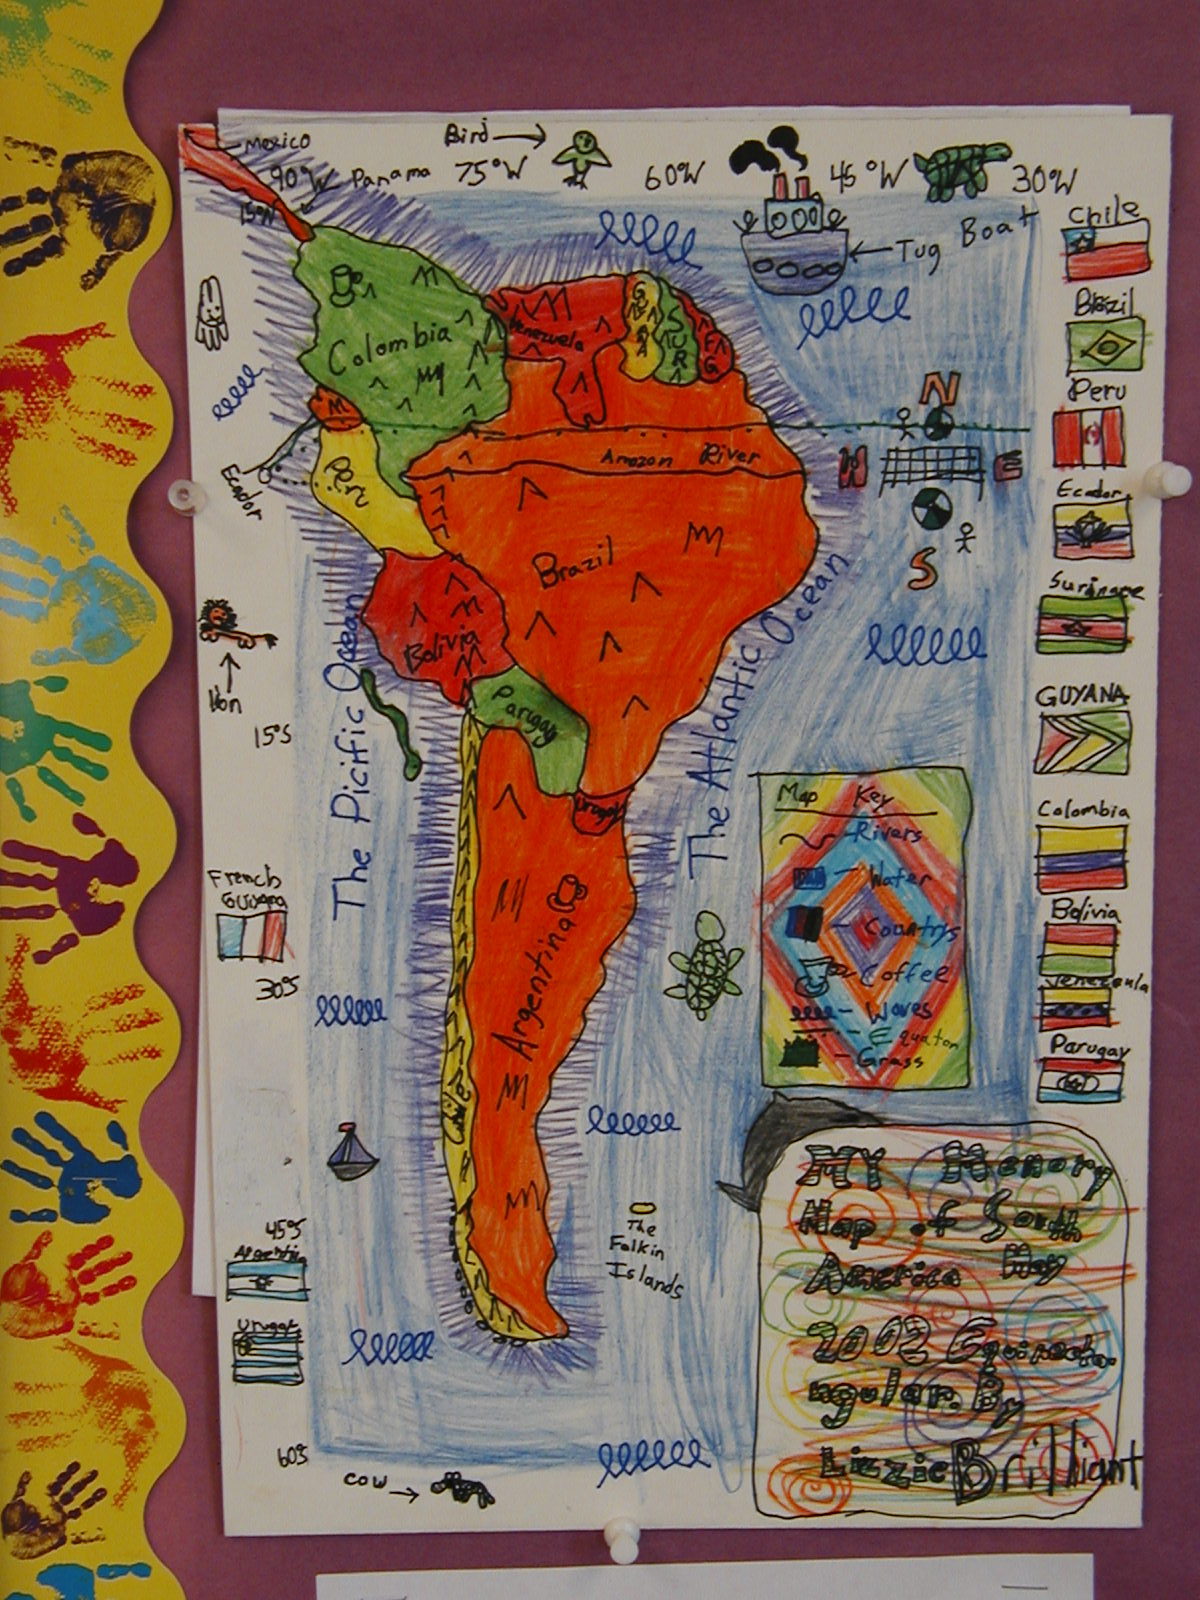
My friend and colleague, Nikki McGuire, brought the Mapping the World by Heart curriculum to our school a few years ago. She introduced the concept to her fourth grade social studies classes by having them map the United States by heart. The maps turned out beautifully, and we decided that just like our linear social studies curriculum, we would ultimately like to spread and spiral the mapping through several grade levels; mapping Missouri in third, the U.S. in fourth, Europe in fifth, and Latin America and the Caribbean Islands in sixth.
What makes the program different than other geography curriculum?
Mapping the World by Heart is a unique curriculum. It is very flexible and you can tailor it to your teaching style. You can make it belong to you and your students.
Every now again you get the “but do students really need to know this?” question. First of all, yes. I want my students to be globally focused. I realize we are only mapping Europe, but looking at life outside of our country makes us more aware that there are others inhabiting this planet. Secondly, being able to map requires using a totally different way of thinking than students are used to. It gives their visual-spatial intelligence and problem solving skills a workout. Think process not product! That being said…the finished product is something that students are extremely proud of.
Many of my students channeled their artistic skills into their maps. A few students created a border of European flags around their map. Instead of coloring the countries a single color, another student drew a national symbol on each country. Some students included sea monsters, ships, and castles on their maps. Mapping was definitely one of the most memorable things that we did this year. In fact, several of the graduating sixth graders named mapping as one of their favorite things that they did in their school careers thus far.


How are you using the program in your classroom?
We decided that fifth grade would map Europe, which would dovetail into our units on World War I and World War II. The 2016 - 2017 school year was my first year mapping with my students. I had a couple of secret weapons in my arsenal; I had Nikki as a mentor, and my students had already mapped the U.S. the year before, so they had some serious prior knowledge. We began by memorizing the locations of the countries of Europe. We spent a couple of weeks splitting up the countries and creating memory devices to help us remember the shapes of the countries (Finland looks like a Fancy dress).
Then a few things became clear:
This was helpful for a handful of countries, but a lot of the European countries were pretty similarly blobby
The cost (time) was outweighing the benefit
I was stalling - it was time to jump into the deep end!
So we started with Iceland and the Arctic Circle, and we moved east. In the beginning, I really tried to cling to steering wheel, and have each student map each country together, but I had some students flying on ahead and other students still trying to perfect Iceland’s northern coast. So I let go. I circulated the classroom, looking for the key longitudinal and latitudinal markers to help keep the students on track. We broke the forty countries that we would be mapping into groups of ten, and then we mapped that section 3 times. Ten countries three times, followed by twenty countries three times, then thirty countries three times, and finally forty countries three times. We penciled and inked our final maps, created a color path, and transferred the color path to the final map.
What tips can you offer to a teacher starting out?
For teachers who are just starting off with Mapping the World, I would say, don’t be intimidated, it doesn’t need to be perfect. Your students will inevitably come out the other side of the program with more geographic awareness, refined problem solving skills, and a better sense of being a global citizen. For me, letting the program flow and evolve was key. Set manageable goals, and step them up each year. Get your students involved. Let them help you work out the logistics of the map.
What was one aha moment using Mapping the World by Heart?
Letting go was a big aha moment in this process. I am not necessarily a detail person, and I was stressing about using the curriculum as an exact science. Then I realized, I need to mold the curriculum to work with my strengths and my students’ strengths. I thought about what I realistically wanted for my students in this first year pilot program. I wanted them to know the European countries and their general shapes and locations. I also wanted them to surprise themselves and feel confident and proud of their maps. Realizing that this curriculum would be a process that would become more polished every year was key.
What is next?
Some of my fellow teachers test the students over their final map of Europe. This year, our maps were more of a project, and less of a memorized assessment. Next year, I plan to have students create three maps of Europe, a modern map, a map of Europe on the eve of WWI, and a map of Europe under Nazi occupation during WWII. The original map will be on tag board, and the WWI and WWII maps will be on tracing paper pages, laying over the tag board, illustrating the evolution of the continent.
Using FableVision’s books, media, and/or software in creative or interesting ways? Click here to nominate someone for the FableVision Creative Educator Spotlight and complete your submission electronically.

Mapping the World by Heart Teacher Spotlight: Nikki McGuire
This week’s FableVision Learning Teacher Spotlight was written by Nikki McGuire, a teacher at Andrews Academy. In her 12-year career, she has taught at various schools in Missouri before settling at her current position. In this post, she shares just what makes David Smith's Mapping the World by Heart an invaluable tool in her classroom.

I was introduced to Mapping the World By Heart while teaching at the Forsyth School. My friend, Jim Dowd, fellow fourth grade teacher, coached me on how to bring mapping to life in my fourth grade social studies class. Forsyth had a memory mapping piece at the fourth, fifth, and sixth grade levels. Fourth grade learned to memory map the US, fifth grade mapped Europe/Africa I believe and sixth grade mapped the world by heart! I was amazed at how these students could learn to do this! It is incredible!

On the surface many people are quick to criticize Mapping the World by Heart as just memorization, but it is so much more. I have had many questions about what the use is, or maybe if it is just a waste of time. However, after mapping the US with 7 different fourth grade classes in two different settings, I can say it is one of the most rewarding teaching experiences! It is a wonderful process, but also an amazing product. Most of the kids frame them and hang them in their homes. They are a remarkable work of art! They will forever have those geographical ‘hooks’ to link future concepts of geography and history. It is well worth the time and effort it takes to teach and complete!

In my opinion, there are two types of memory mapping. One type is what I call "free drawing." That is where the shapes of states and countries are drawn in their proper location in relation to all the states or countries that border them, but it is not necessarily on the longitude and latitude grid system. The other is more precise and teaches the students to draw using the lines as guides, and really works to draw the countries and states in the "right" place. Both are beneficial. We use the grid system in tandem with free draw. The final map is done solely from memory, and takes place over 3-4 sessions, about an hour each. The students set goals and map to their goal. They are free to practice in between sessions or for homework, then continue on to their next goal.

I always begin the school year with a memory map which is usually really inaccurate! We save these maps and compare them to our final maps at the end of the year and then write about how it felt to draw from memory in August, versus in May. We spend several weeks working on map skills, memorizing the spellings or all the states and countries, and we complete many black line maps and test on the locations before we ever begin mapping lessons.
We talk a lot about different projections and how projections change the look of the map. Because I had never taught mapping Latin America, I did not have a longitude and latitude projection grid drawn out to use, so I decided to let my students plan one of their own after studying different projections. I played around with it and had a decent idea of a grid that would work, but one of my students figured out a great one, and it is the one we are all using! A lot of thinking, trial and error, and reasoning go into finding the right intervals, spaces, shape of rectangles, number of lines, etc. I was really proud of all the efforts made by my students. It really helped them understand how different projections can make your countries look long and thin, or short and fat, or too tiny, or too huge!

My biggest tip to anyone teaching memory mapping is to let go a little. Teach it in manageable chunks, and practice, practice, practice! Keep it fun, and don't be overly critical. Have the students take on the role of teacher. I also recommend that as you progress through the states, or countries, always draw them in the same order in the same way. In this way, it becomes almost rote. As you add chunks, always have them draw ALL the states up to the new chunk. For example, if you draw Washington, Oregon, Idaho...always start that way. When you add Montana, Nevada, California, always draw WA, OR and ID first, then add the next three, and so on.

I have found that the some of the most unlikely students will surprise you while mapping. Students with disabilities, little creativity or poor art skills often excel. Everyone can be successful with memory mapping!
Mapping the World By Heart Teacher Spotlight: Jim Dowd

The world seems strange and unimaginably big, but Jim Dowd has found ways to inspire his students to make the world seem that much smaller. This surprised even the parents in how effective his geography lesson plans worked.
“I would hear lots of feedback like, ‘I could never draw this map myself, and I can't believe that my 9-year old can!’ Parents would often frame the final map boards and hang them up at home,” he said about using David Smith’s Mapping the World by Heart curriculum in his classroom around the globe.

Jim’s teaching career spans continents. Working with the JET Program, he served as an English teacher in Japan. Back in the states he worked for an outdoor education program in St. Louis, MO and as a fourth grade teacher a Forsyth School in St. Louis, and a second grade teacher at the Latin School of Chicago.
He recently chatted with Fablevision Learning about his experiences using Mapping the World By Heart both in and out of the classroom.
How were you introduced to Mapping the World By Heart?
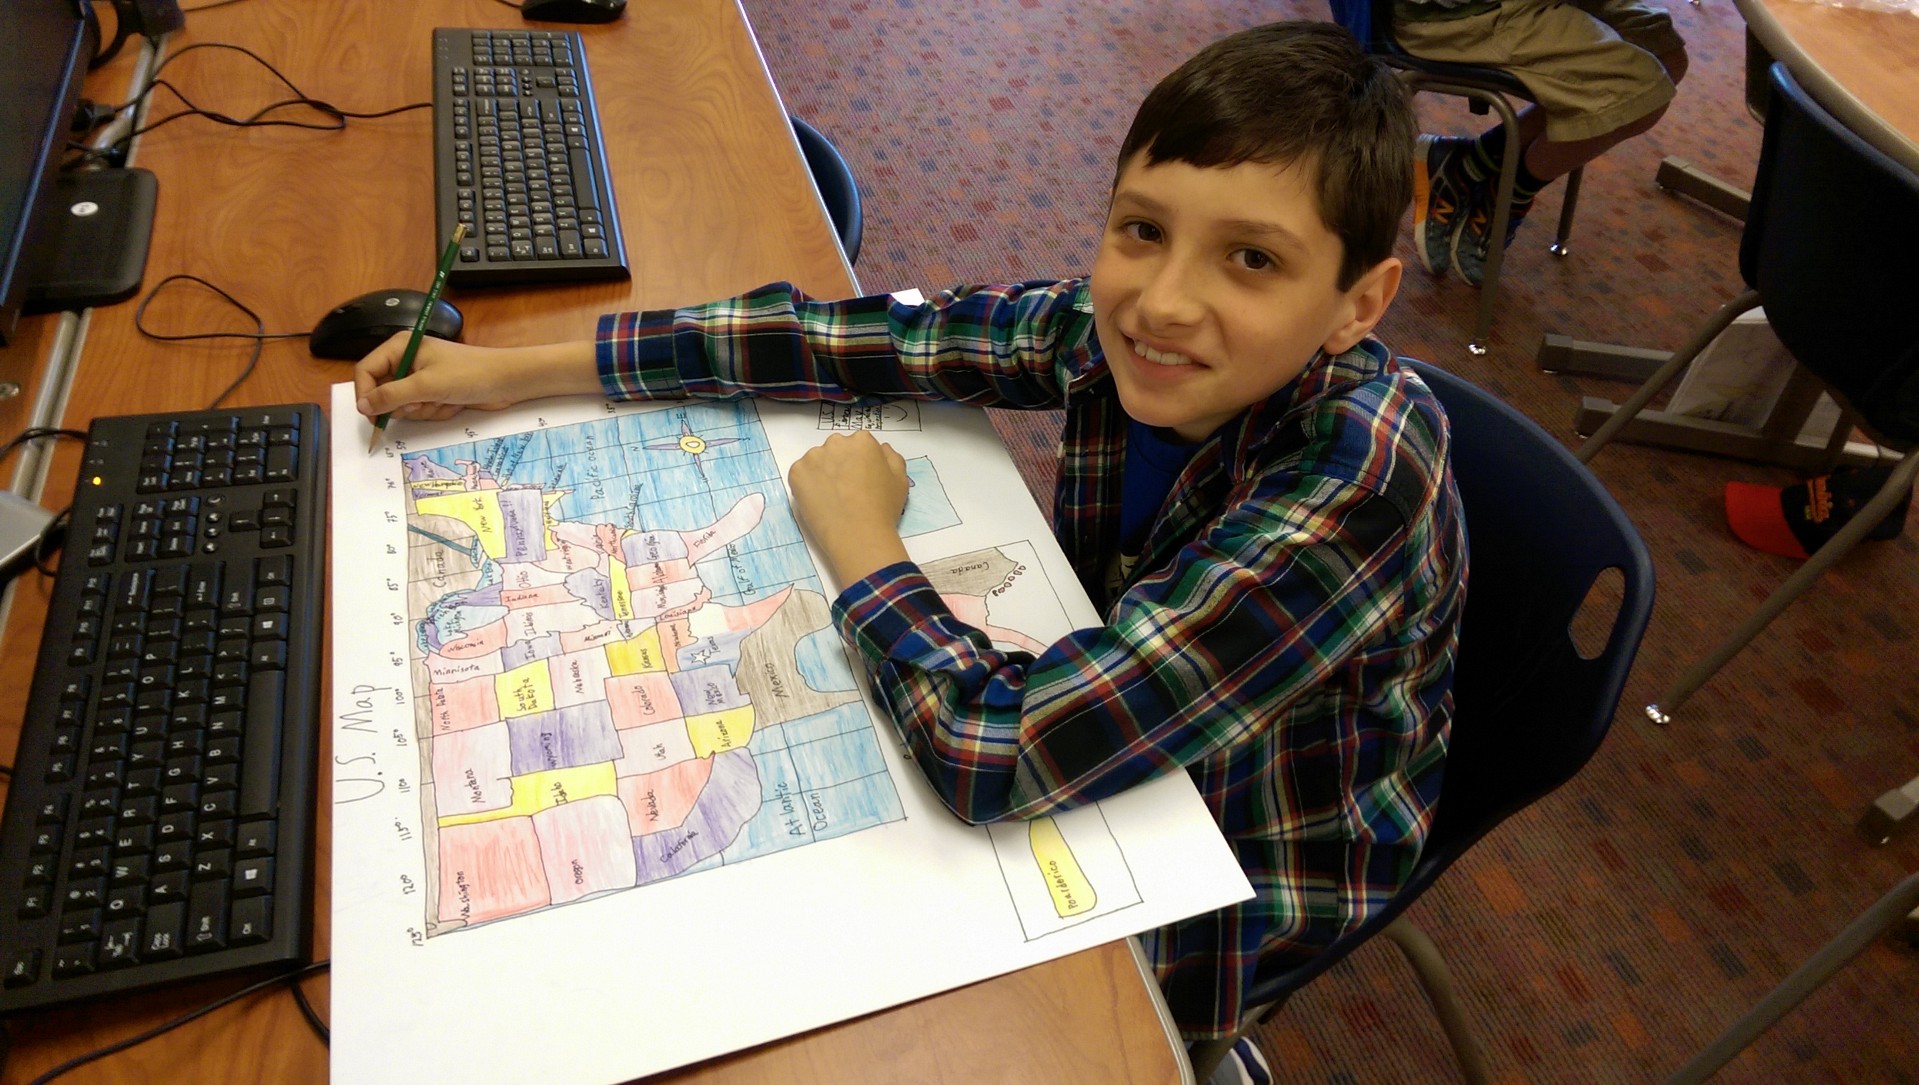
David Smith came to the Forsyth School in 1997 for a one-day teacher seminar. I had never heard of the program before, but I adapted his Mapping the World By Heart curriculum to fit my fourth grade USA-based social studies program. The students would do a memory map of the USA on the very first day of the year, and then draw all 50 states by memory in May. The difference in their geographical knowledge from September to May was mind-boggling!

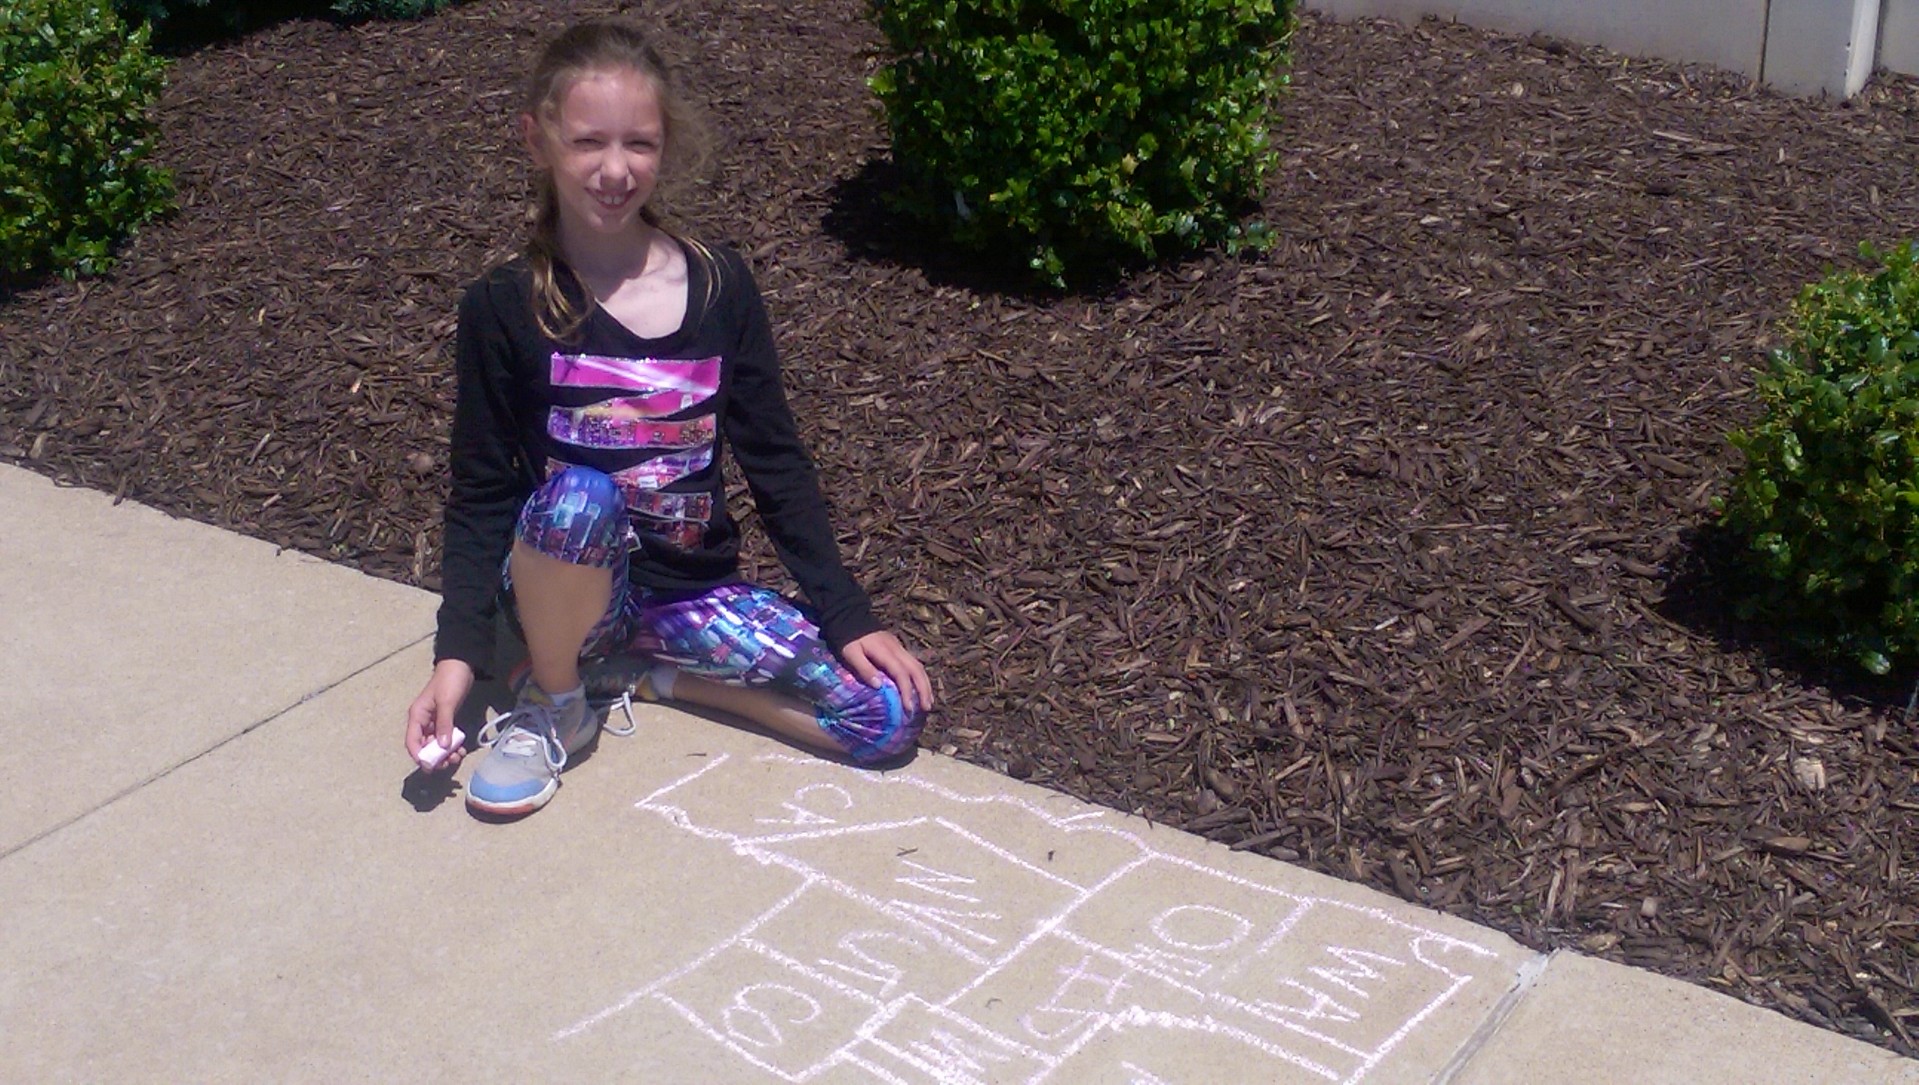
Working with your students, you have mapped the world in many creative ways, can you share a bit about the playground world map?
As a PTA member at Don Benito Fundamental Elementary School in Pasadena, CA, I arranged for David Smith to come for an author visit. He met with the entire school and discussed his books and the importance of geography. Then the entire faculty, during a meeting, created the grid for a world Mercator projection map on the playground according to the guidelines in MTWBH.

The next day, students from each class came to draw a section of the world on the map. PTA parents and students then painted in the countries and oceans. After the map was completed, we had an assembly where parents and students born in different countries greeted the student body while standing on their home country. Don Benito has a very diverse student population, and I think we had about 30 countries represented. Teachers have since used the map to teach the locations of continents, oceans, and countries. Playing interactive games on a giant world map is much more engaging than looking at one in a textbook!

You’ve worked with students in elementary and middle school, what is the importance of teaching geography – and mapping – at a young age?
Unfortunately, geography is not studied formally in most schools anymore. Geographical and cultural literacy is so important when understanding the history of a time and place. Students who map the world by heart will know exactly where exactly where countries like Syria and Argentina are, while most adults have no idea.
What was one “aha” moment using Mapping the World by Heart?
My "aha" moment was when a students would tell me that they could never draw a section of the world by heart, but 8 months later they could do it. Another satisfying aspect of the curriculum for me was how parents would rave about the final mapping projects.
What’s next?
Now that my kids are approaching middle school, I hope to return to teaching full-time. I will definitely take a job at a school that will allow me to incorporate Memory Mapping to the curriculum, as it is always the highlight of the year!
Would you like to learn more about Mapping the World by Heart? Click, here.
Are YOU – or someone you know - activating any of FableVision’s books, media, and/or software to approach learning in more creative, engaging ways? If you'd like to nominate someone for the FableVision Creative Educator Spotlight, click here and complete your submission electronically.
Teacher Spotlight: Anne Turner, Kindergarten Teacher at North Tama County Community School

Every day is a new adventure for Anne Turner. As a kindergarten teacher at North Tama County Community School in Traer, Iowa, she encourages hands-on, active participation in her classroom with STEM (Science, Technology, Engineering, and Math) at the center of her lessons.
“I love creating new things, whether it’s new STEM centers at school, books with my students, or crafts at home,” she says. “Every day is a new adventure!”
Her love for creating new things sparked an innovative nature that she uses while teaching her kindergartens. Whether it’s producing books, developing STEM centers, or making arts and crafts, she says that hands-on, experiential learning is the way to go.
For the Teacher Spotlight, Anne, a FableVision Learning Ambassador, recently shared her favorite things about being a teacher, how she applies Stationery Studio in the classroom, and how she and her students had a blast on International Dot Day 2016!

Tell us about your classroom; what is a typical day like?
My kindergarten classroom is full of fun! A typical day starts with morning meetings and welcomes. We then get the opportunity to explore different STEM centers. We do many book read-alouds throughout the whole day and this will start a new learning adventure! We focus on literacy and math throughout the day as well, connecting everything together and creating hands on fun… In the afternoons, we focus on Daily 5 and guided reading centers that encourage our independence as young readers and writers!
Daily 5 are centers we rotate through that help us learn on a more individualized level. Each child rotates through guided reading (individual work with Mrs. Turner), read to self or to someone else, listen to reading, work on words, and work on writing. These centers can include activities from our STEM investigation, or working on our leveled readers and things we struggle with. The kids go at their own pace and include their own interests!

What is a STEM center?
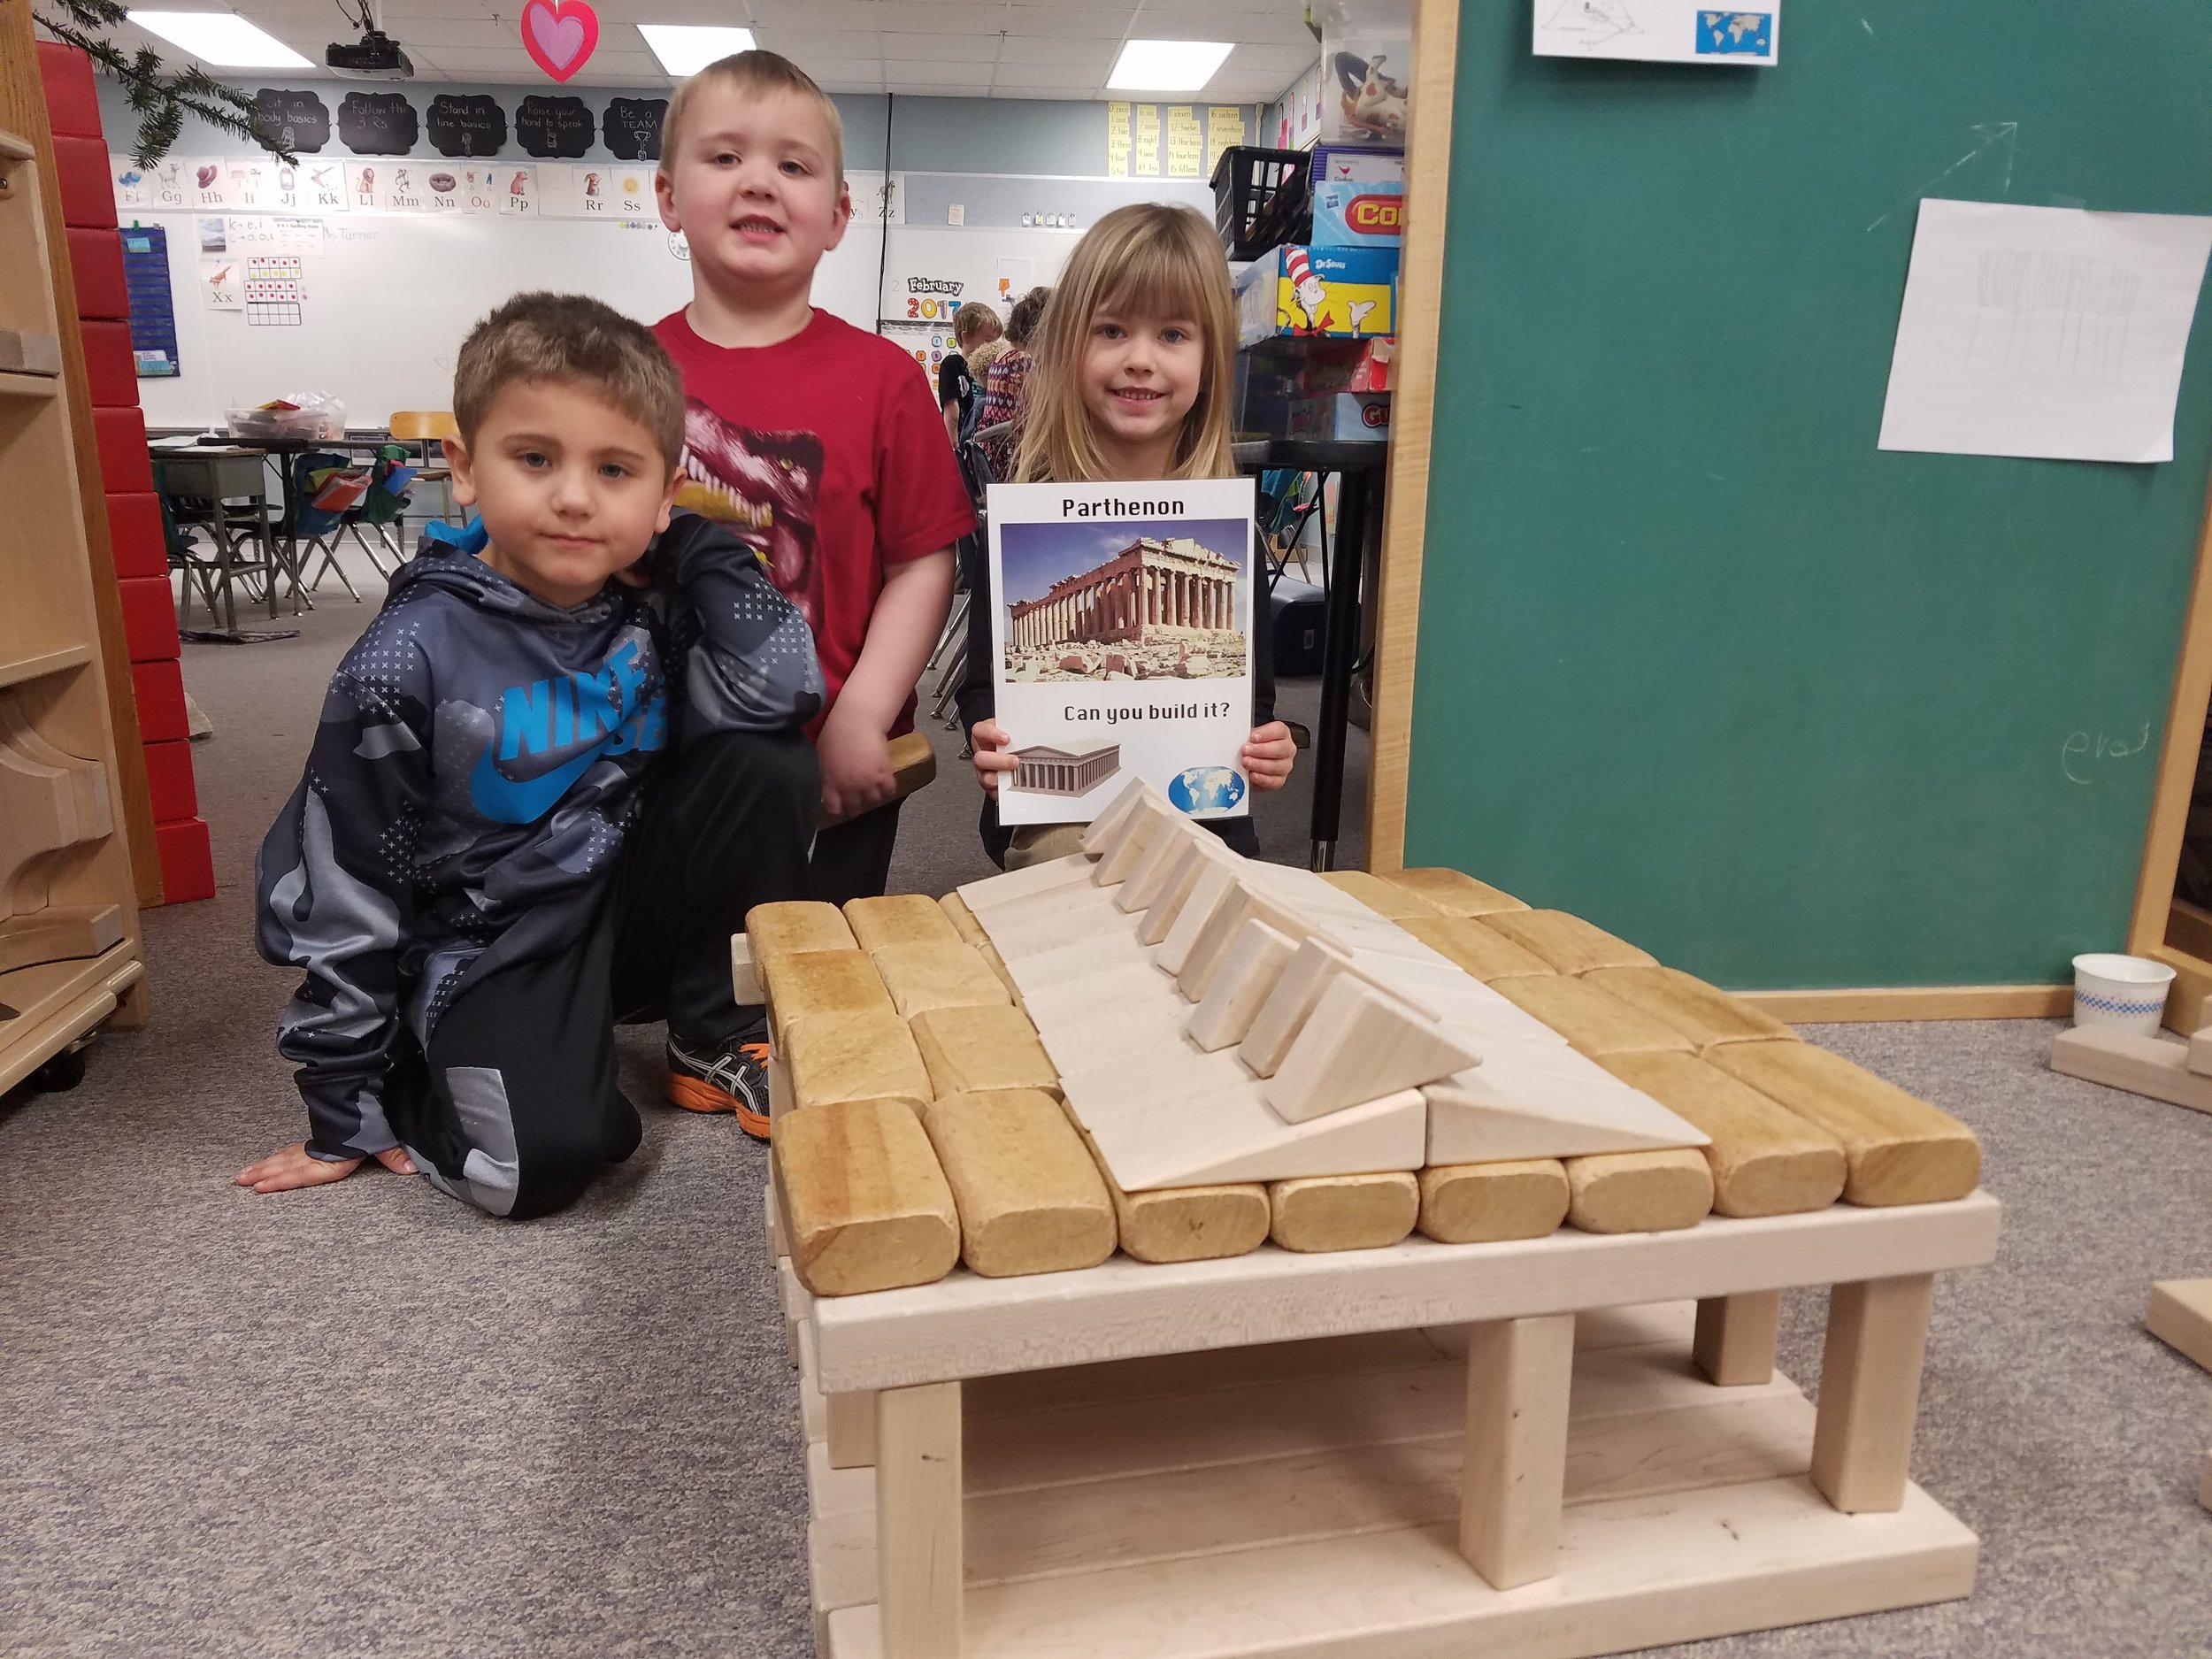
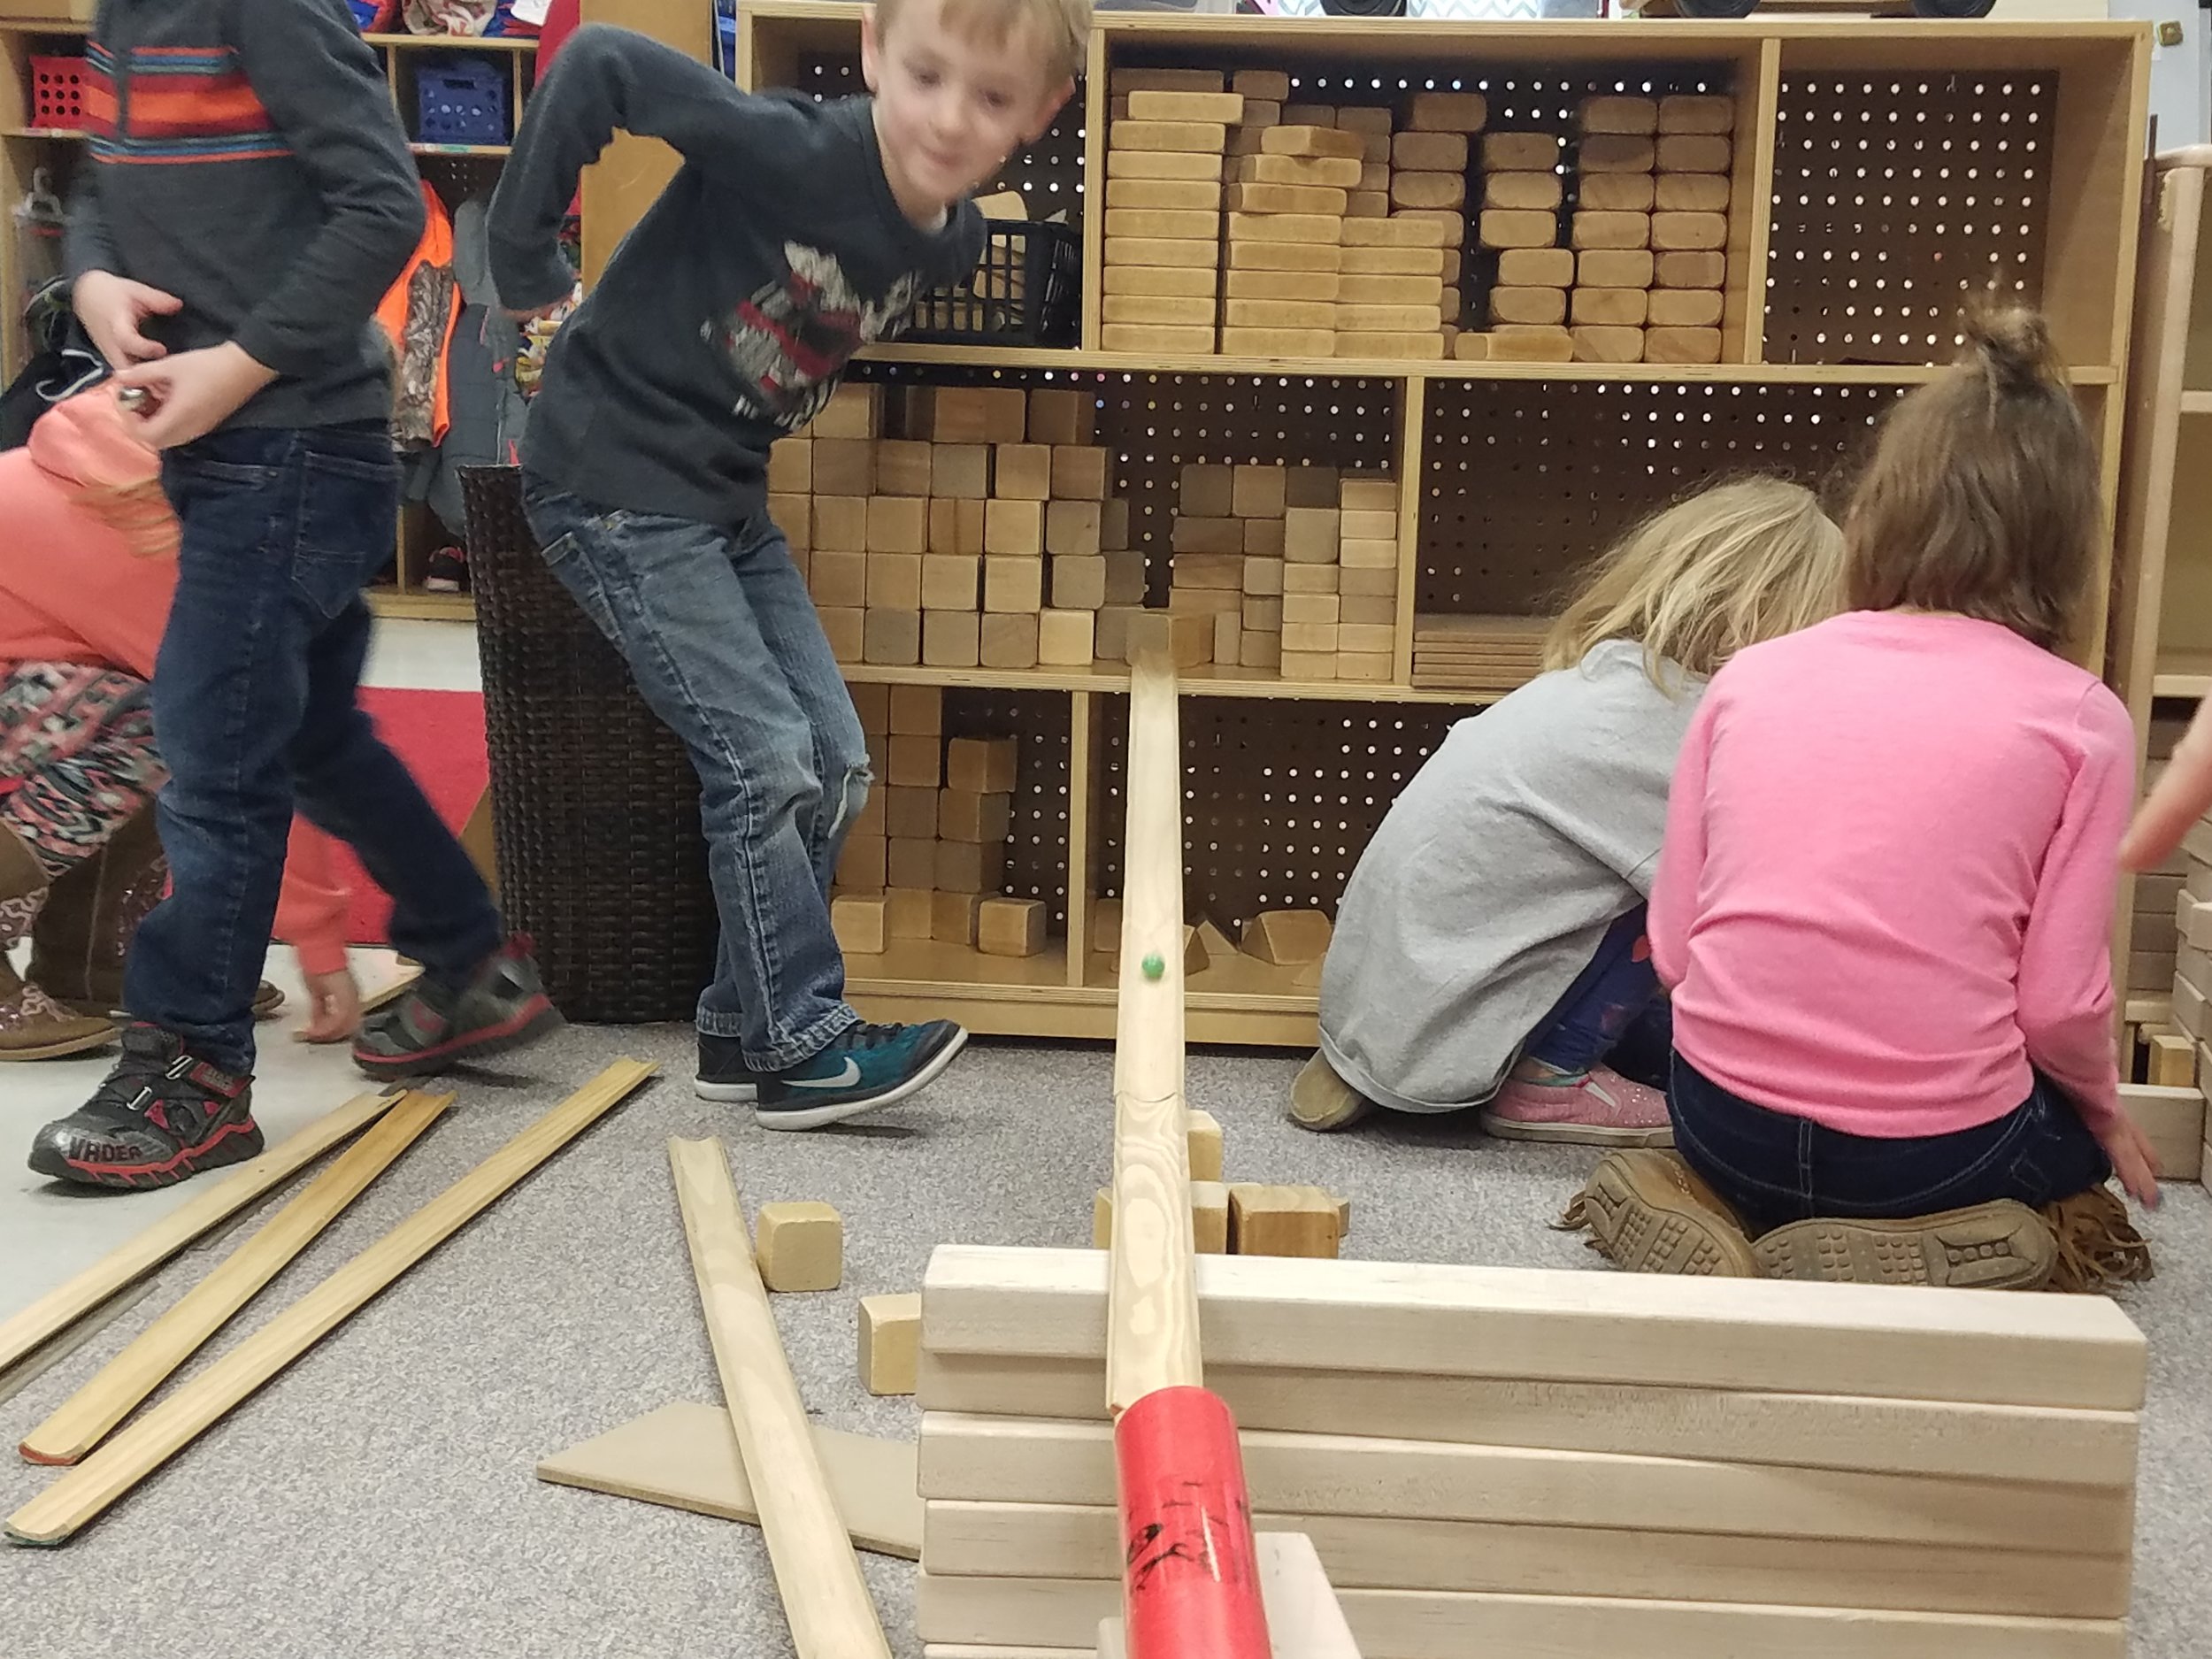
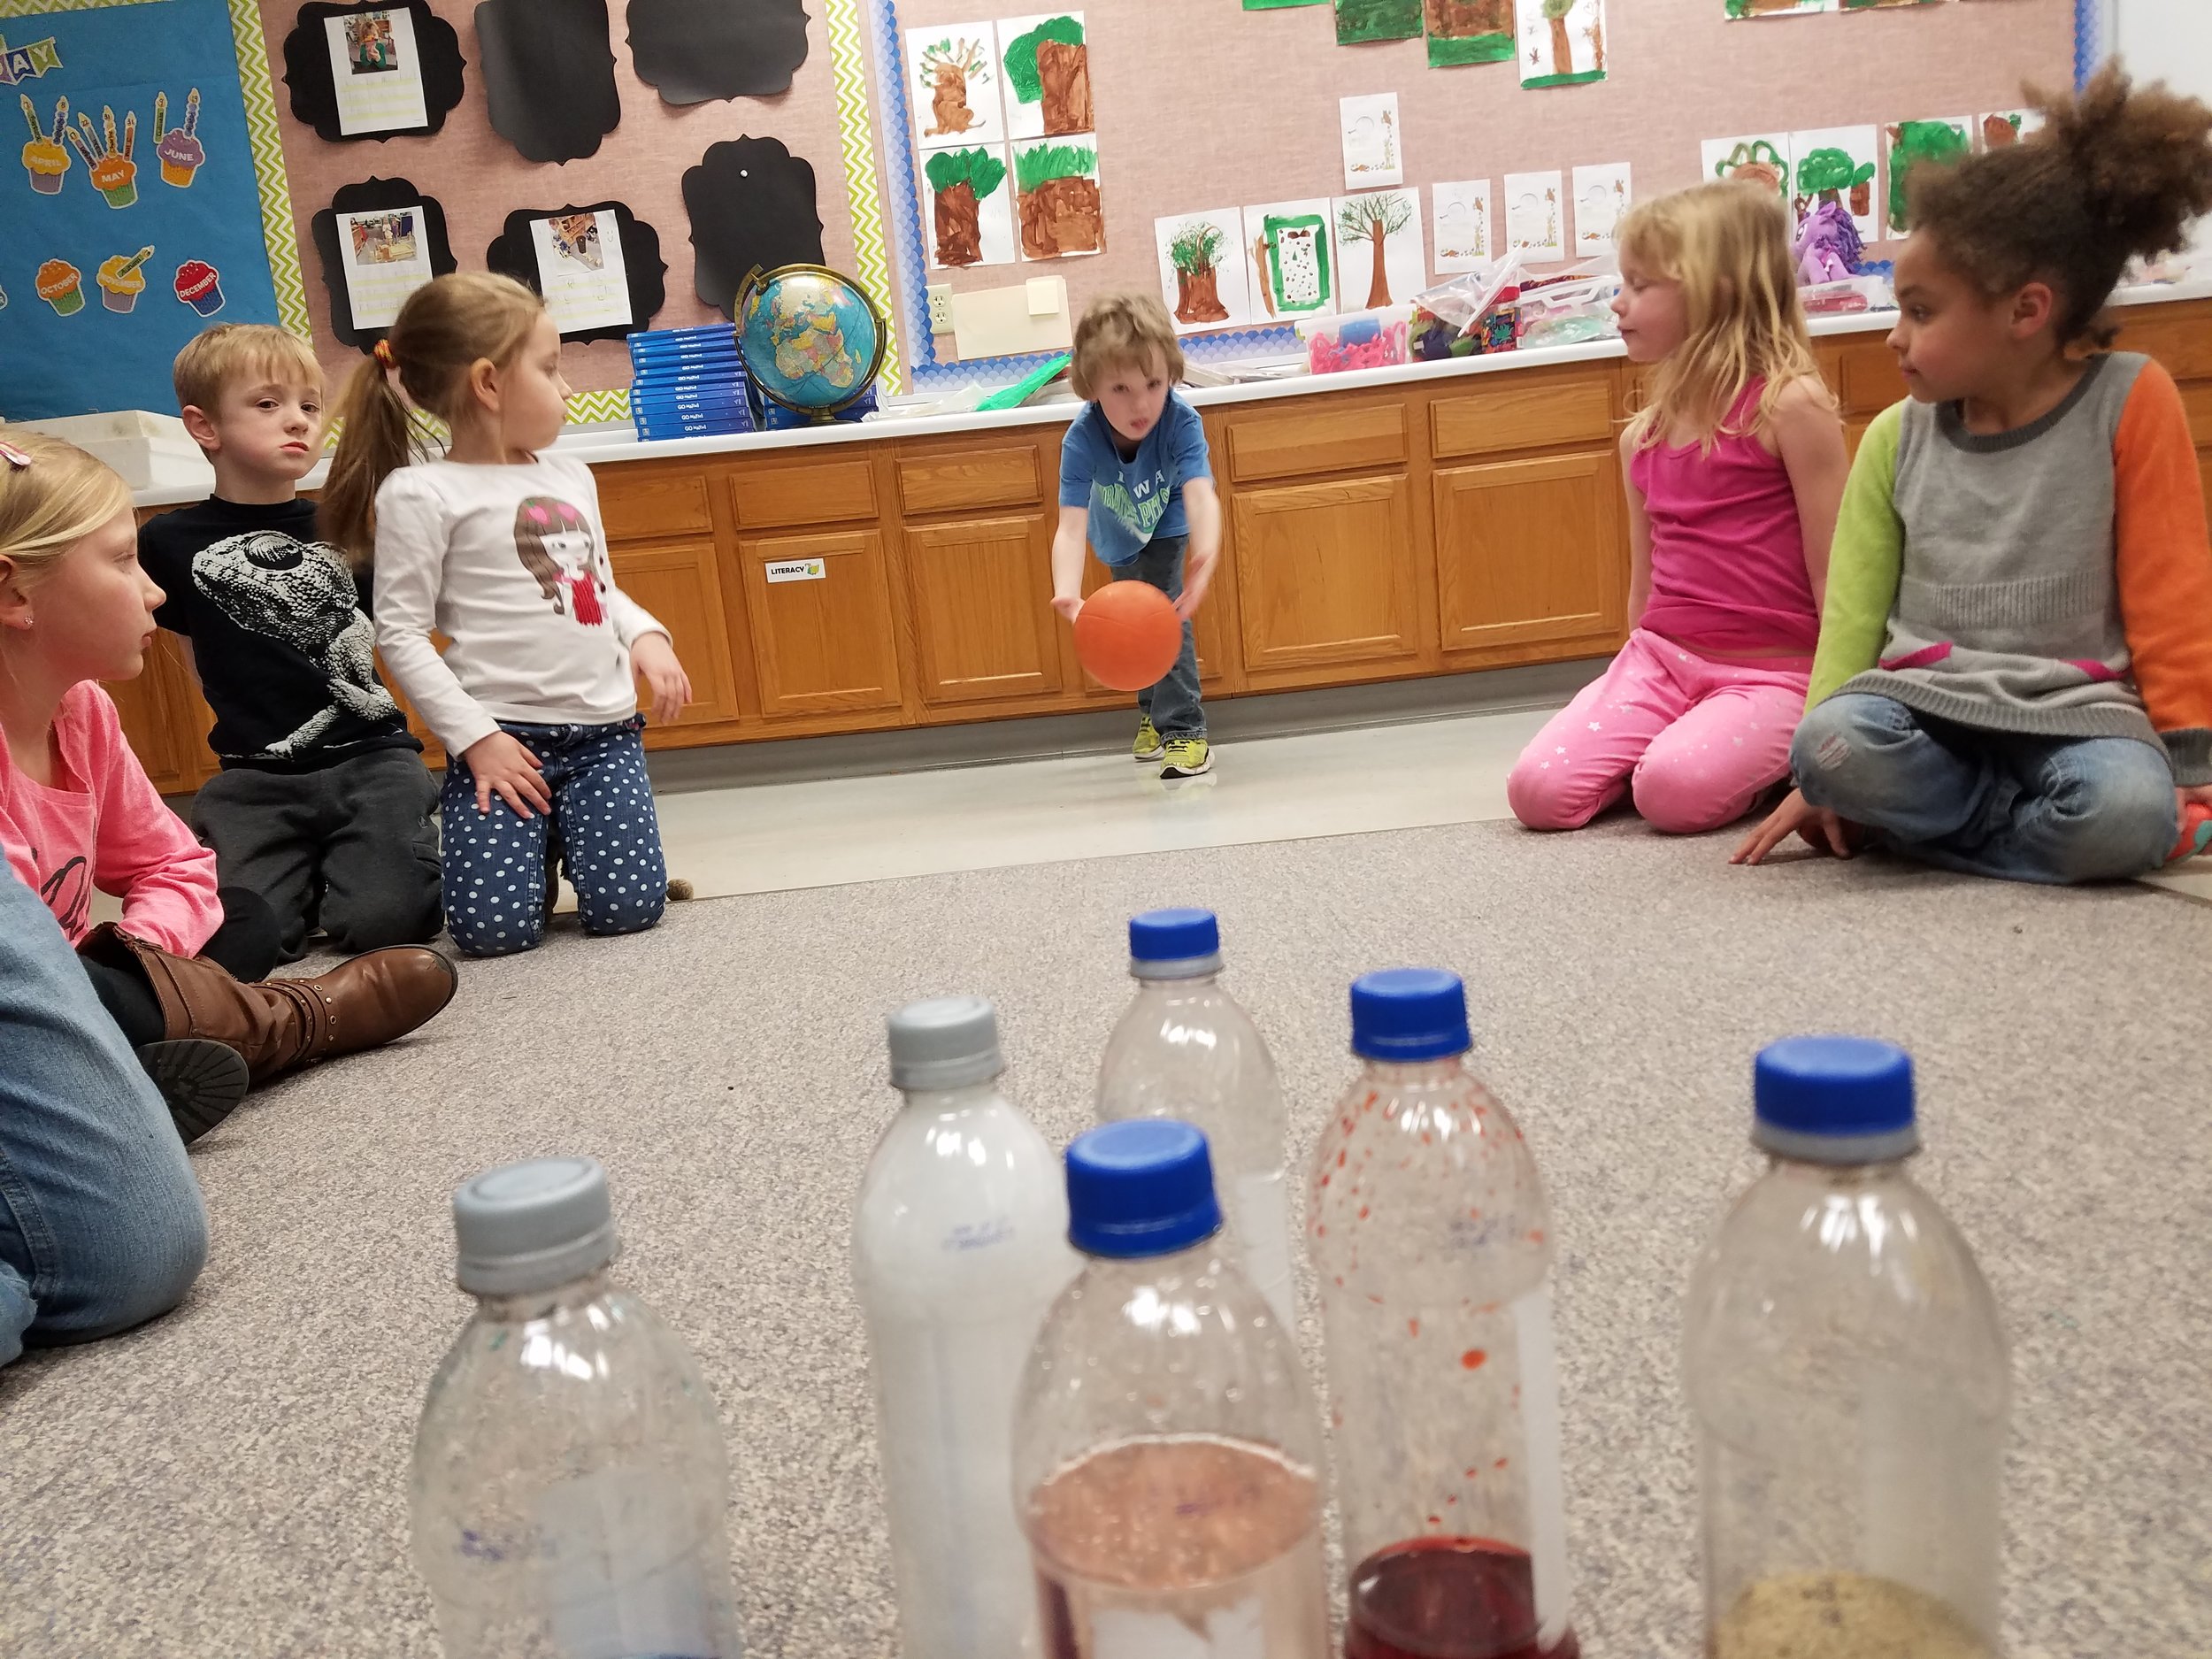
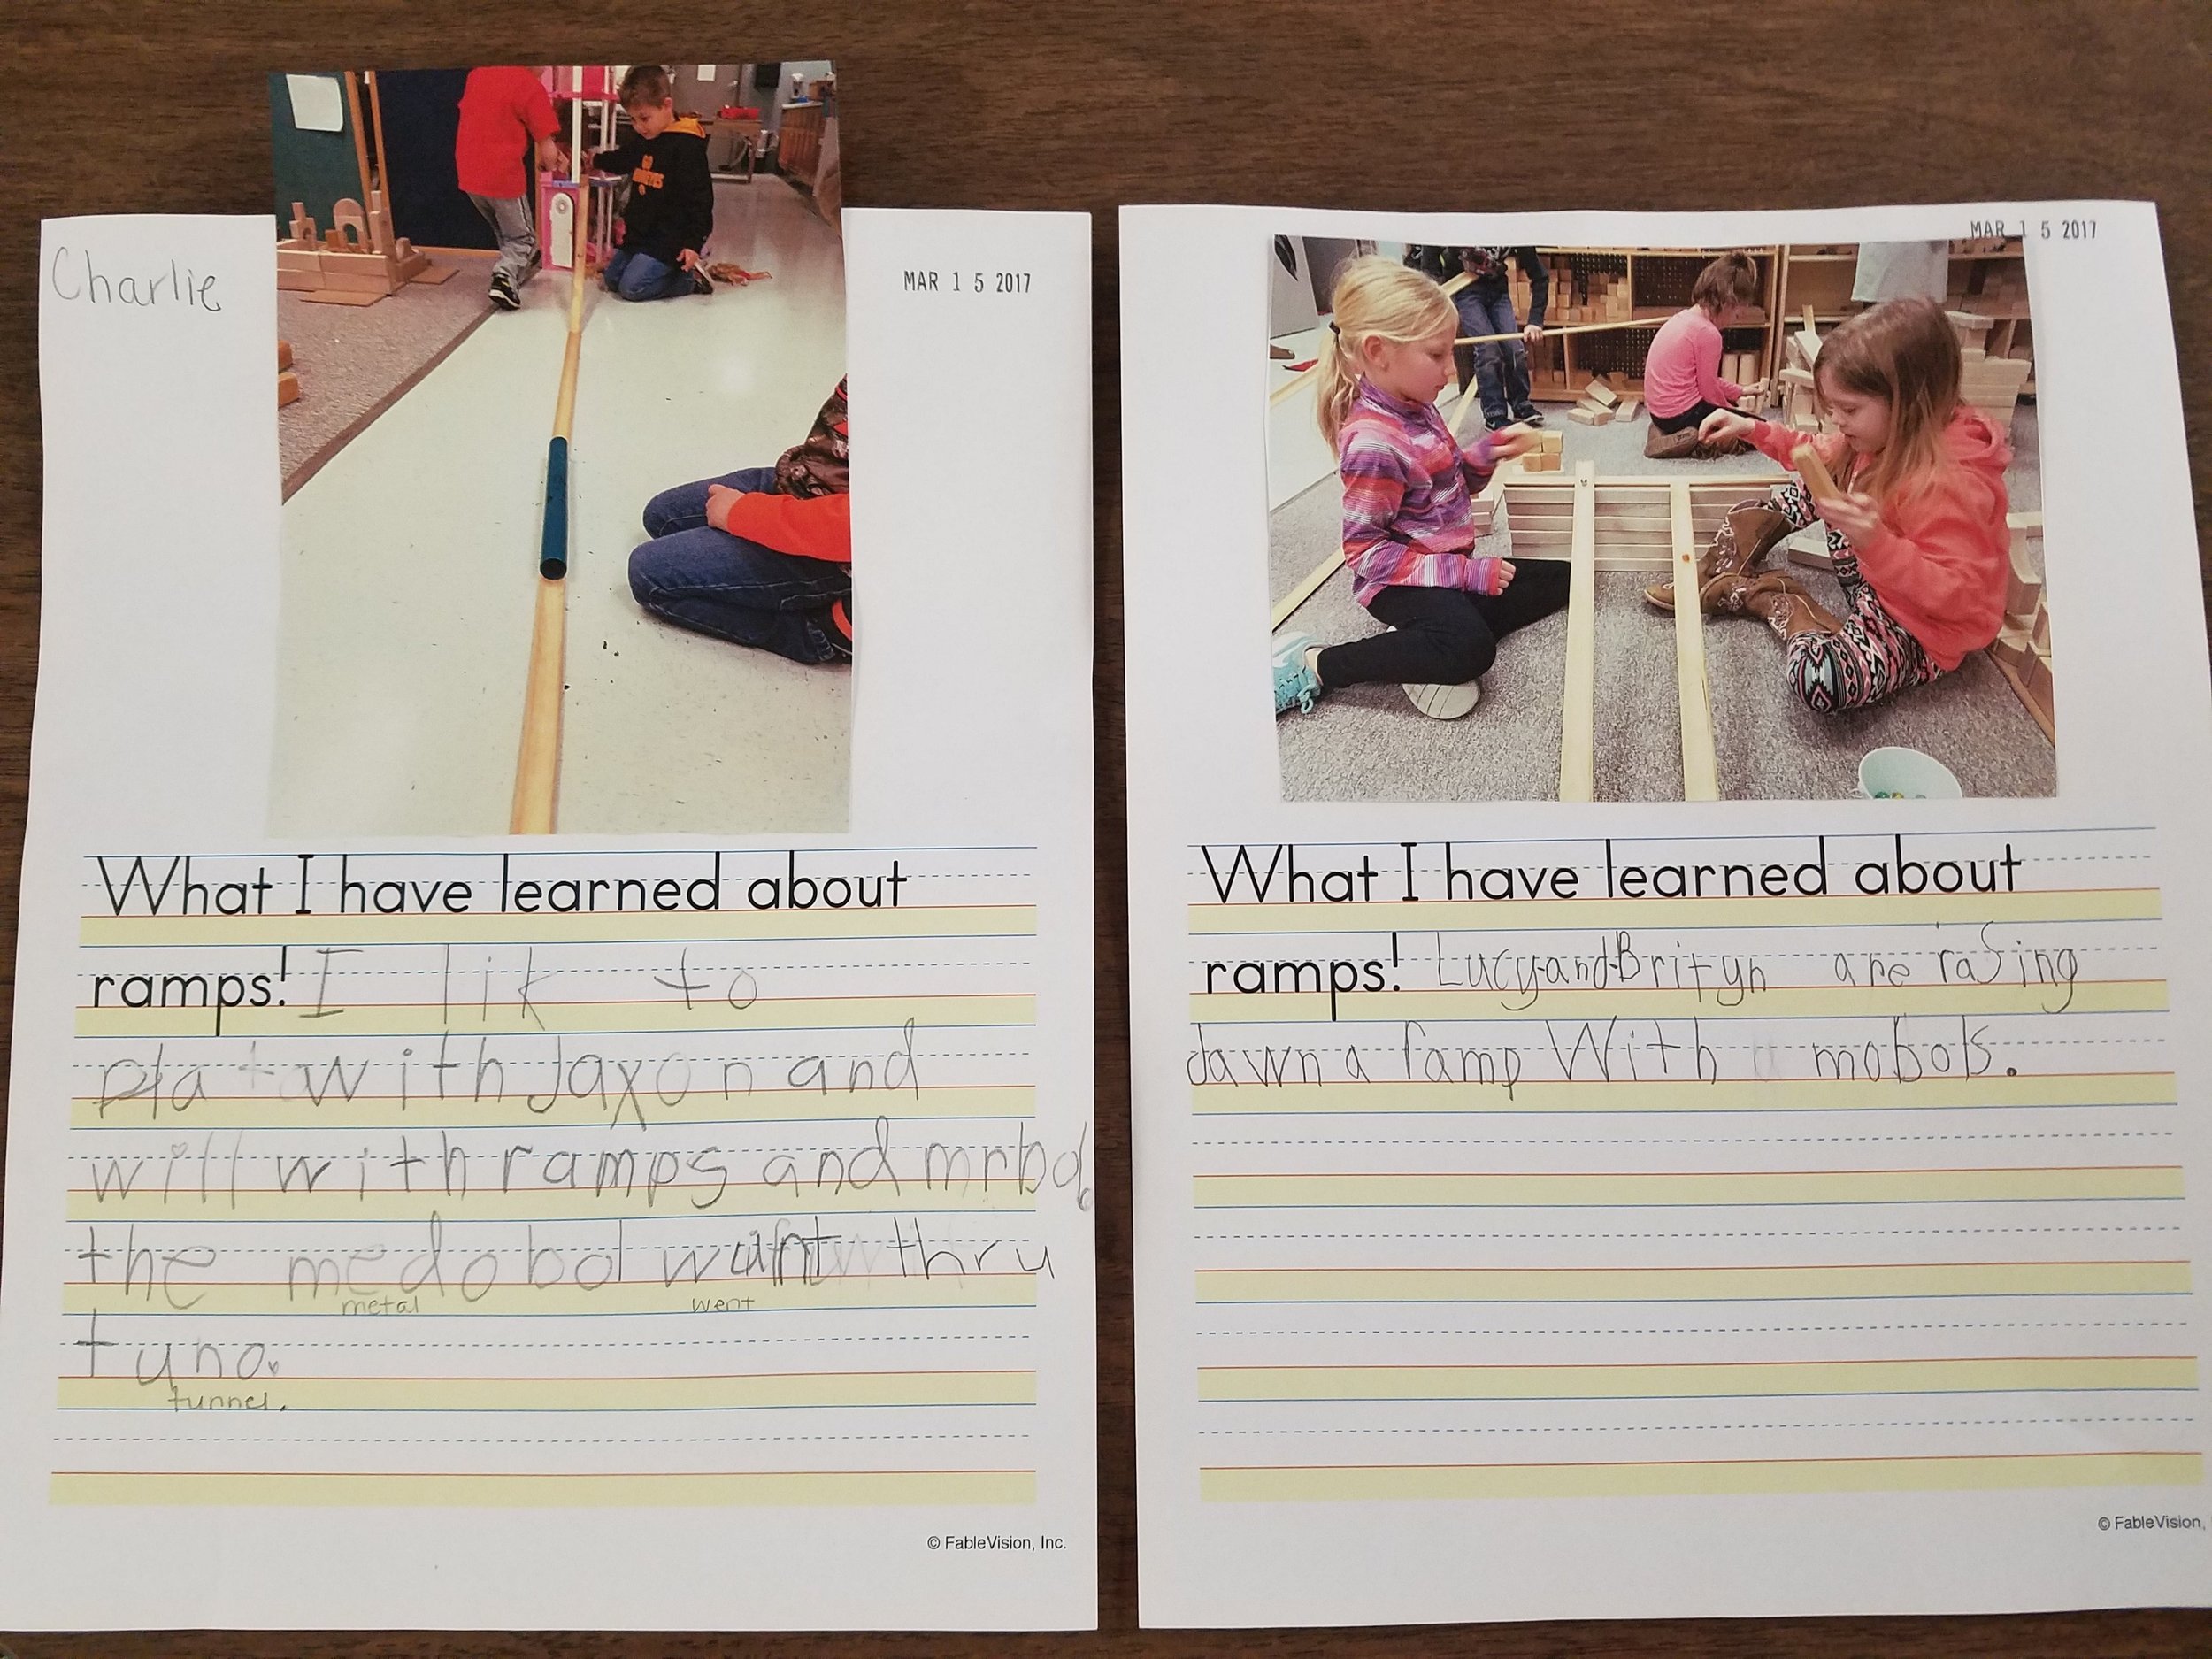
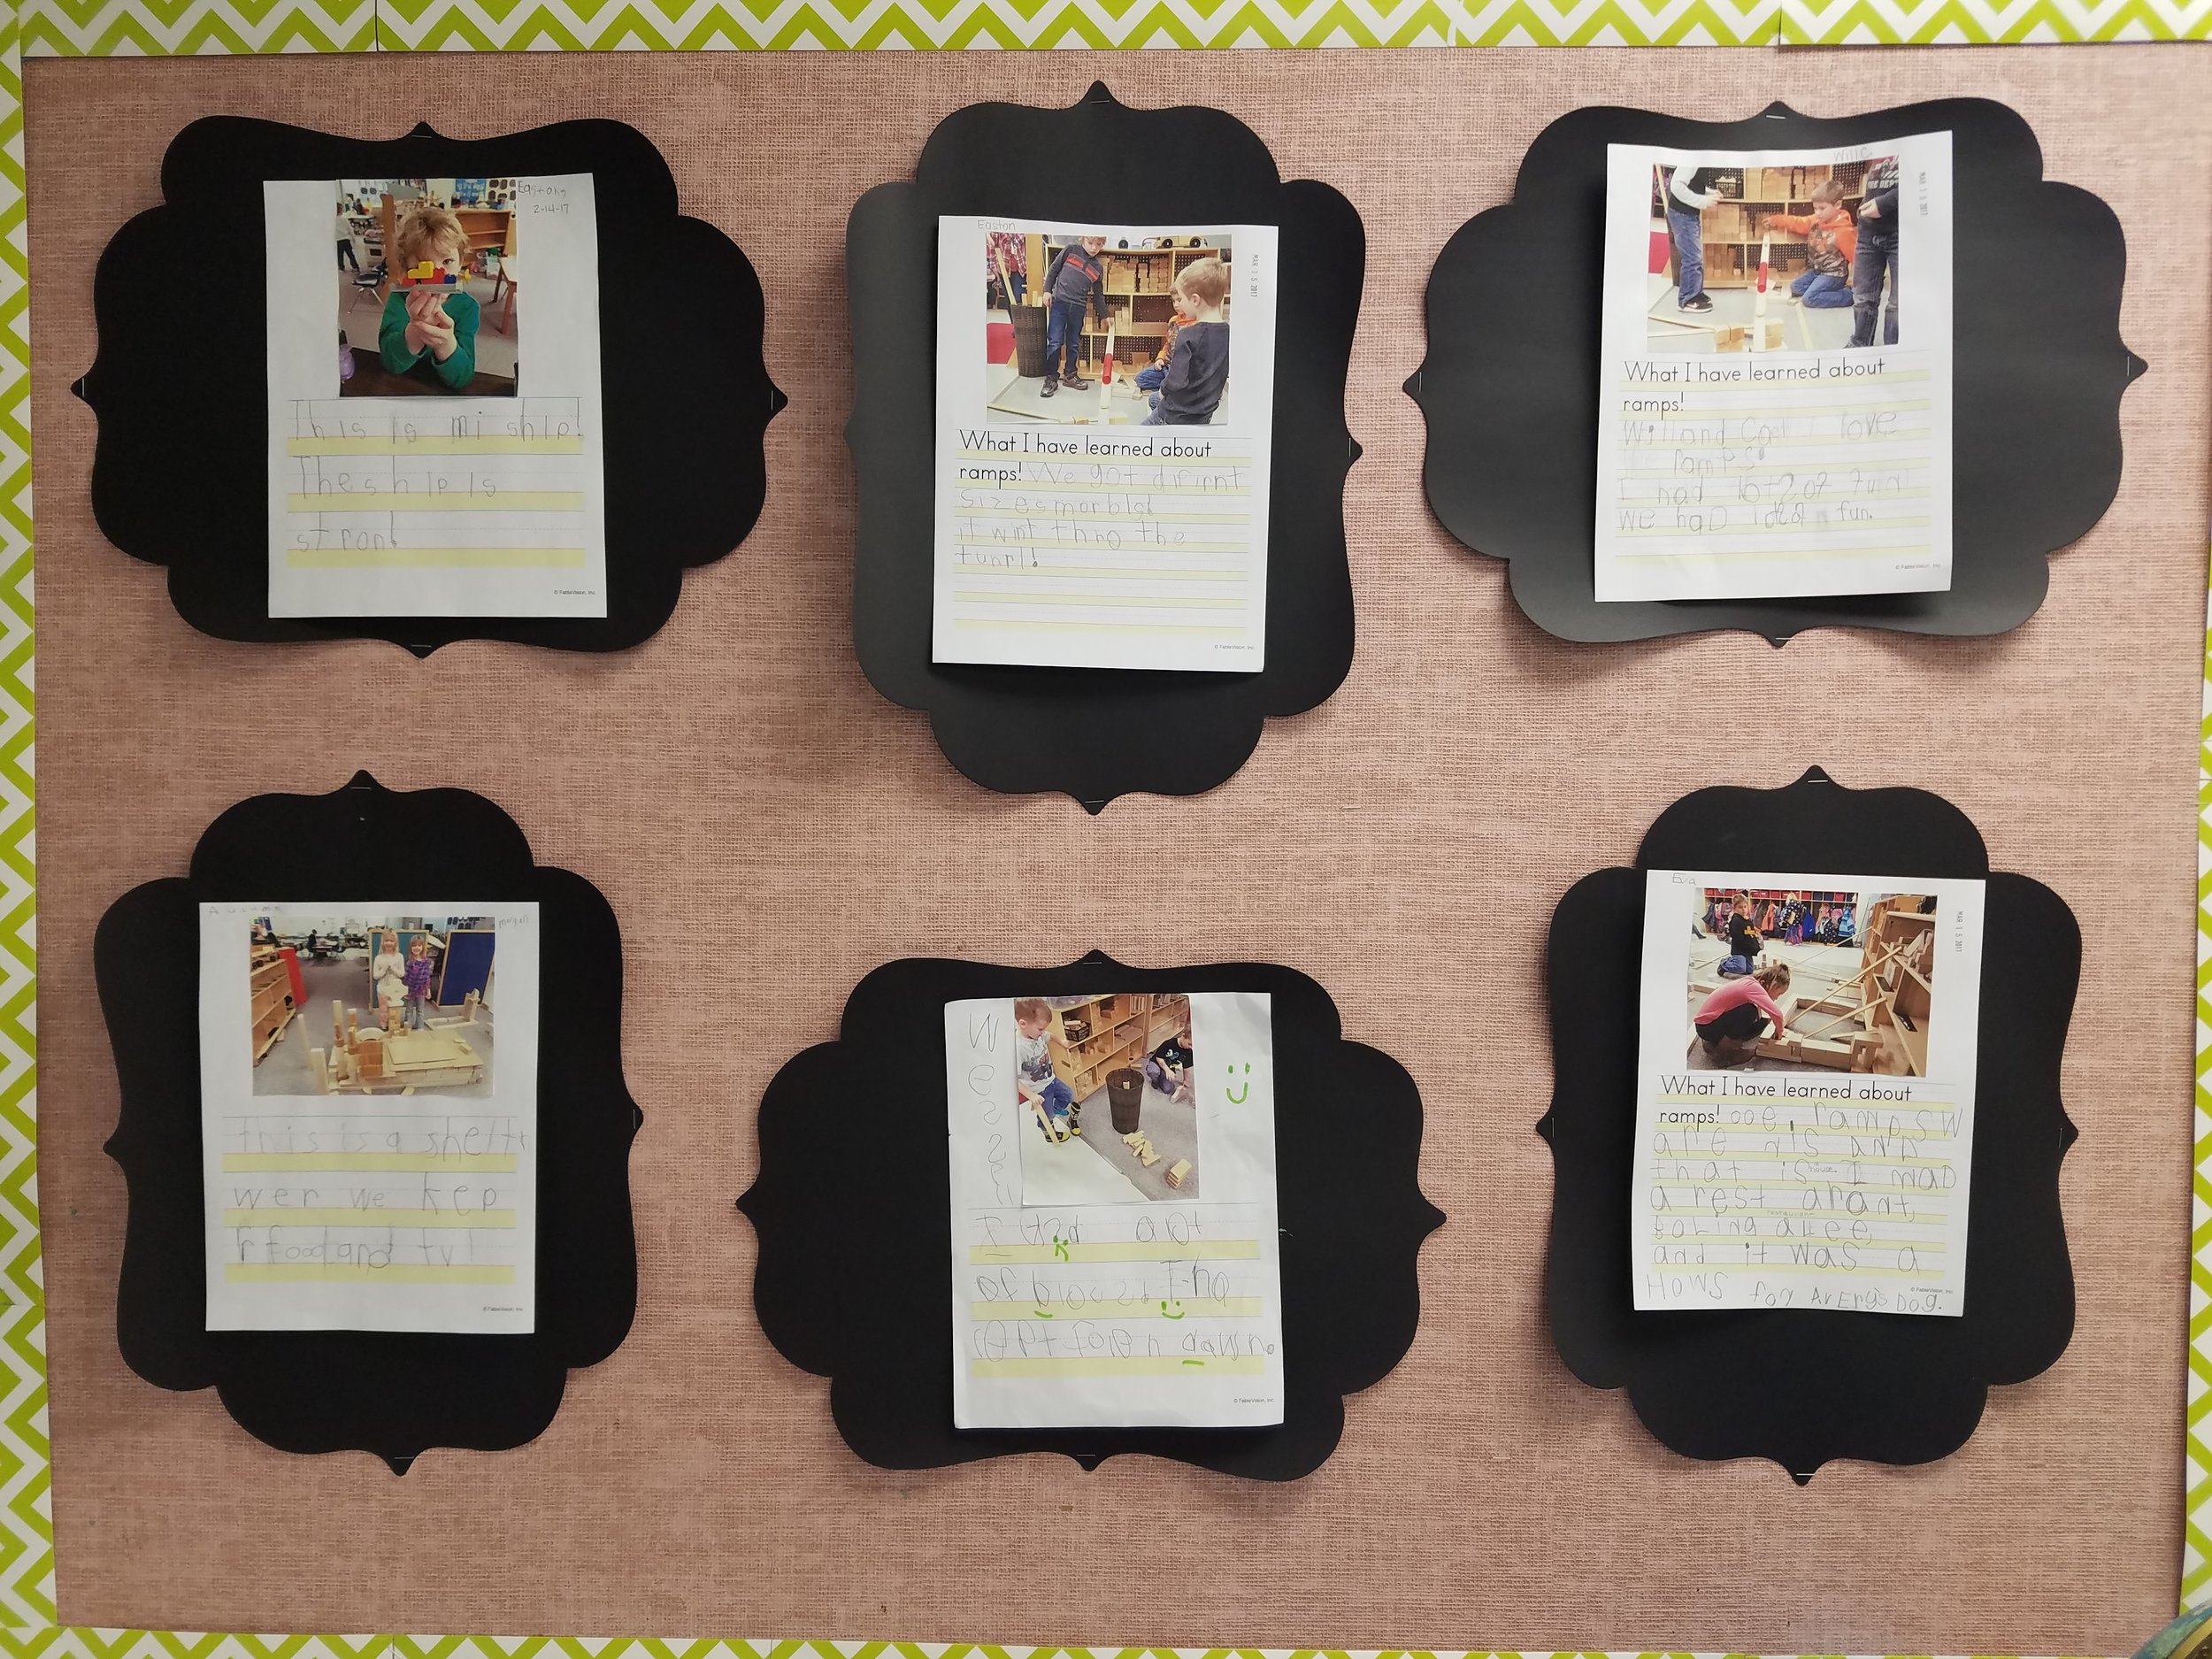
These centers are a great way to connect everything you learn in school together and spiral kids’ learning. We don’t have just science or reading time anymore. Let’s say we are meeting the standard ‘analyze data to determine if a design solution works as intended to change the speed or direction of an object with a push or a pull.’ We would, in our STEM investigation, build ramps and use different types of balls to conduct tests. We would also meet our reading standards by looking at different types of texts to support this and by dictating opinion pieces based off of the pictures we take of each others ramps. They become pretty big writing projects. So, STEM, to us in our room, is mixing all of our learning together to truly understand!
I hear you have some snazzy uses for Stationery Studio, can you share a few?
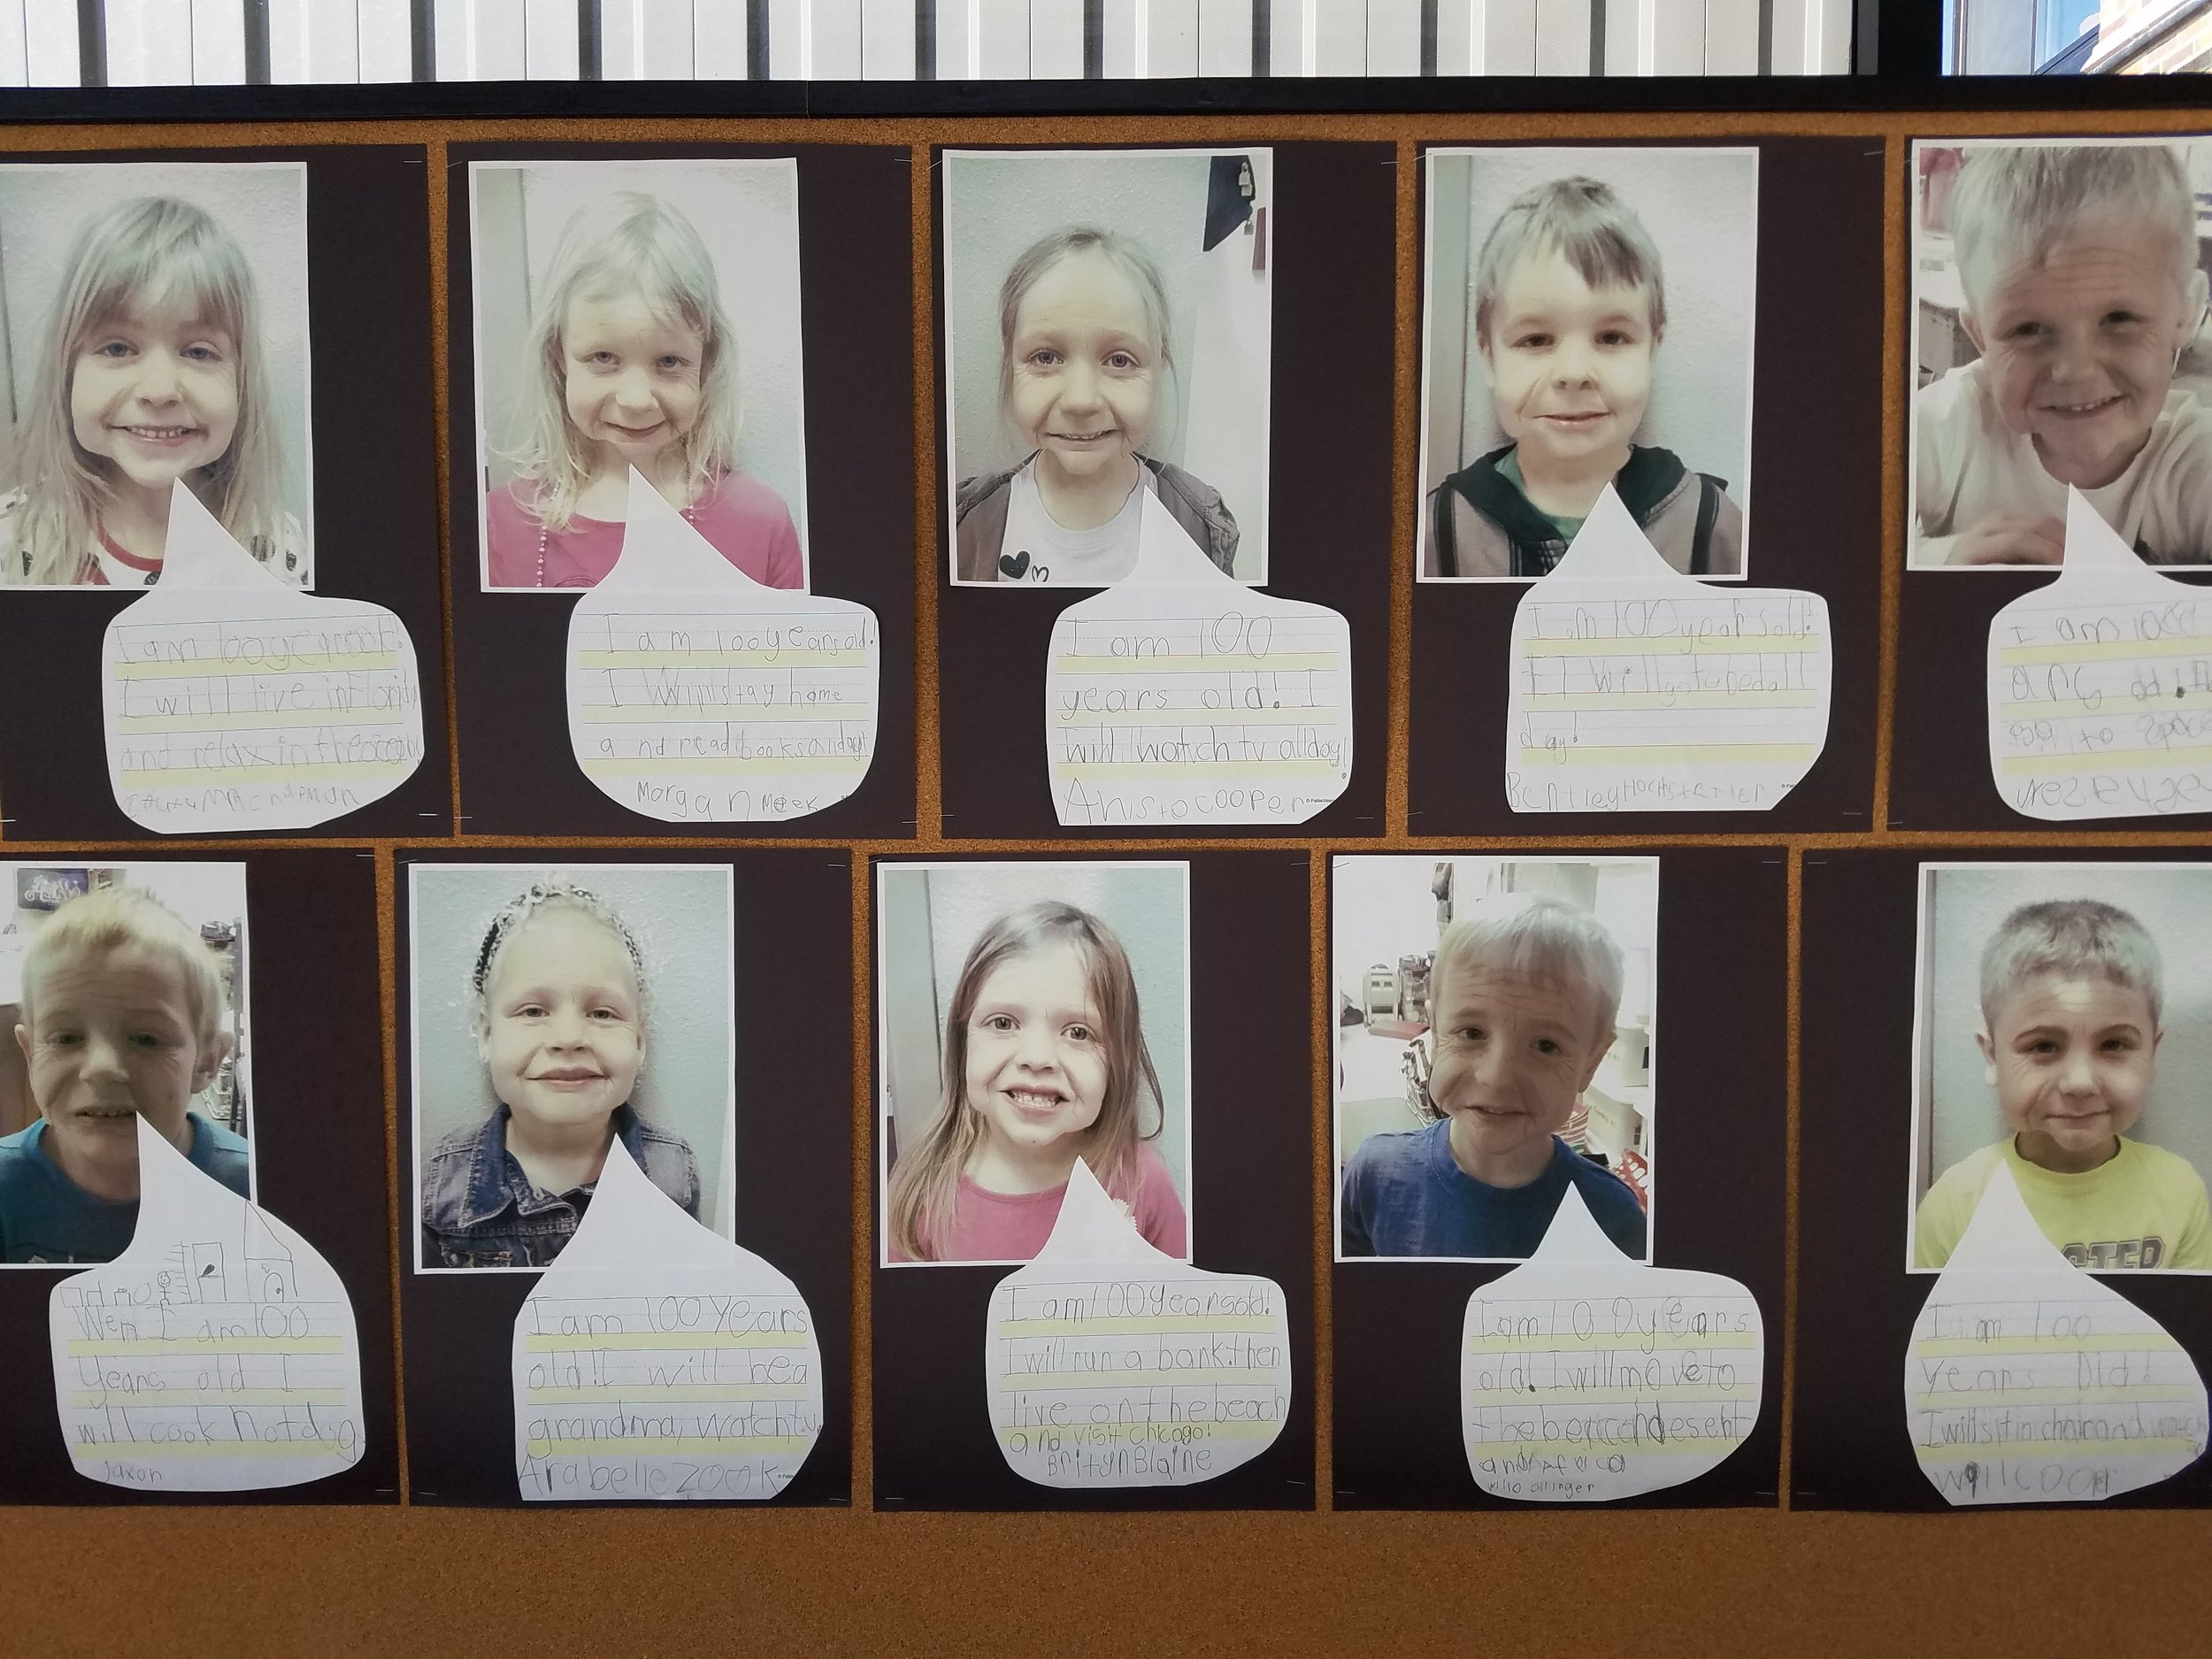
We use Stationery Studio almost daily! I use the software to create different styles of writing pages to encourage the kids to write and help them get new ideas. I also insert images that connect to a book we've read to help use continue to write about our findings. It is greatly beneficial to my students because they have writing lines (head line, belt line, and foot line) that help guide them to write legibly. With the fun pictures and borders, they are much more encouraged to write. When the kids take a picture of their creation or investigation, and we print it and glue it on the Stationery Studio paper, they feel great ownership!
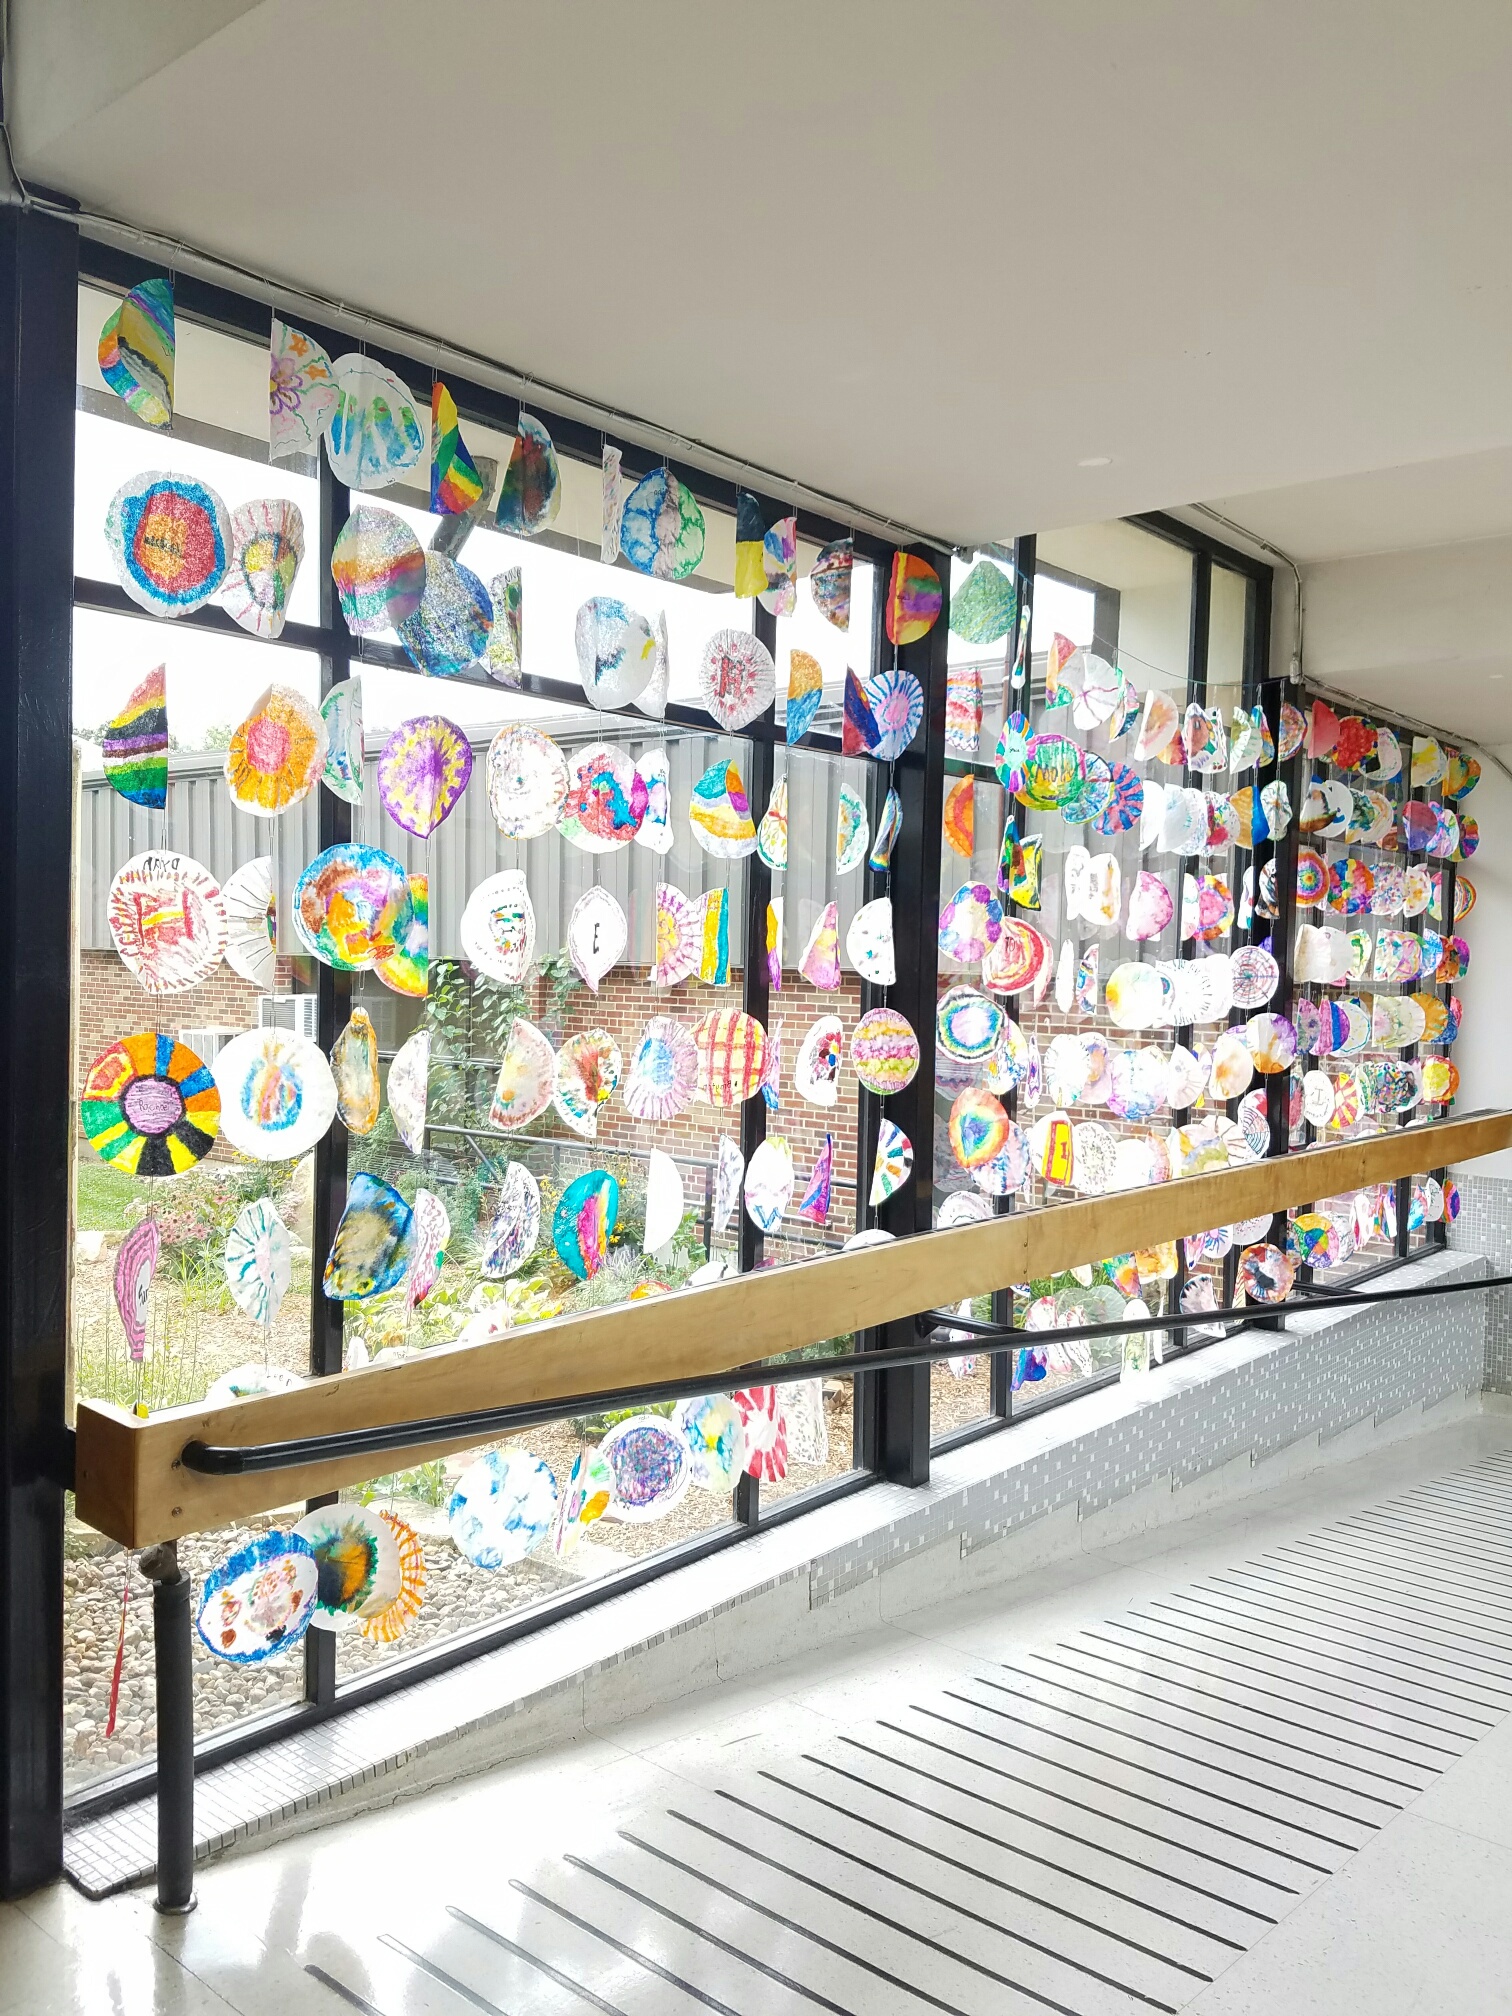
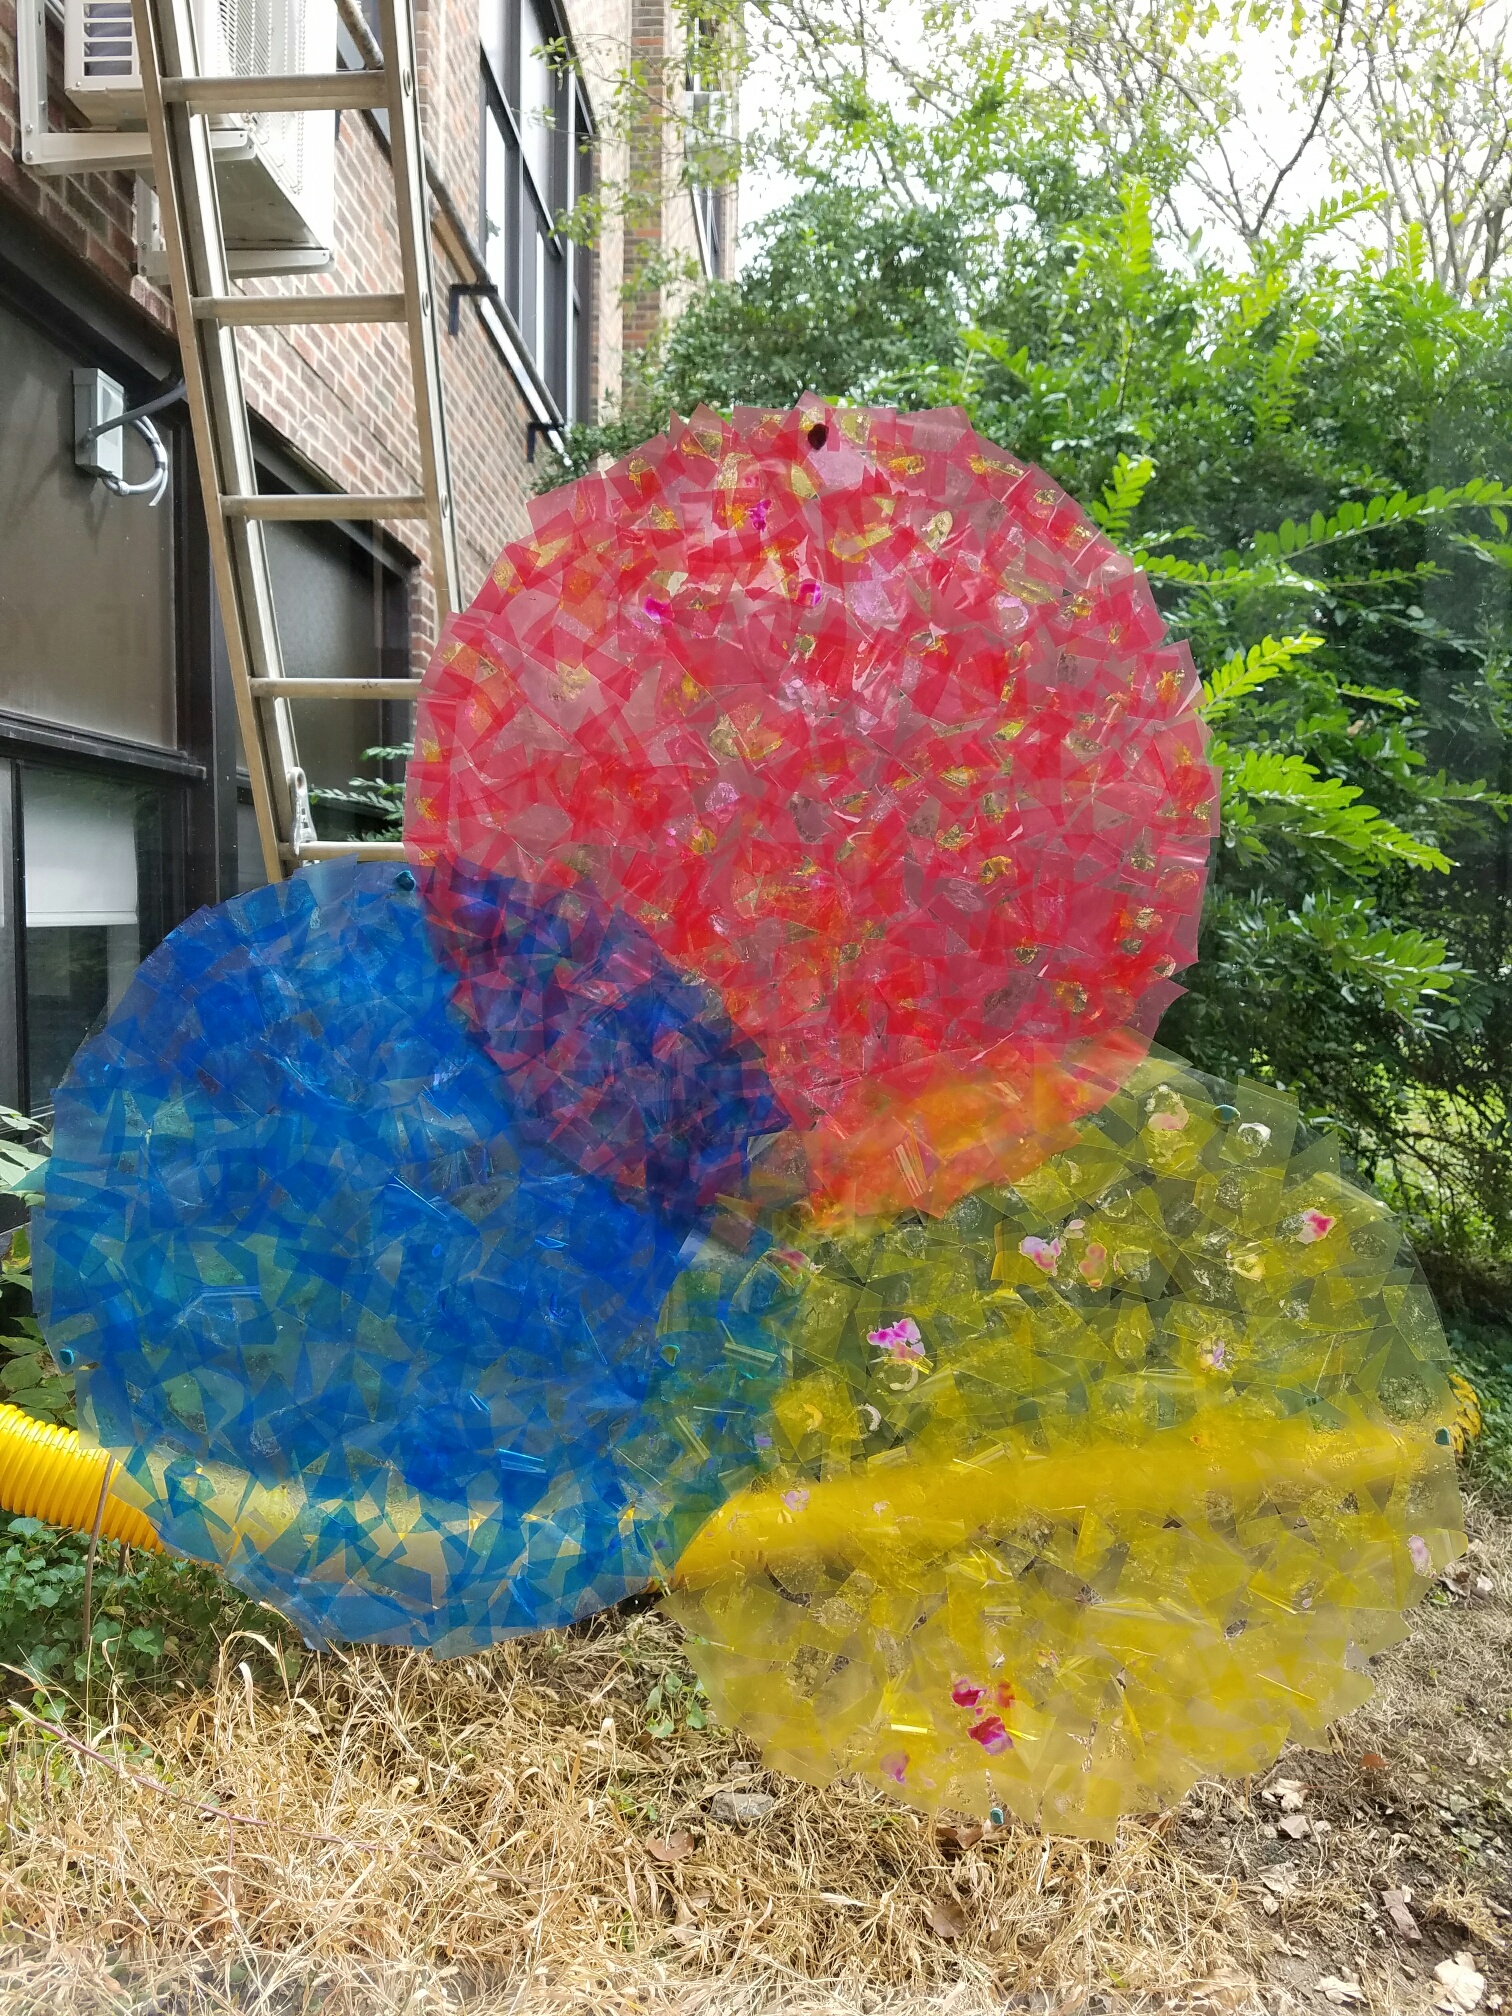
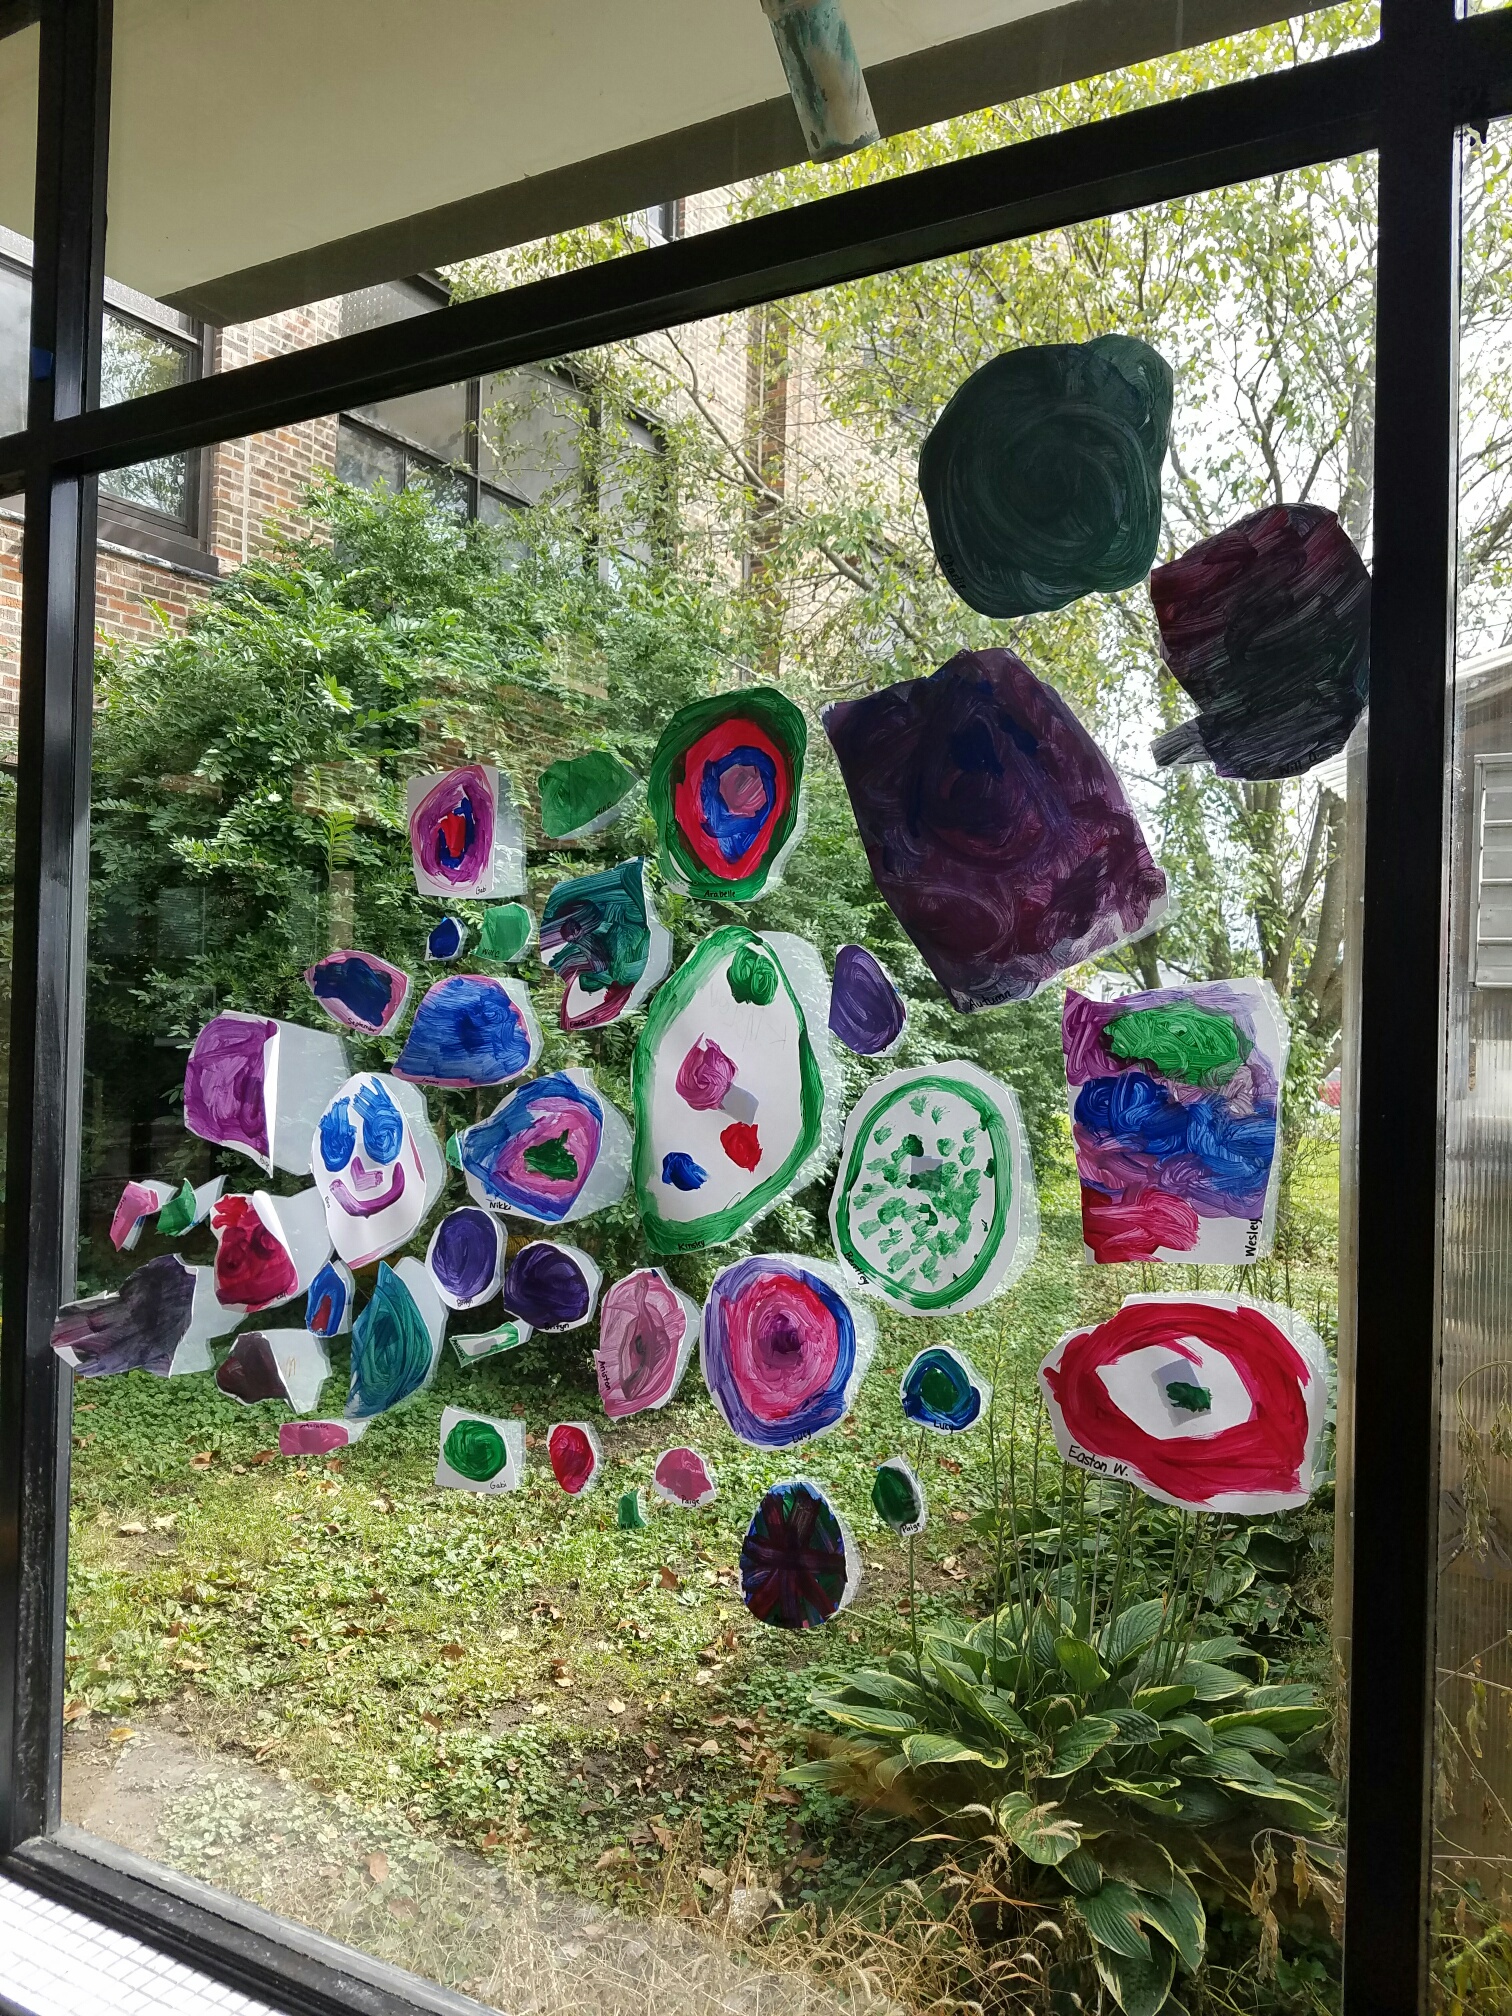
Dot Day 2016 was huge at your school this year, can you share how your students got ready for the day?
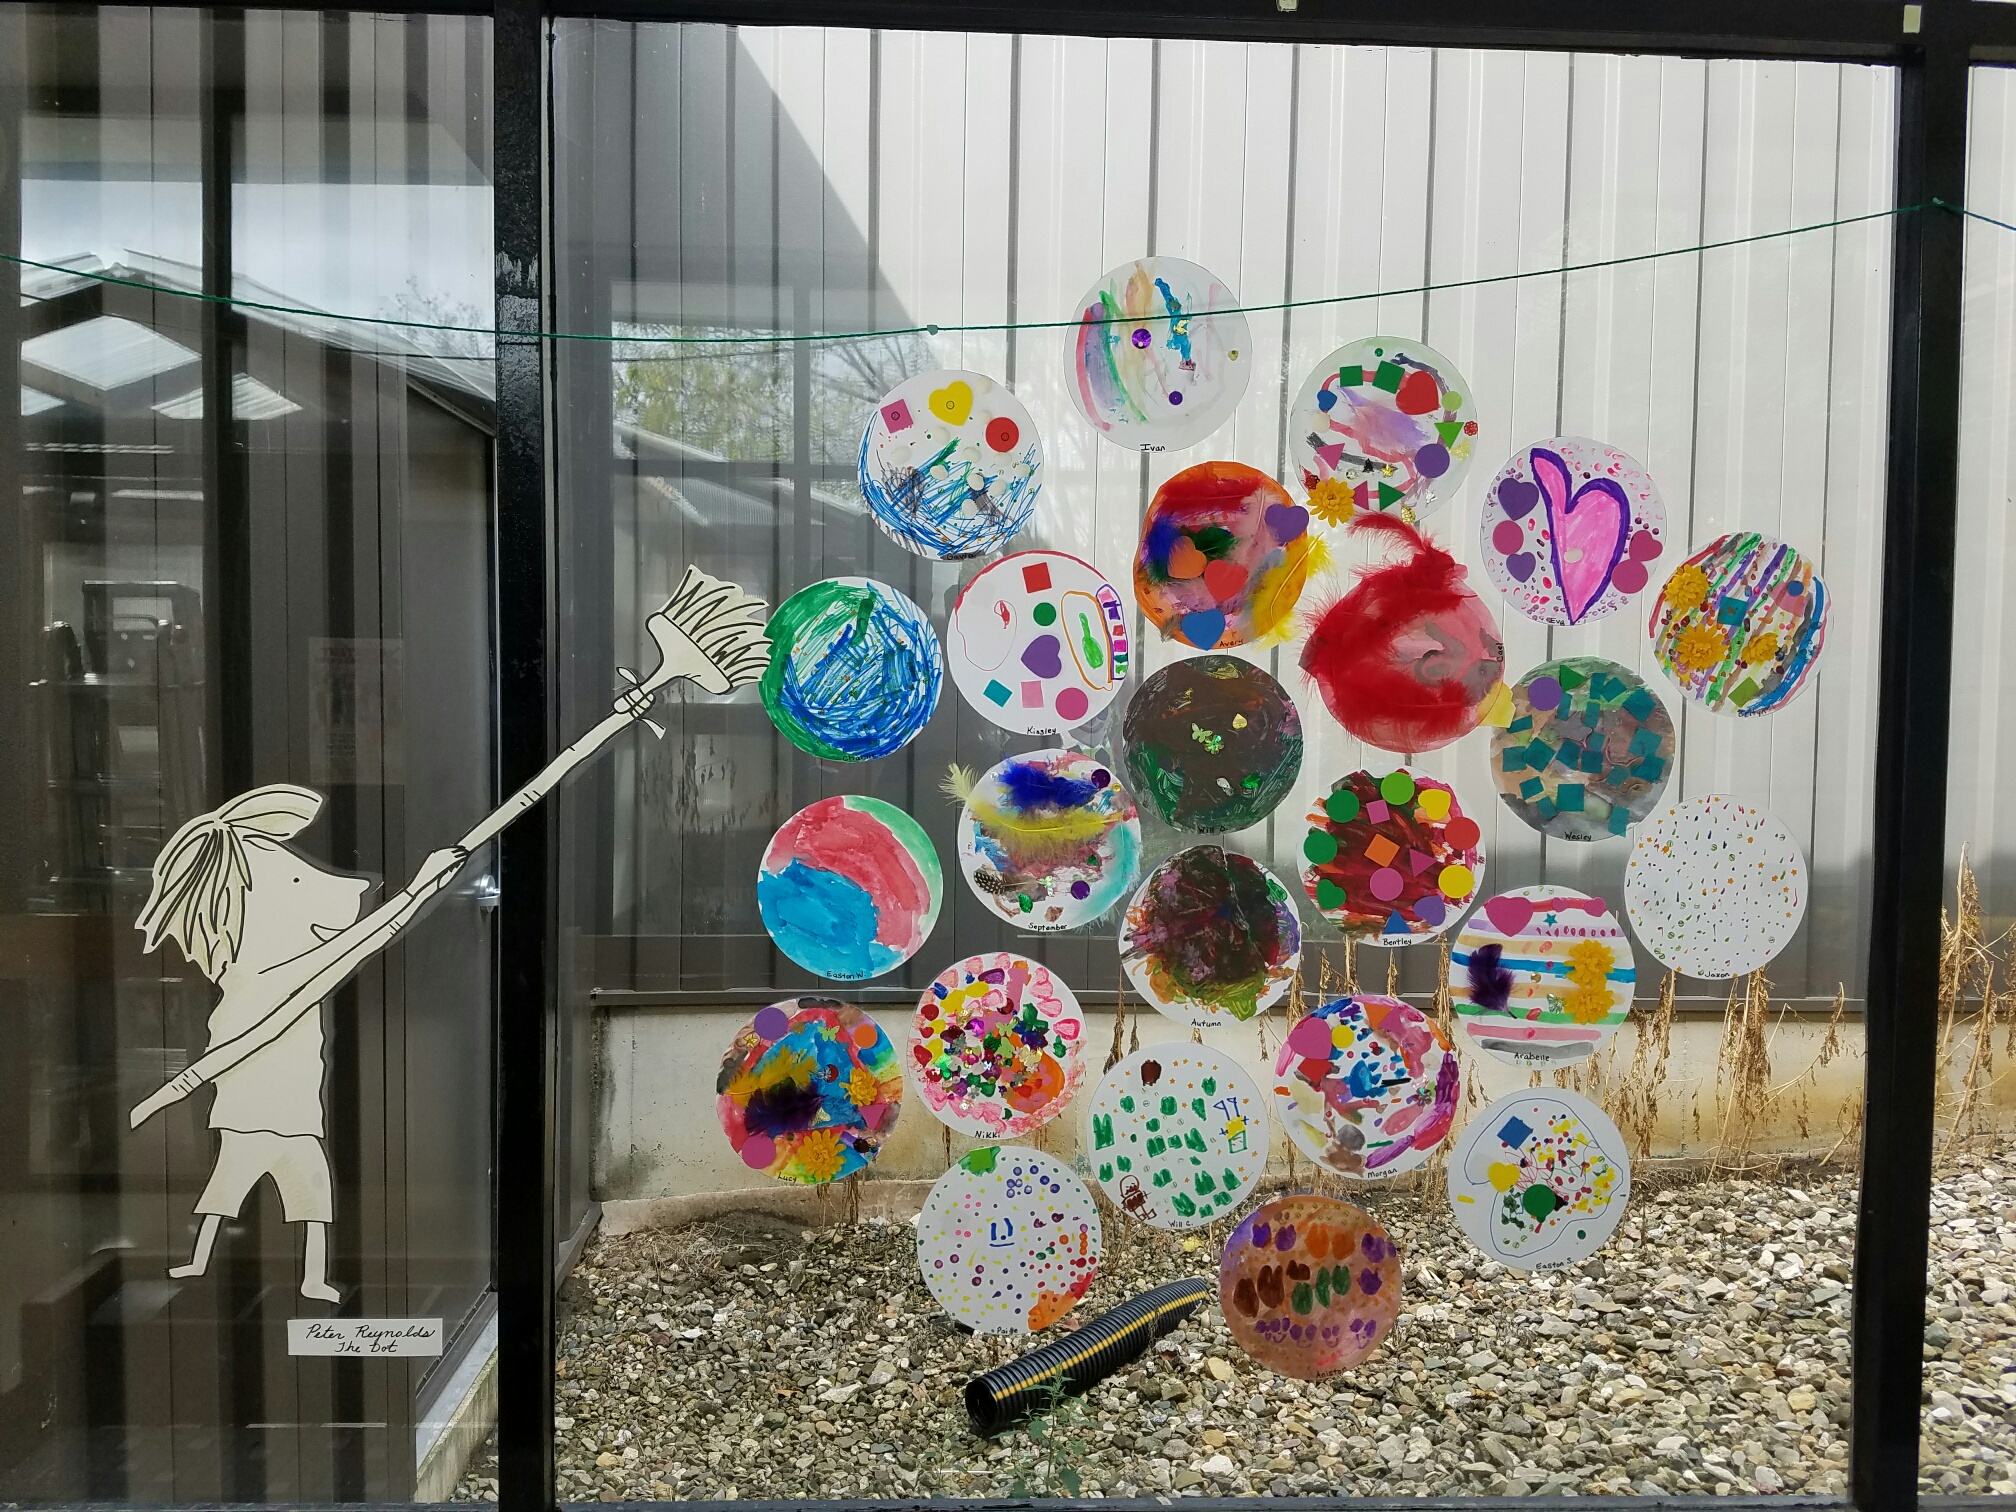
My students love International Dot Day! This celebration is new to them and we may have read The Dot about 20 times! Our students started learning about how special they are and how we are all unique. We brought in families to see how each family dynamic is unique. We also learned about mixing paint colors to make our own dot and tried to cut out a circle. We had fun decorating dots to fill our halls! As a whole elementary school, each student got to decorate coffee filters and hang them in our hallways to fill the windows. It was so beautiful! Our class also explored all of Peter H. Reynolds’ books, one being The Water Princess. We helped raise $50 for Ryan’s Well as we found it shocking that people in our world struggled for water every day.
What was your favorite 2016 International Dot Day moment?
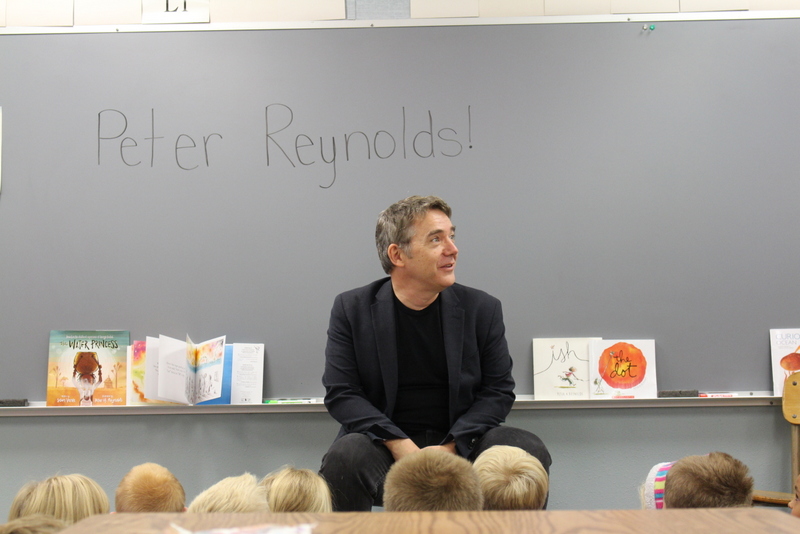
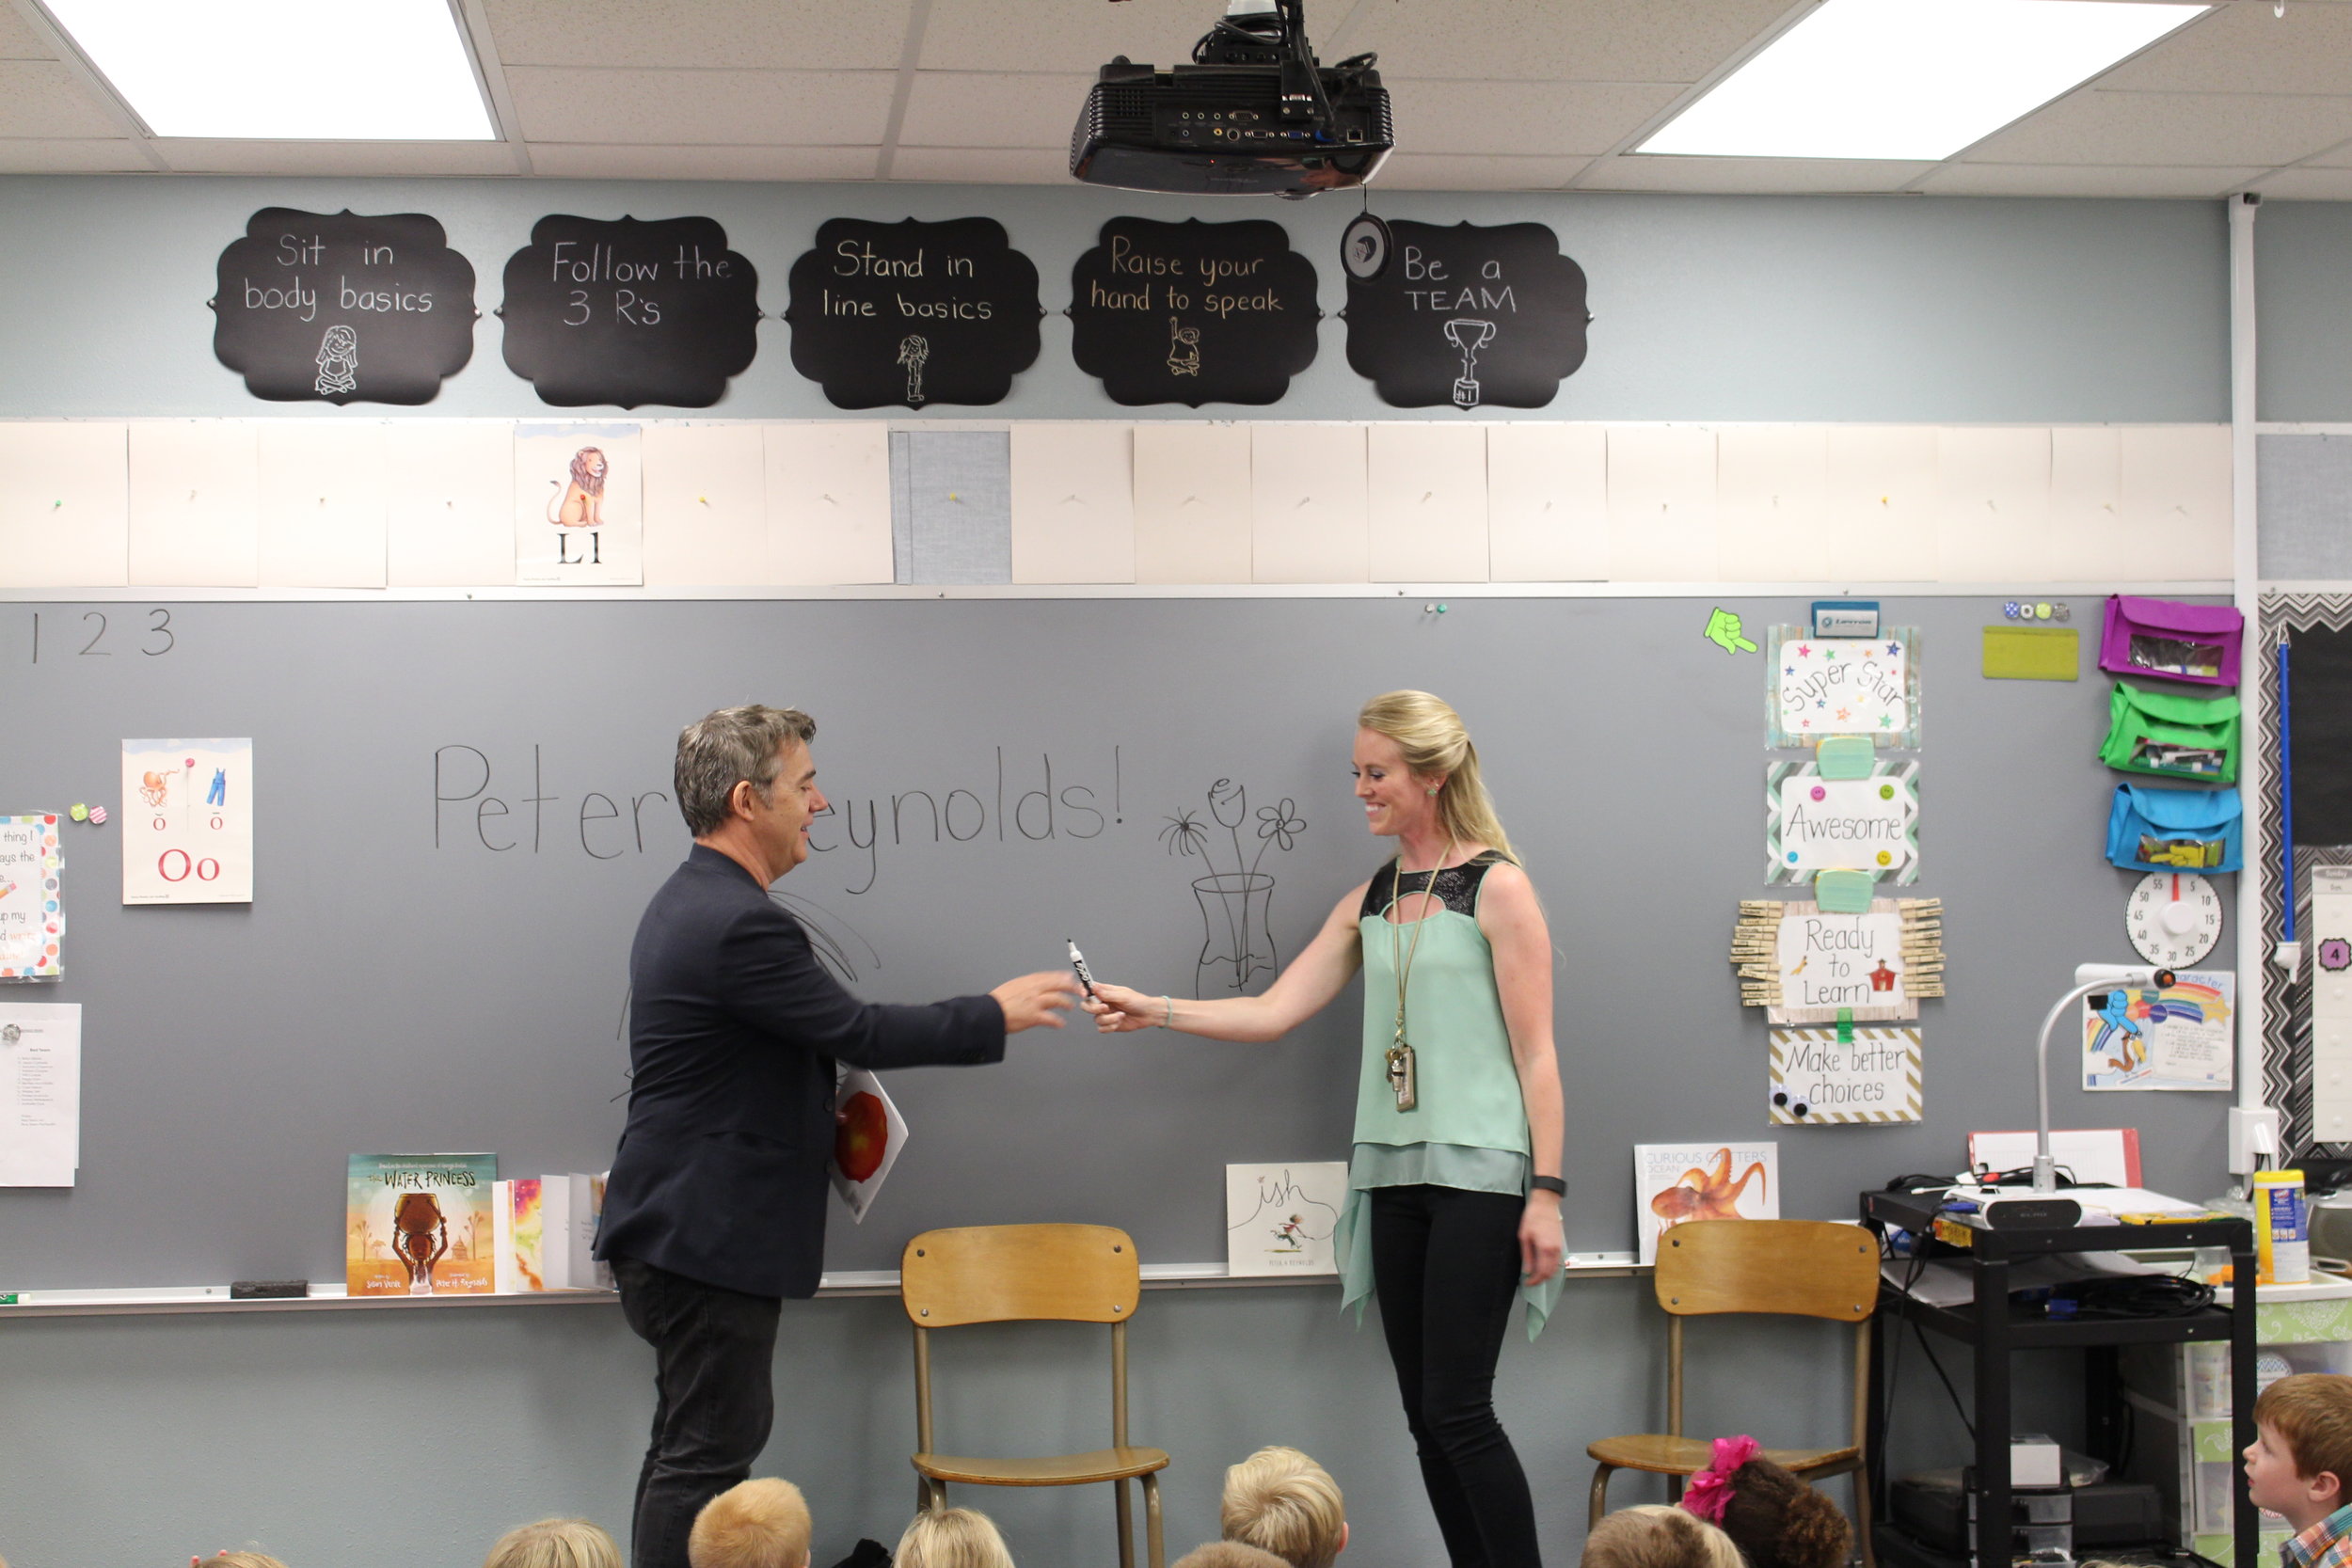
My favorite International Dot Day moment this year was getting Peter H. Reynolds into our classroom to talk to my students. Their faces were glowing! We talked about typical “kindergarten” things, like frogs and other random things. Mr. Reynolds drew us a new idea for a book called “Toad the Artist” because the students got stuck on talking about frogs and toads. We are currently working on creating this book! Peter H. Reynolds inspired a lot of people that day at North Tama.

What has been your favorite moment as a teacher?
My favorite moment as a teacher is working with the kids. I love our Daily 5 centers because I get time to work with the kids on learning individual skills, making books, and writing letters that the kids want to create. We have also extended chapter books and had lots of fun together doing that!
You are new to the league of FableVision Ambassadors. What are you looking forward to?
I am always looking to learn! I am anxious to explore everything and to use what I learn with my kindergarten students. Always up for new things!
Are YOU – or someone you know - activating any of FableVision’s books, media, and/or software to approach learning in more creative, engaging ways? If you'd like to nominate someone for the FableVision Creative Educator Spotlight, click here and complete your submission electronically.
FableVision Learning’s Teacher Spotlight: John Long
Let Helping Teachers Develop Students that Learn Through Creating

“My classroom is a bit large these days,” explains John Long, technology program specialist in the Department of Educational Technology for the School District of Palm Beach County. “It involves working with several hundred teachers and thousands of students at about 30 schools a year…I like to consider myself a digital learning architect at any of the 183 schools in Palm Beach County. My role involves designing professional development for the schools and implementing professional learning communities for integrating technology embedded into the curriculum.”
John recently chatted with FableVision Learning about his unique method of integrating technology into the curriculum, his work with programs like Animation-ish and Fab@School Maker Studio, and plans for Dot Day! If you are curious about what he is up to in the classroom, follow John on Twitter: @adigitallearner
Can you share a bit about your creative teaching style?
I focus on coaching, modeling, curriculum design, and creating professional learning networks for educators. I believe it is important for students to create based on their learning instead of constantly consuming content and having to be assessed on it.
I started years ago training in educational technology on how to use programs but they never seemed to understand how to use it in their classrooms. Over the years I changed my methods to include ongoing professional development with time to implement and receive feedback. Then took the professional development into the classrooms and talked with teachers, librarians, administrators, and parents. I researched their standards and curriculum. I have built quite a community of teachers over the past 20 years and decided to head back into the classroom to work directly with teachers and students on integrating. This was the key to getting teachers comfortable with using technology into their curriculum.
The first emphasis was to focus on teaching and learning. It is hard for teachers to see this because they focus on the “wow” or “cool” factor and it is more show and tell and not about learning from technology. The second focus is to design a project where the teacher is comfortable enough to watch and learn. Teachers are still learners too. Focusing on a core set of apps or tools that allow students to create projects. Once teachers get comfortable they turn it over to them and observe and give feedback. Each project and class is different so the learning never stops. This process is my methodology in a nutshell.
You have created a fantastic collection of videos that show how Animation-ish can be used in the classroom. Can you tell us about the subject of some of these videos and the inspiration behind them?

I believe in developing a core set of apps or tools to work with in the classroom and then supplement with more tools based on grade level and subject area. The core set of apps should be used in grades Kindergarten through 12th grade. One of my apps in that core set is an animation app. Animation allows students to design and draw concepts that they have learned and demonstrate that learning. It allows them to synthesize and apply the learning. I learned about Animation-ish back in 2009 talking with a dear friend, Dr. Peggy Healy Stearns. I started to see all kinds of uses in Science but also in language arts. One of my first projects was to create a animated dictionary of words. Here is a great example of this in action..
Animation-ish is great in Science. Using it to document things like the water-cycle, or the butterfly life cycle, and even things like cell mitosis. This got me thinking of another project creating digital student portfolios in iBooks Author or now Book Creator. Students can create e-book portfolios by recreating through word processing, video, pictures, or animation using Animation-ish. I started working with a biology teacher and a fifth grade teacher to design these projects. This is an ongoing project that keeps evolving over the years.

A few years ago, a librarian colleague of mine shared with me her fairytale project, which was part of the second grade curriculum. I got to thinking about making it digital and letting students create a digital fairytale. The premise was to start with writing a fairytale including the characteristics then let the students animate the project. Since it is electronic, let the students read their passage with the animation and create an e-book to share. I decided that I would become the story wizard and began to dress the part. This is a fun and challenging project. We have now completed three digital fairytales. One of the favorite parts of the projects is the students learning how to use Animation-ish. You can see how the project is implemented below.
After we did the second digital fairytale, I thought wouldn’t it be interesting to try a digital mystery and what would that look like? In the digital mystery, I became the digital sleuth to guide them through creating a digital mystery. How do you create a mystery, you have to start with the ending first. Then you need to develop four or five clues guiding the students to veer away from inappropriate types of mysteries. Once you have the ending and the clues decided, you start from the beginning and guide them through creating the story including the clues. You have to keep them focused on the clues, the characteristics, and the ending as they forget and need reminding. You even have to narrow the focus of some of your most “creatives” in the class. Then they can start to use Animation-ish to create their scenes. It was a most rewarding experience with students thanking me. Check out the video with student and teacher feedback.
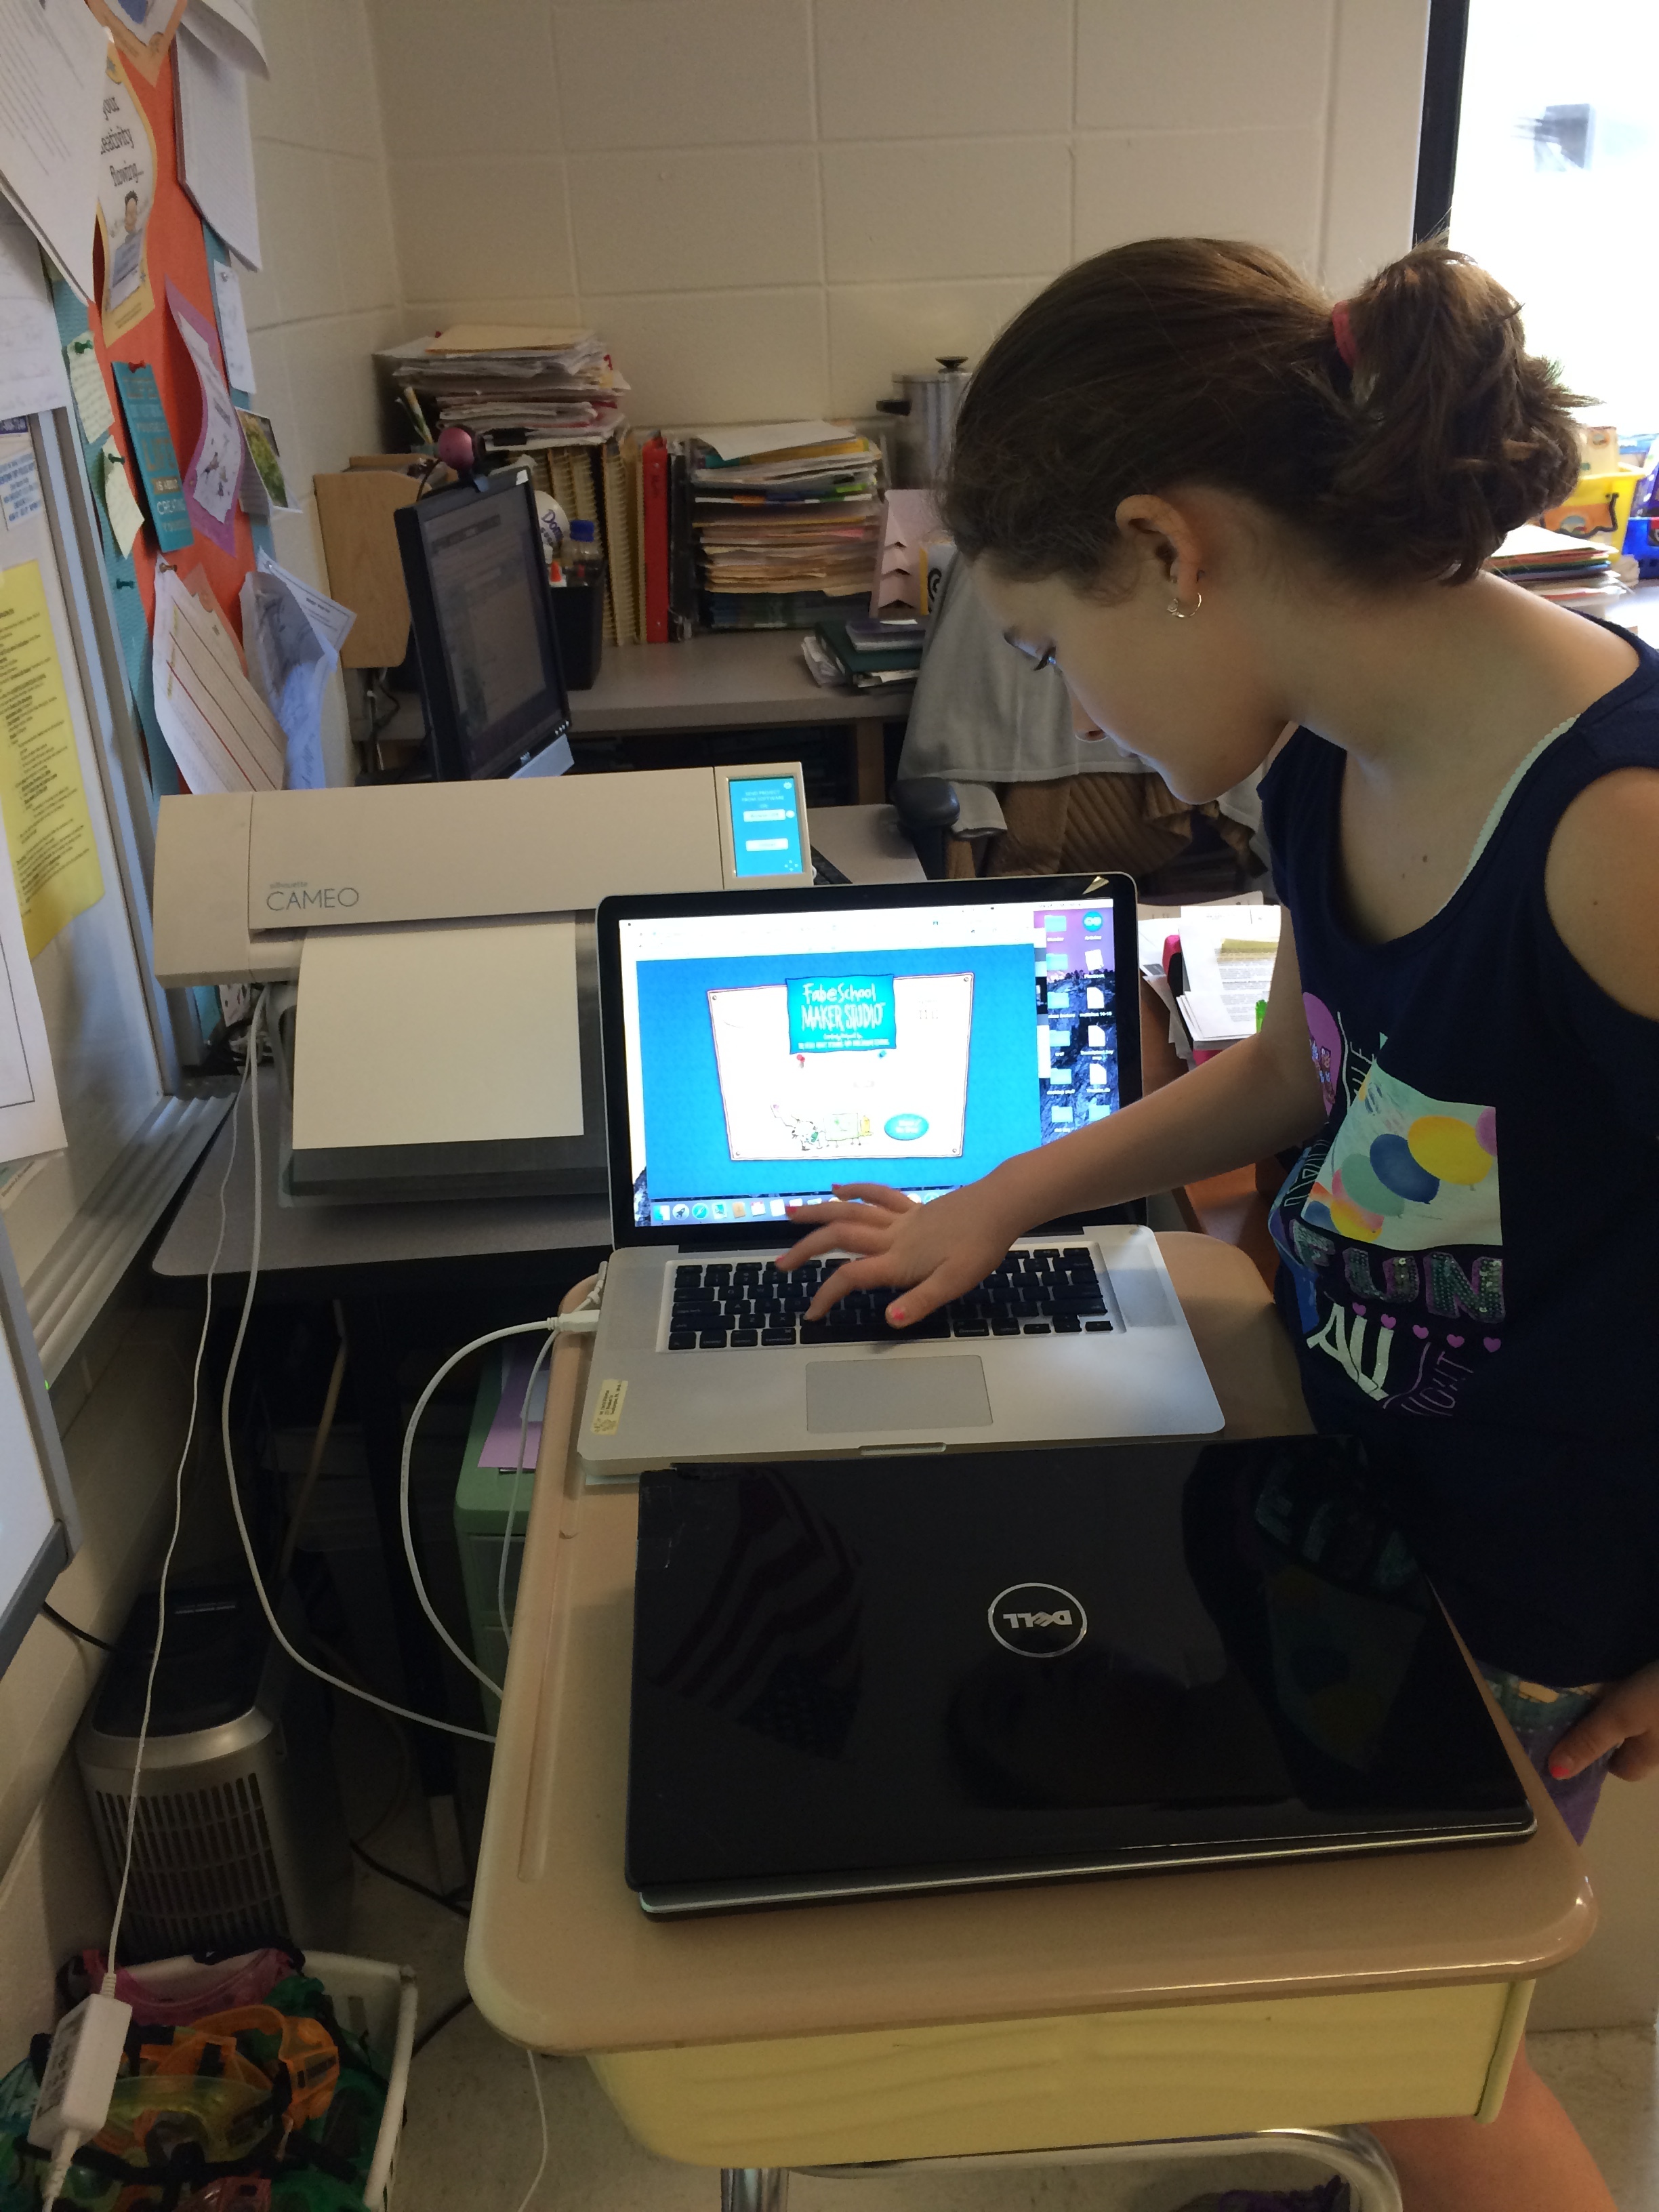
Do you have any cool Fab@School Maker Studio stories to share?
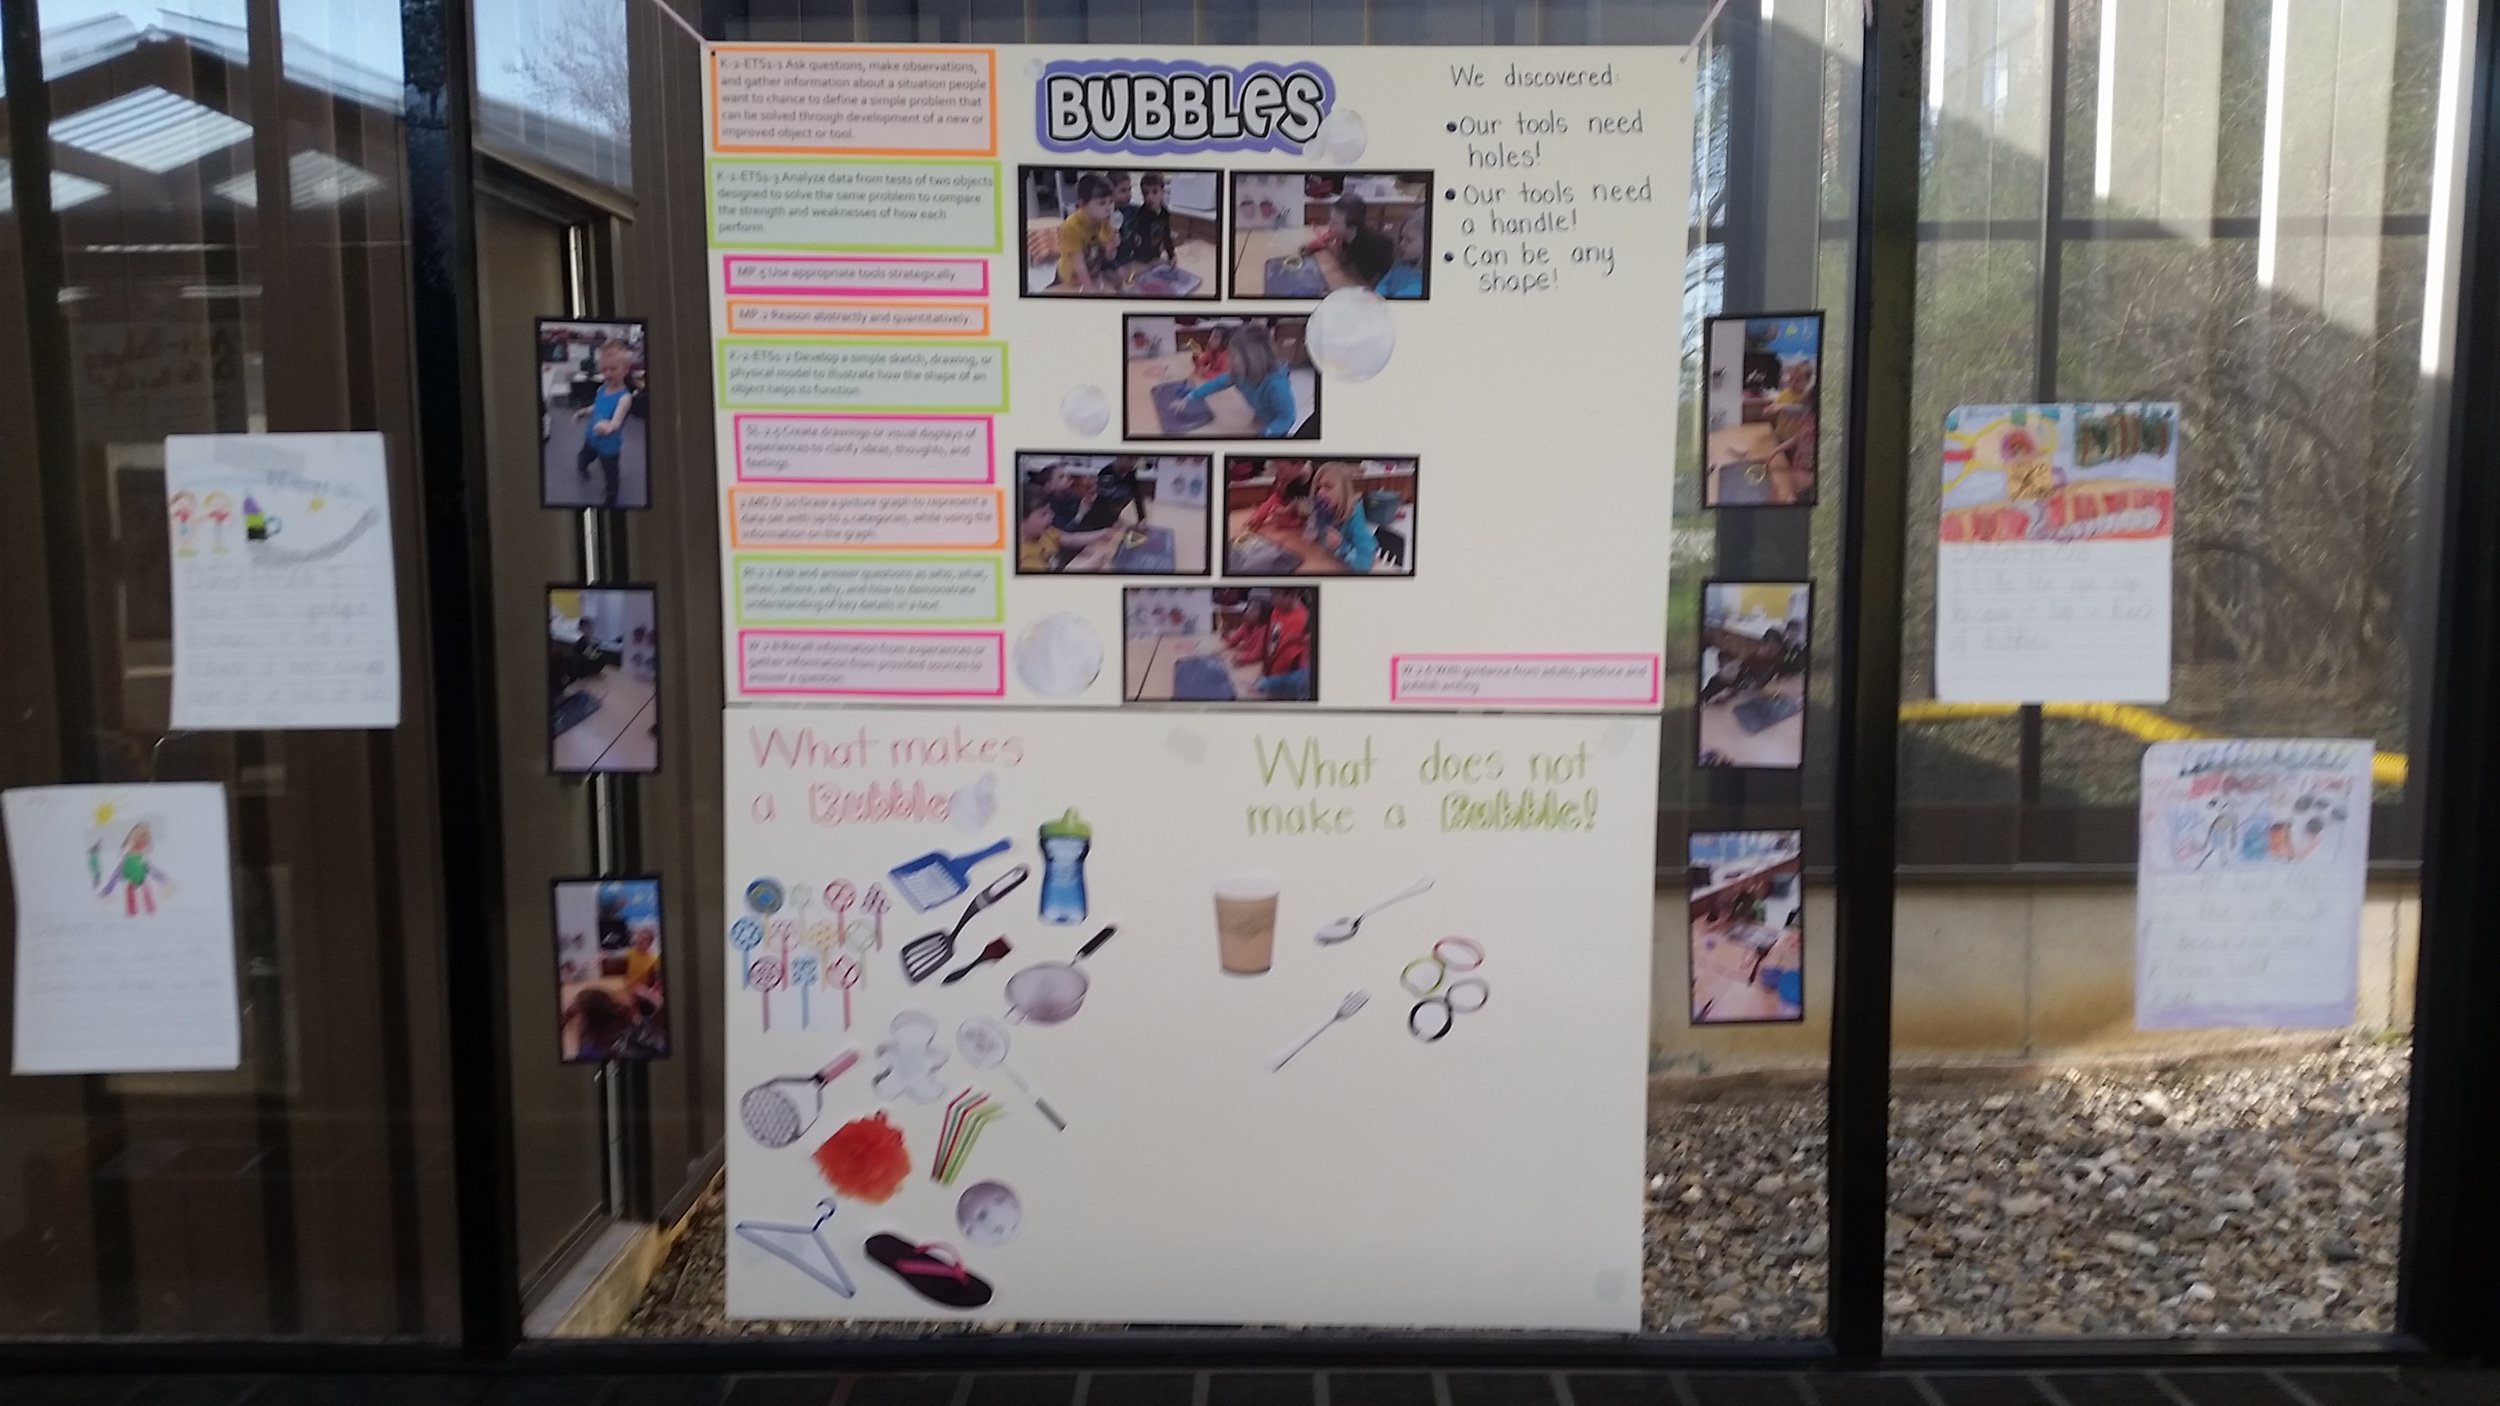
I have followed the development of Fab@School Maker Studio for 6 years since Dr. Peggy Healy Stearns showed it to me in Denver, CO at the 2010 ISTE conference. I was so excited to see this product was the missing key to teaching STEAM in the classrooms. I first used (Fab@School Maker Studio) a few years ago to design a jack-o'-lantern with an electric circuit with fifth graders and now use it with other groups. It is perfect to build something and teach. I always refer back to the literacy aspect as most schools need to still focus and that is the hook to using it.
We are just getting started in Palm Beach County and with all large districts, it takes time but as the video below will show - we are Going Places...
You love to find creative ways to mark International Dot Day. What has been your favorite celebration and what do you have planned for this year?
Terry Shay challenged me at 2013 ISTE in San Antonio, Texas to bring International Dot Day to Palm Beach County. This is a big task due to the nature of a large district with over 13,000 teachers and 187,000 students.
I am sure that some teachers in this district celebrated International Dot Day way before I brought it up. I had heard about it but never really did it. So, I decided to take him up on his challenge. I went back home and discussed with my supervisors and they agreed to support it. It took six weeks to approve it and it finally became a bulletin, which is how information is officially communicated to the schools.
The first year was a test and I developed some ideas to support International Dot Day. I came up with the basic illustrations and language arts activities. I even came up with the idea to create the first “Dot”cumentary to share how people use it in their classrooms. The first year was definitely a trial run. After the first year, I spent a whole year thinking of new ways to develop ideas for the next year. It is truly a yearlong process. We have had math teachers, science teachers, art teachers, music teachers, and everything in between participate. I have had librarians use it for teaching digital citizenship about making their digital footprint and leaving their mark. Each summer after school is out, I work on the “Dot”cumentary from that year as a way to gear up for the next year.
2013 “Dot”cumentary
2014 “Dot”cumentary
2015 “Dot”cumentary
In 2014, one of my professional learning networks called eMobilize developed a workshop around The Dot as a way to promote and build projects for International Dot Day. The workshop is called the Excellent Learning Adventure and the premise is to learn to use the iPad with Common Core (aka Florida Standards) to help students make their mark in the world through learning. We conduct the workshop a month before International Dot Day so that teachers become aware and promote creativity.
2015 Excellent Learning Adventure
Each year gets better and better with more people learning about it and innovating. The past school year, I started working with a librarian and art teacher at a middle school. The librarian wanted to do a digital project but didn’t know how to get started and lacked the confidence to try. She works well with the art teacher and she wanted to do something with International Dot Day even though it was January. The art teacher was using Photoshop in their class. I brainstormed with both of them and came up with a project. The art teacher would teach them Photoshop by making backgrounds out of dots. Then I would work with the librarian and art teacher to coach them on how to film their students in front of a green screen talking about “how they will make their mark” in the world. It was amazing what came out of the middle school students.
You can see it here:
Check out his awesome Dot Day ideas for the classroom, here.

FableVision Learning Teacher Spotlight: Maryann Molishus
Maryann Molishus
Maryann Molishus is not just any fifth-grade teacher, she is an advocate for hands-on, experiential learning and a champion for the importance of a positive classroom experience in STEM (science, technology, engineering, and math).
Many students learn to dislike these subjects in elementary school; Maryann is inspiring her students at Goodnoe Elementary School in Newtown, Pennsylvania to love them using Fab@School Maker Studio.
Maryann rallied a few colleagues and three amazing fifth-grade students to apply for a grant from their district’s Council Rock Education Fund to develop a makerspace-type program. With the grant in hand and the support of their principal they were able to get started.
“Our principal gave the OK to purchase a class set of accounts for Fab@School Maker Studio, and it is the perfect fit for elementary students,” she shared. “The last piece, the creativity and collaboration needed to design interesting products, comes from our fantastic students! Our intent is to spend at least this school year learning how the grant materials can best be used by our school population and then put together a program we can share with all our elementary schools.”
Maryann, a FabAwesome FableVision Learning Ambassador, was kind enough to share her and her students’ experiences using Fab@School in their classroom. Read on!

How did you hear about FableVision Learning and then become an ambassador?
In 2004 it seemed that wherever I went I was crossing paths with Peter and Paul Reynolds and the folks at FableVision. In quick succession I heard Peter speak during a virtual author visit with hundreds of students across Pennsylvania, then at a live meet-up in Philadelphia at what was then NECC (now the ISTE Conference), and we had a mutual connection to the Pennsylvania Keystone Technology Integrators Program that had just begun. Soon after I volunteered to be part of Paul Reynolds’s graduate research project, The North Star Virtual Community. I began using The North Star Classroom Program in my classroom and we even did a performance of The North Star Musical Journey with one of my second grade classes. It was some time later that I connected with the amazing Terry Shay and the ambassador program and began participating in fun events such as International Dot Day.
Tell us a bit about your classroom and what the students are working on.
Creativity and collaboration at work!
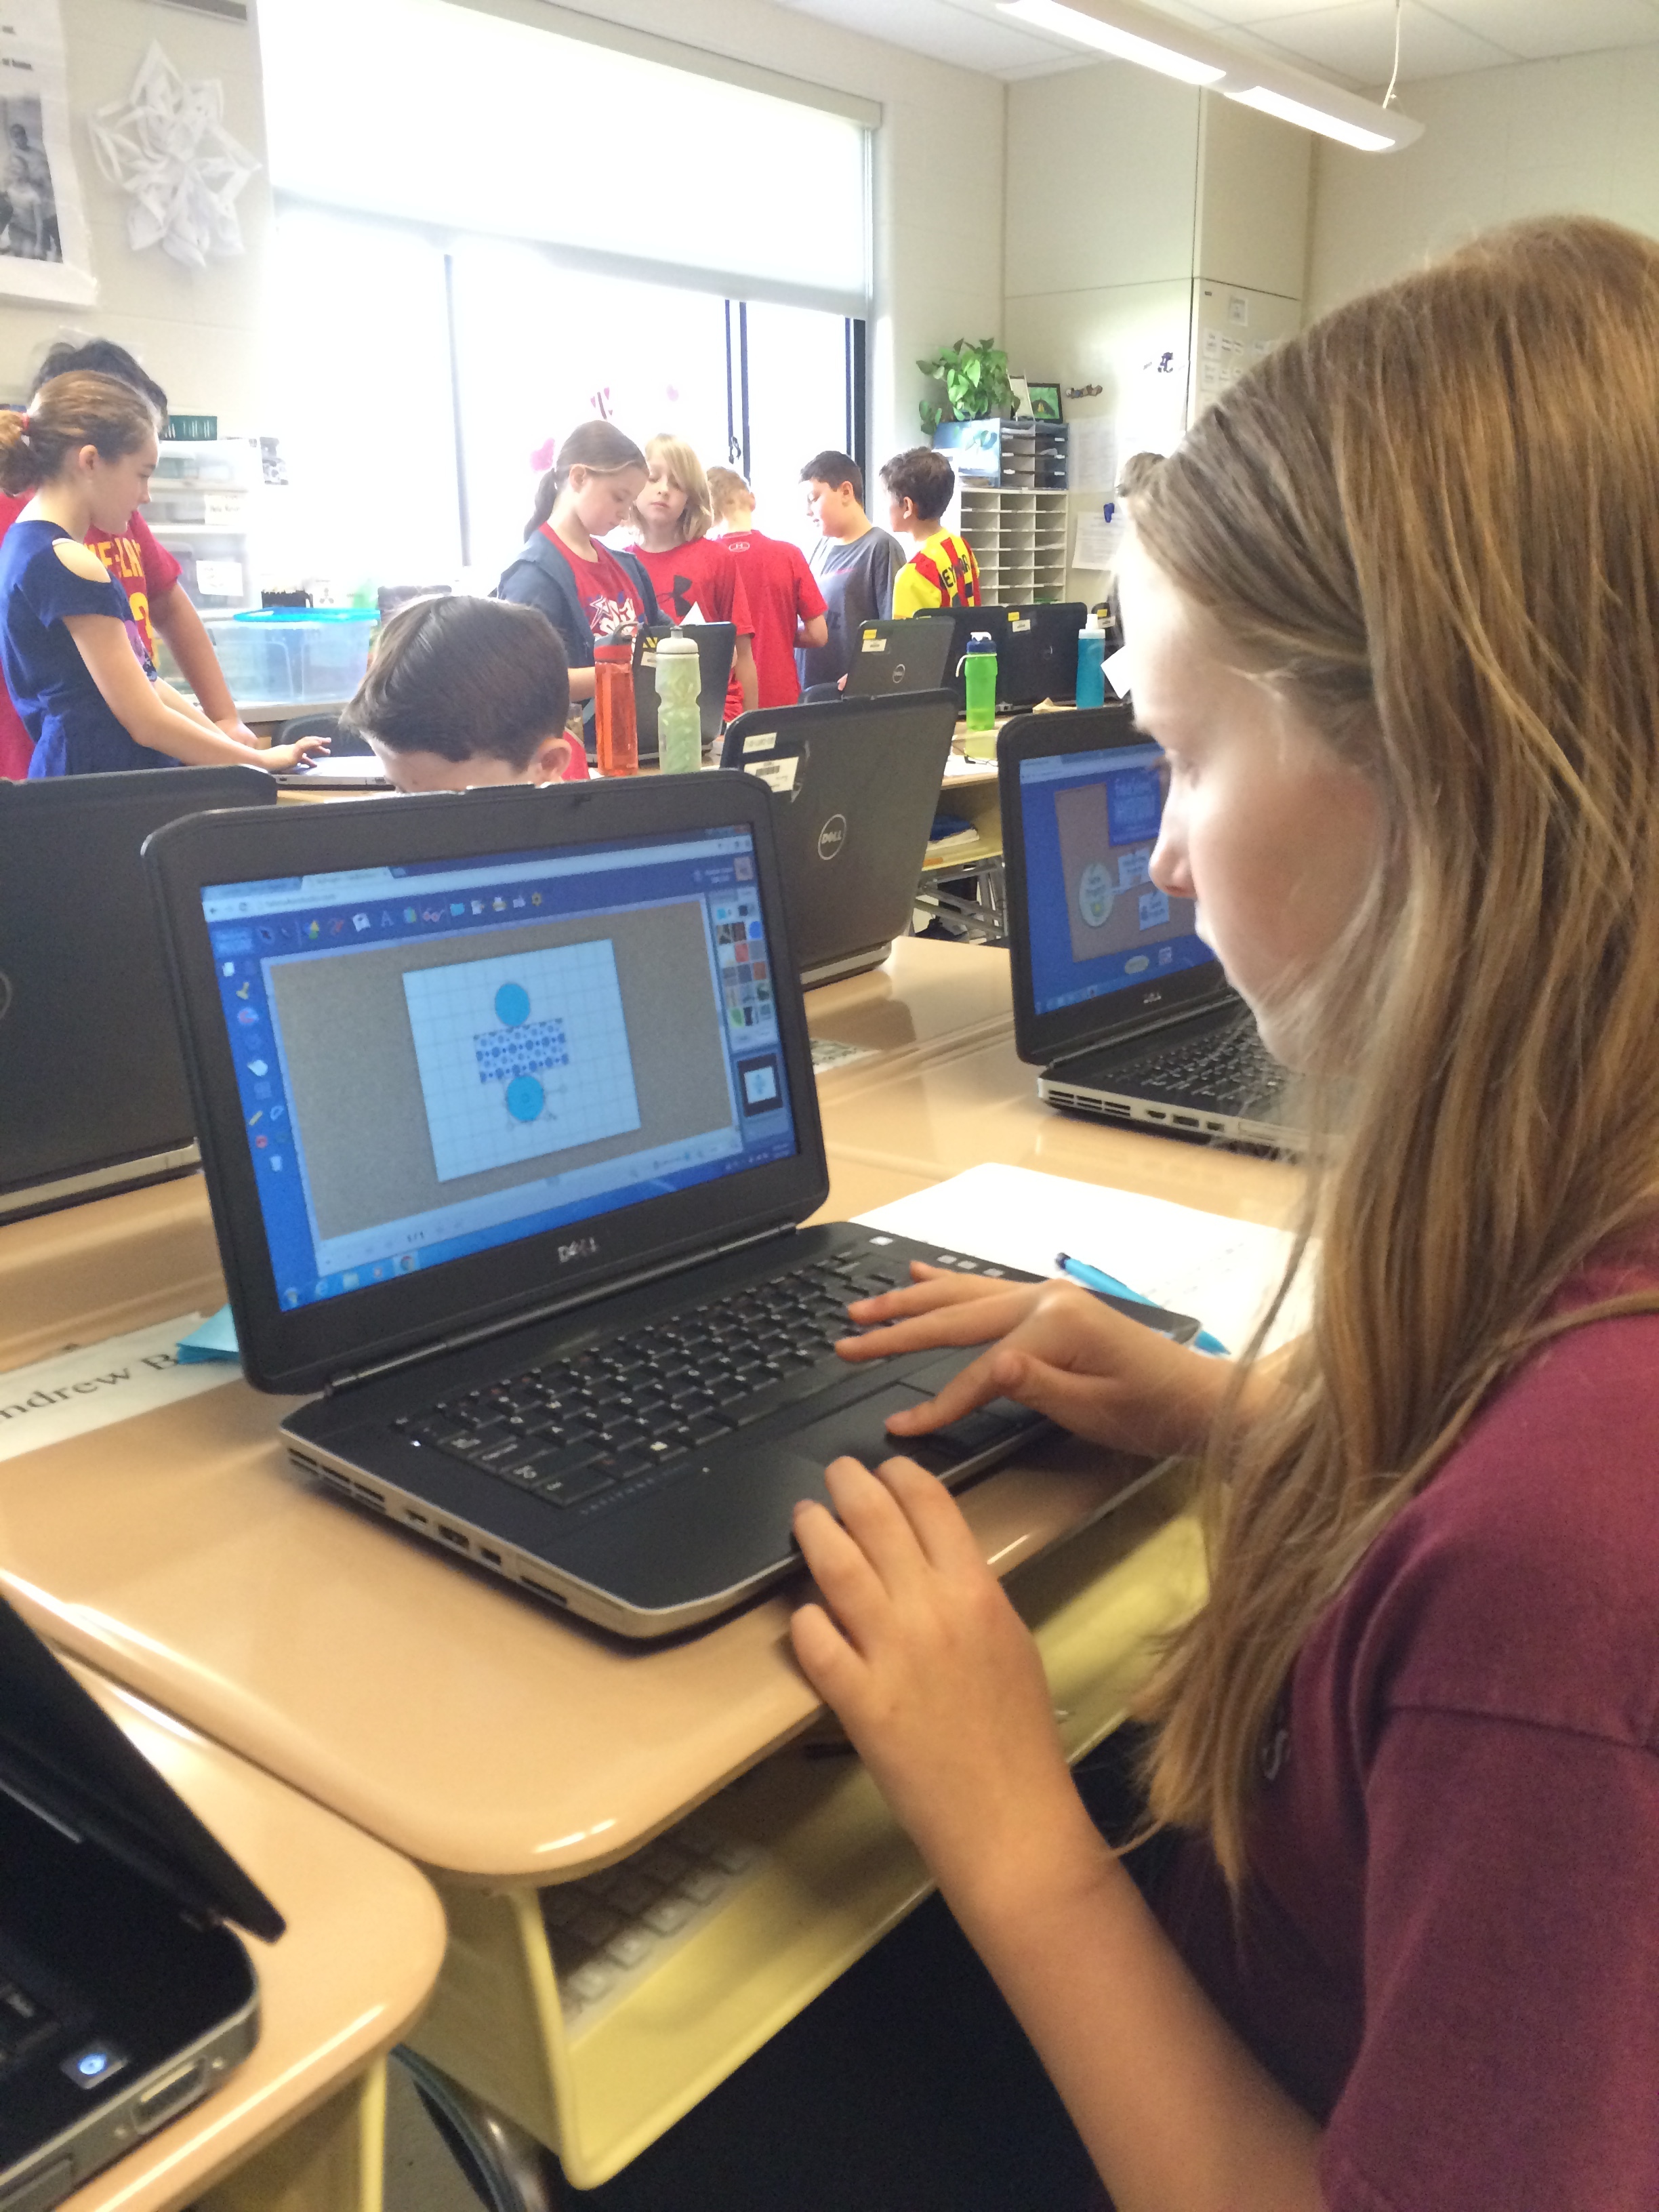
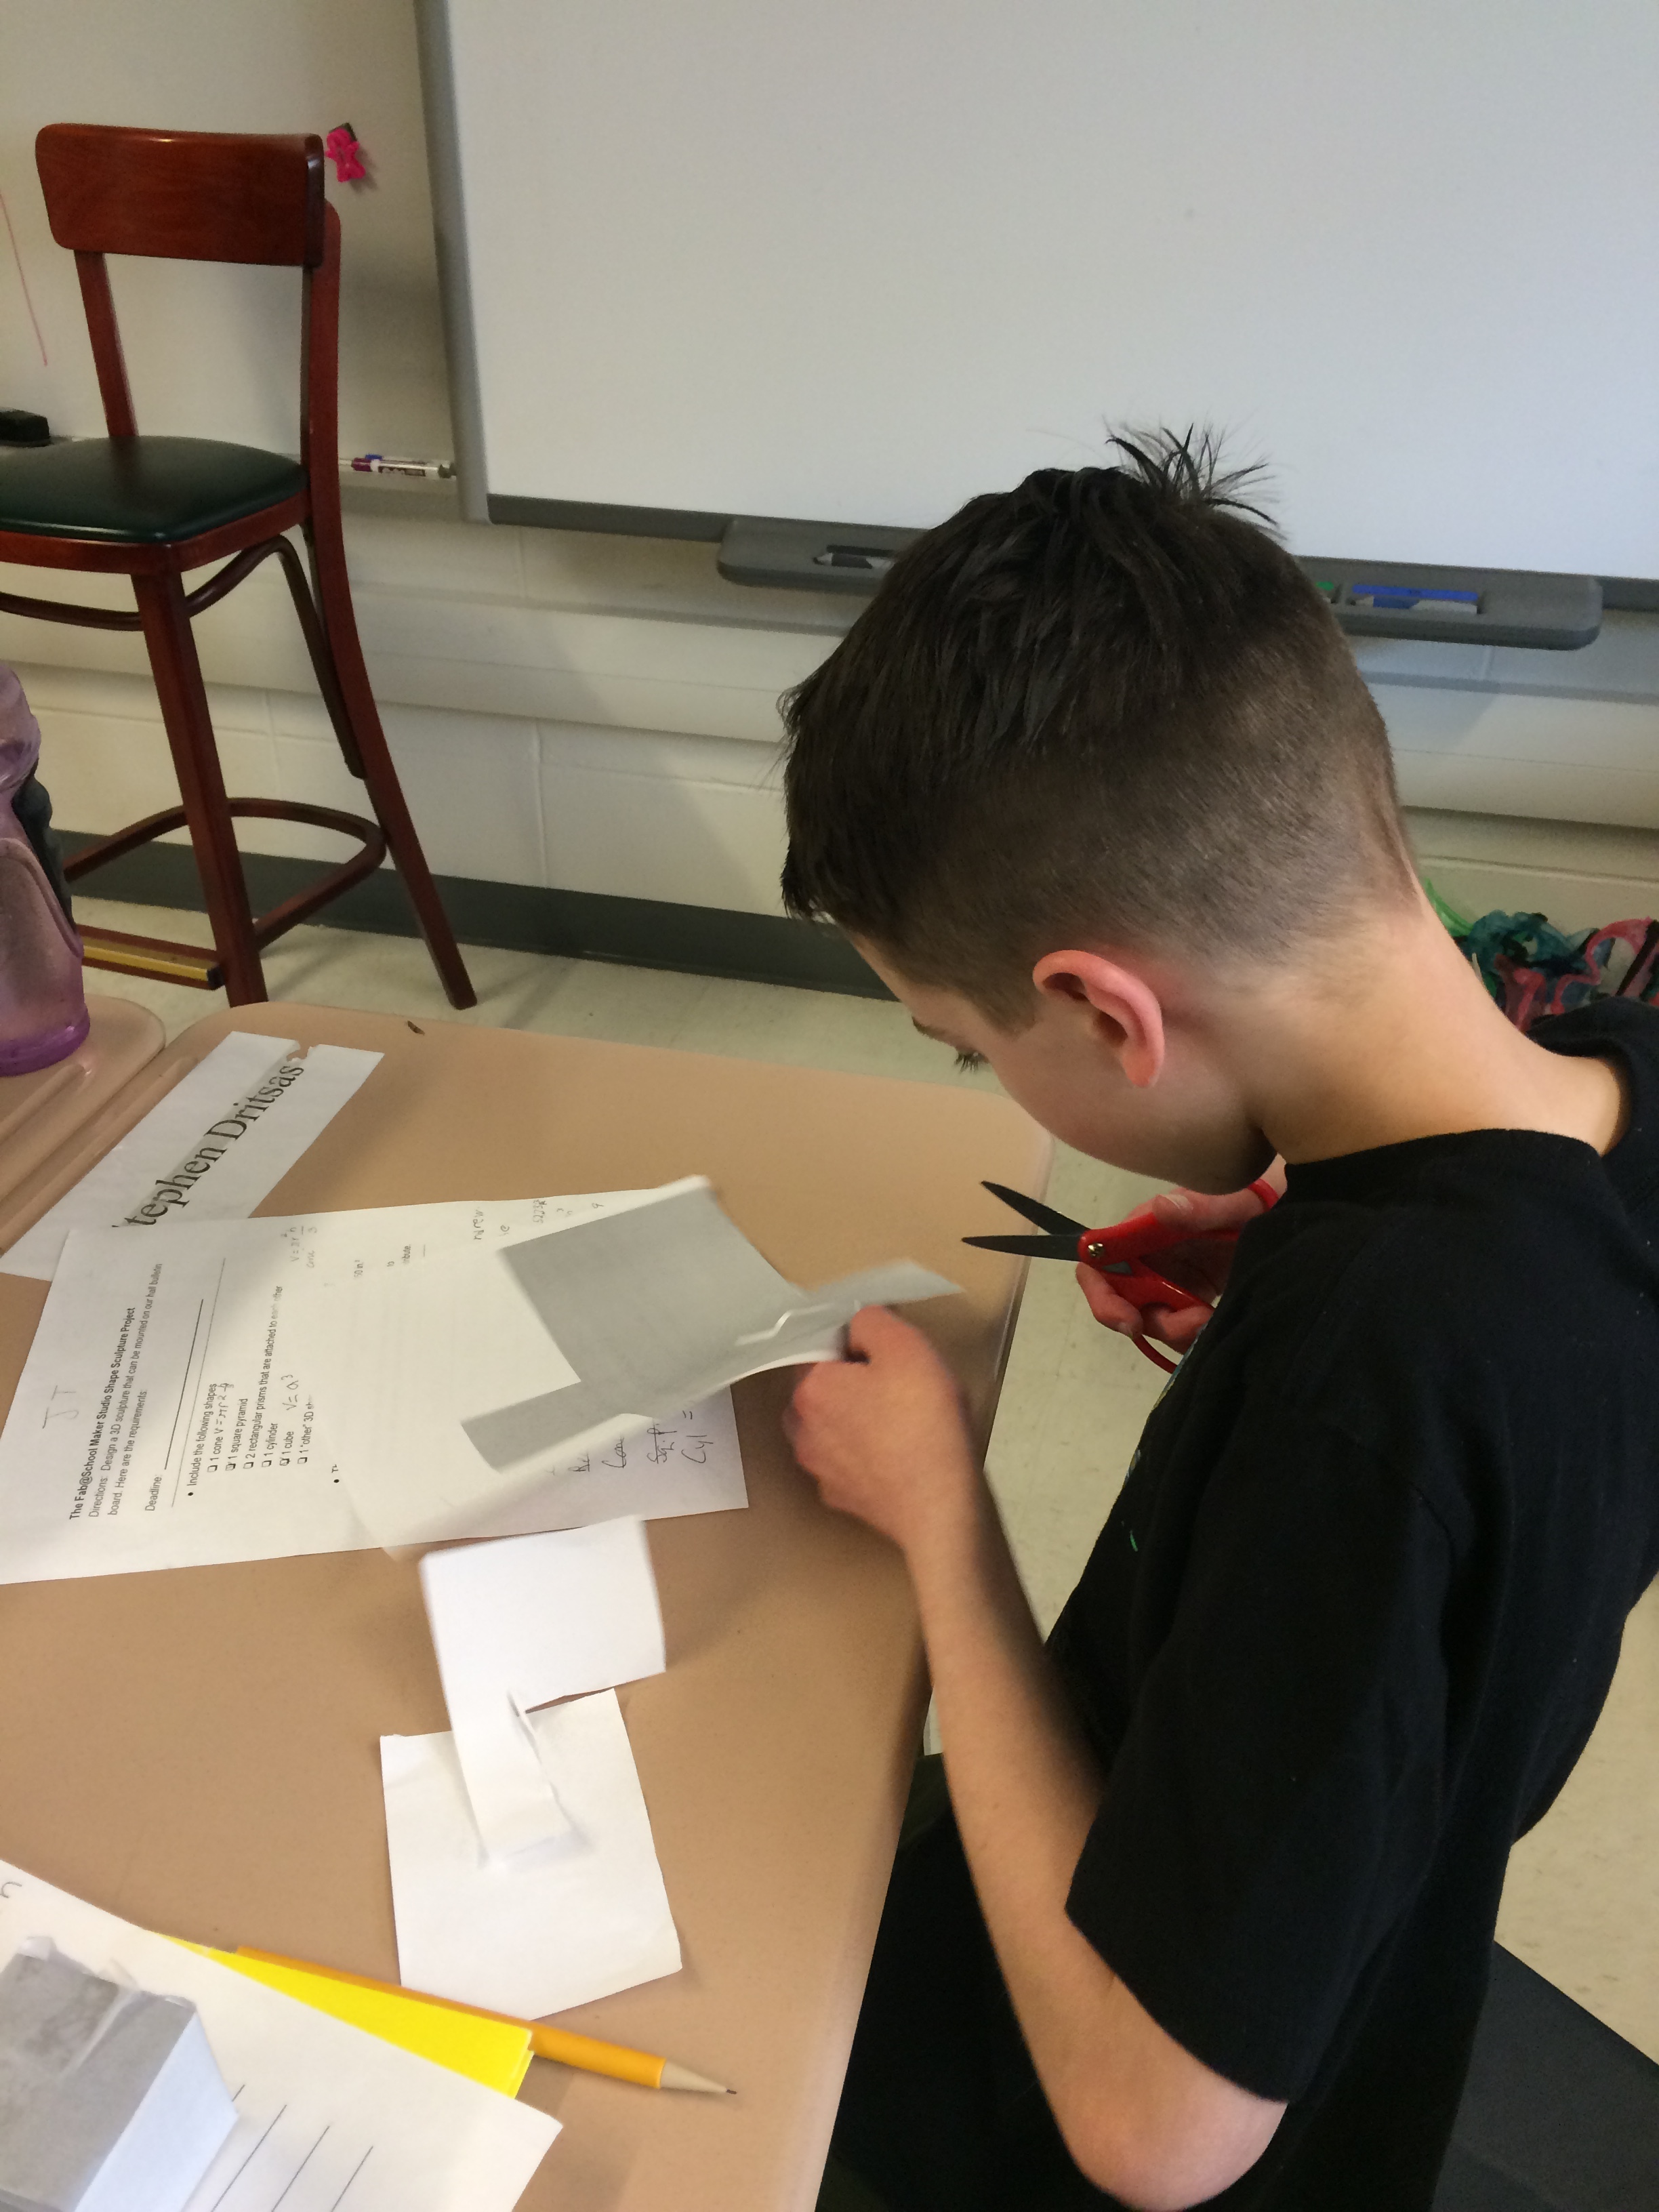
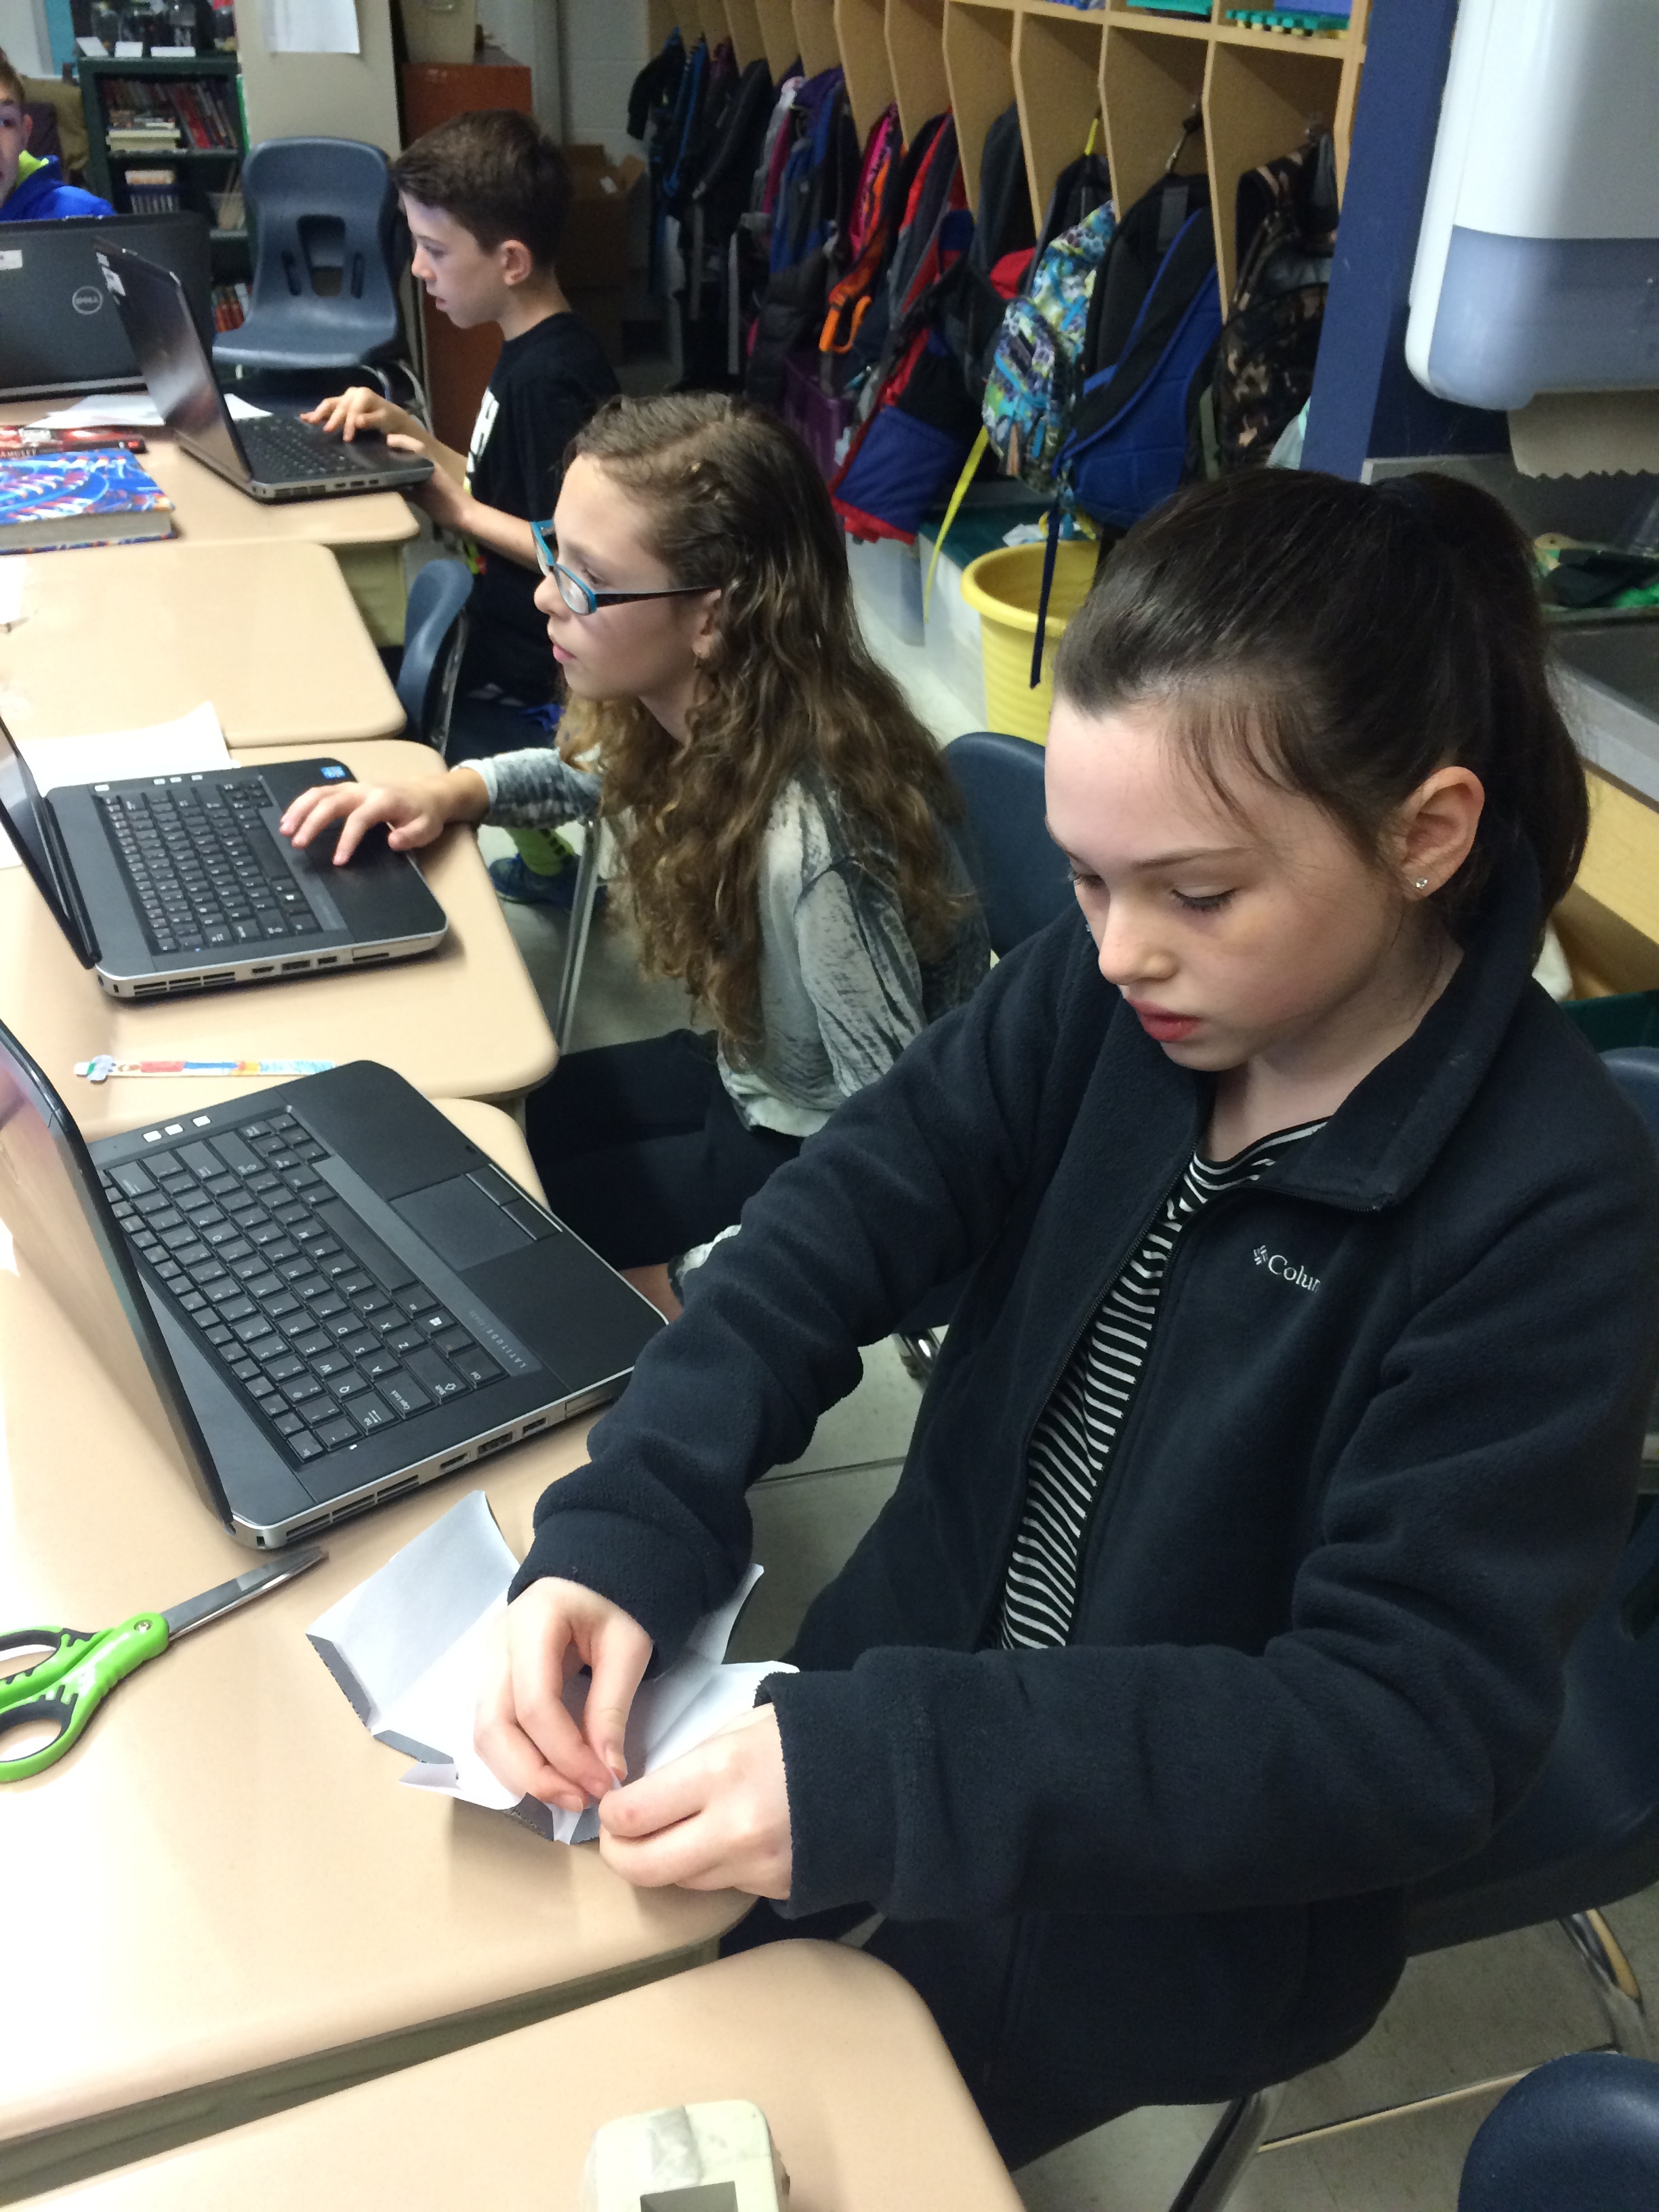
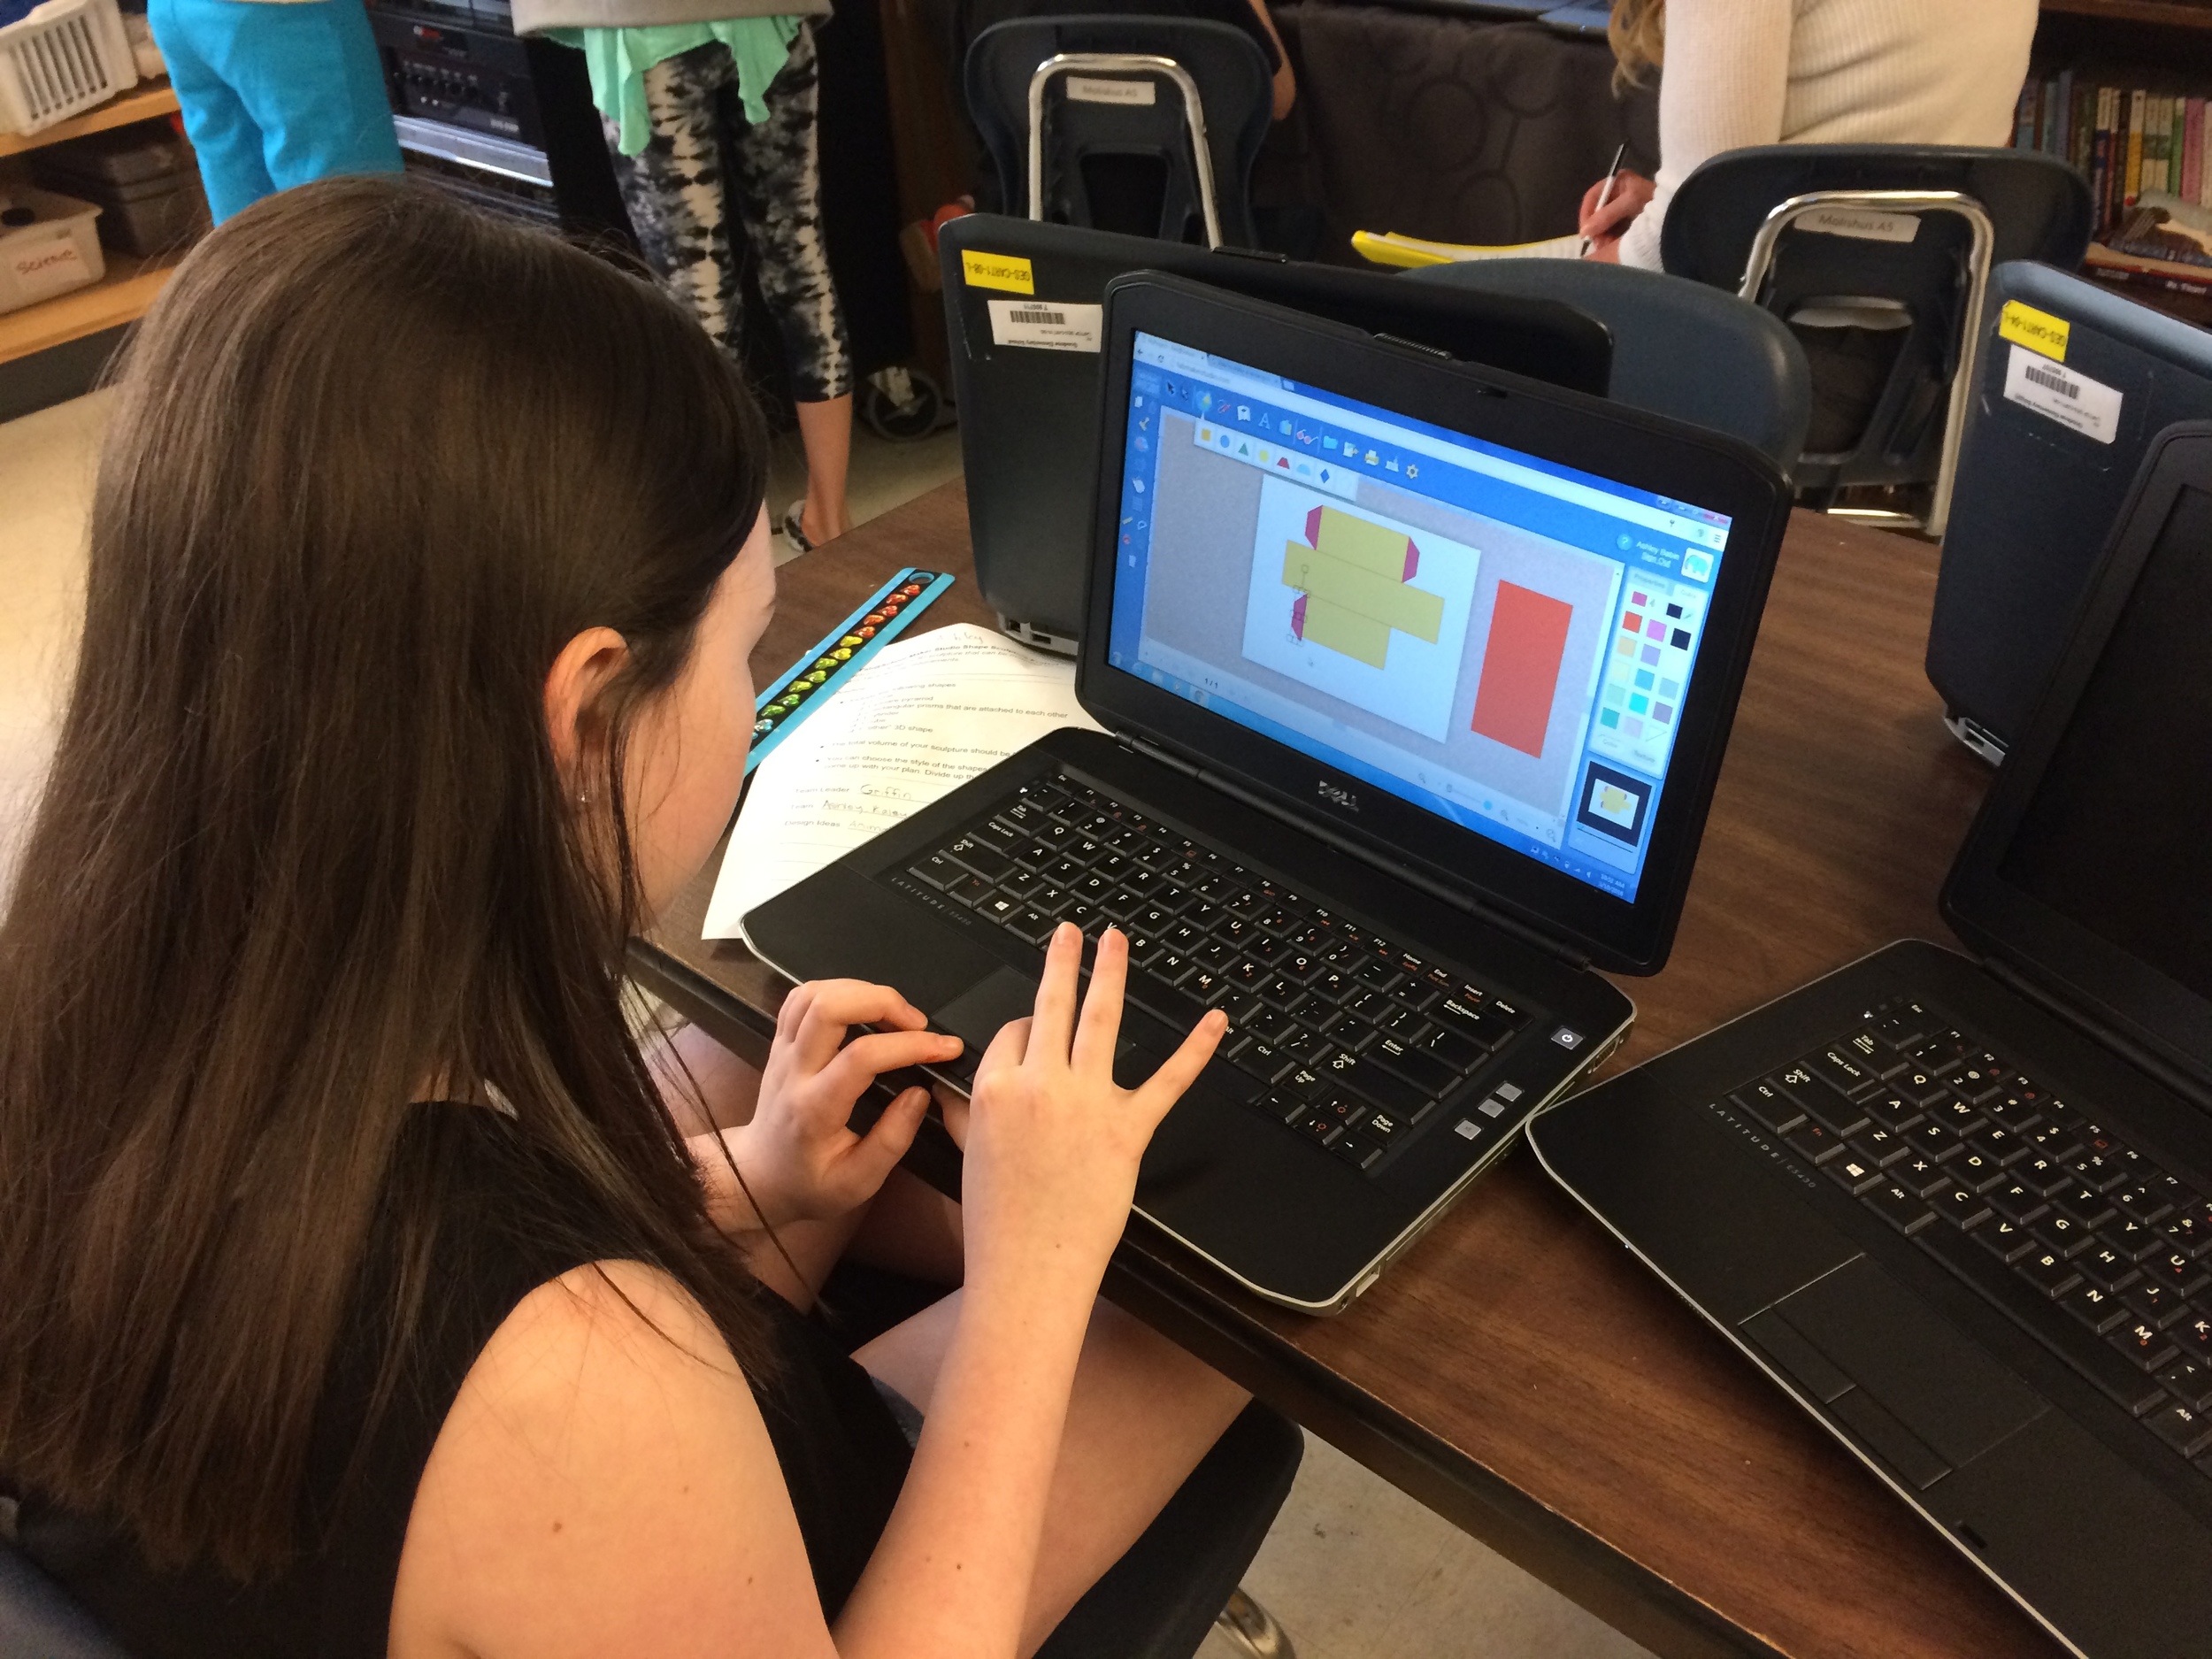
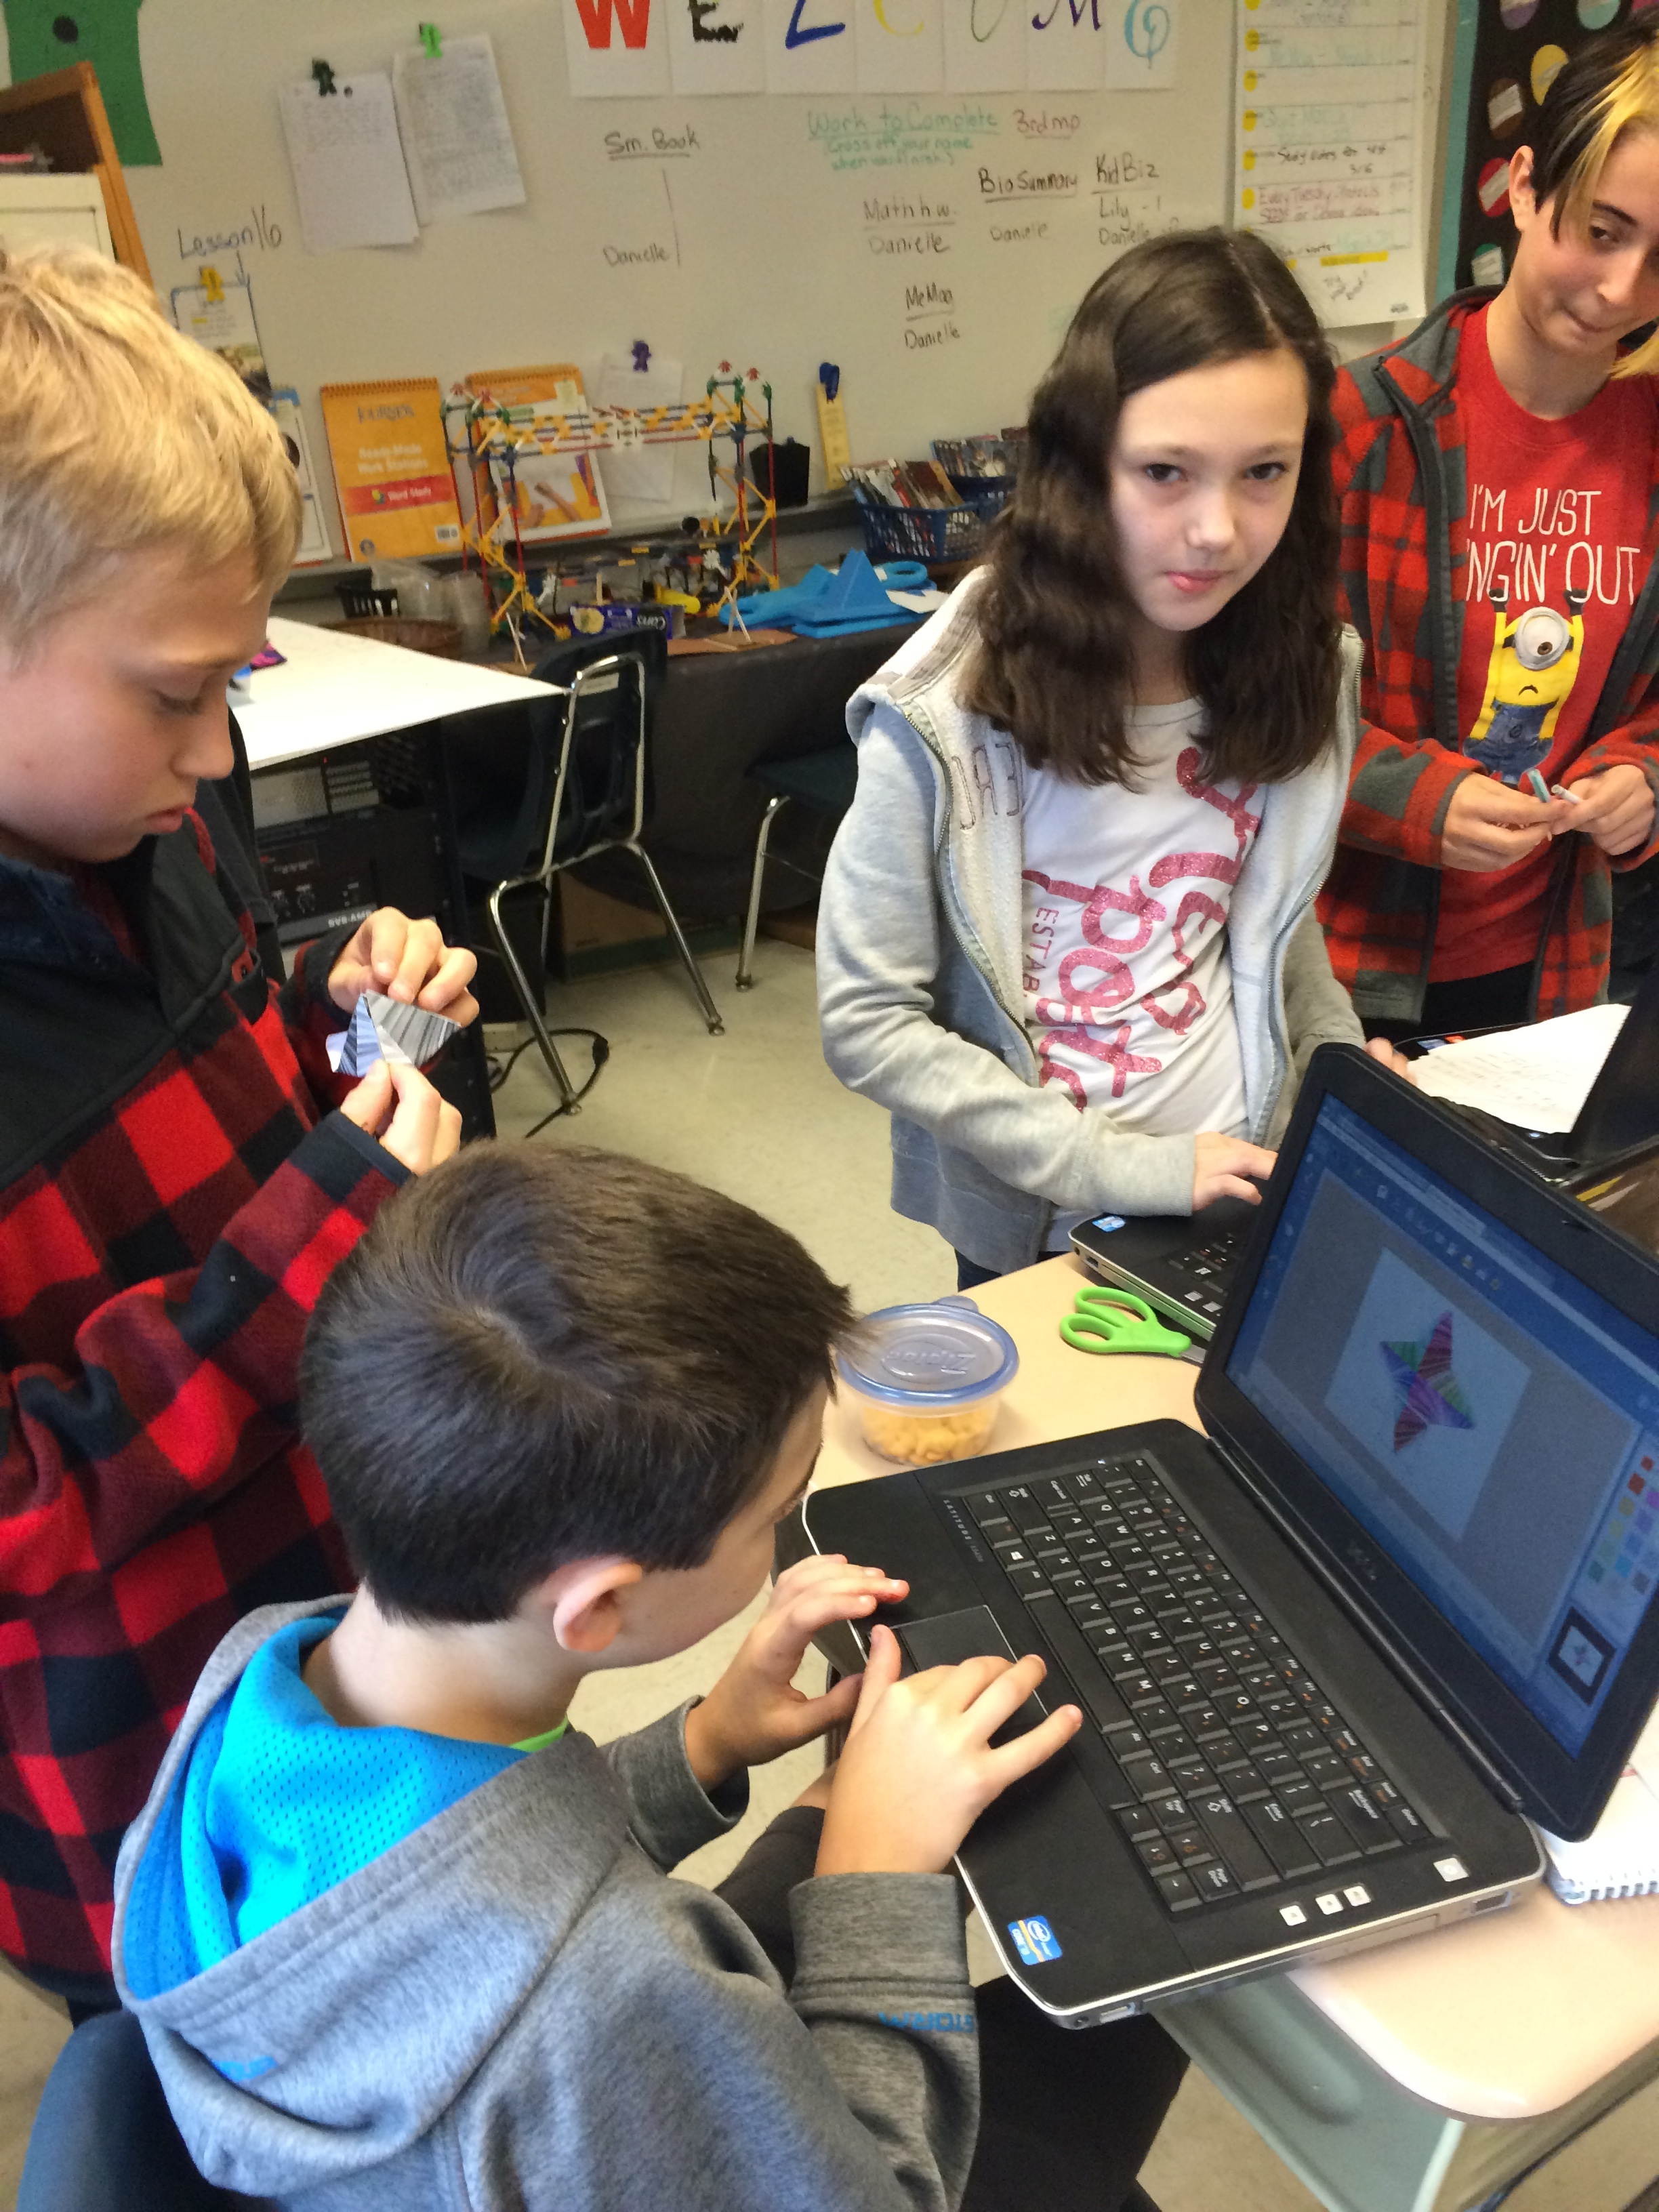
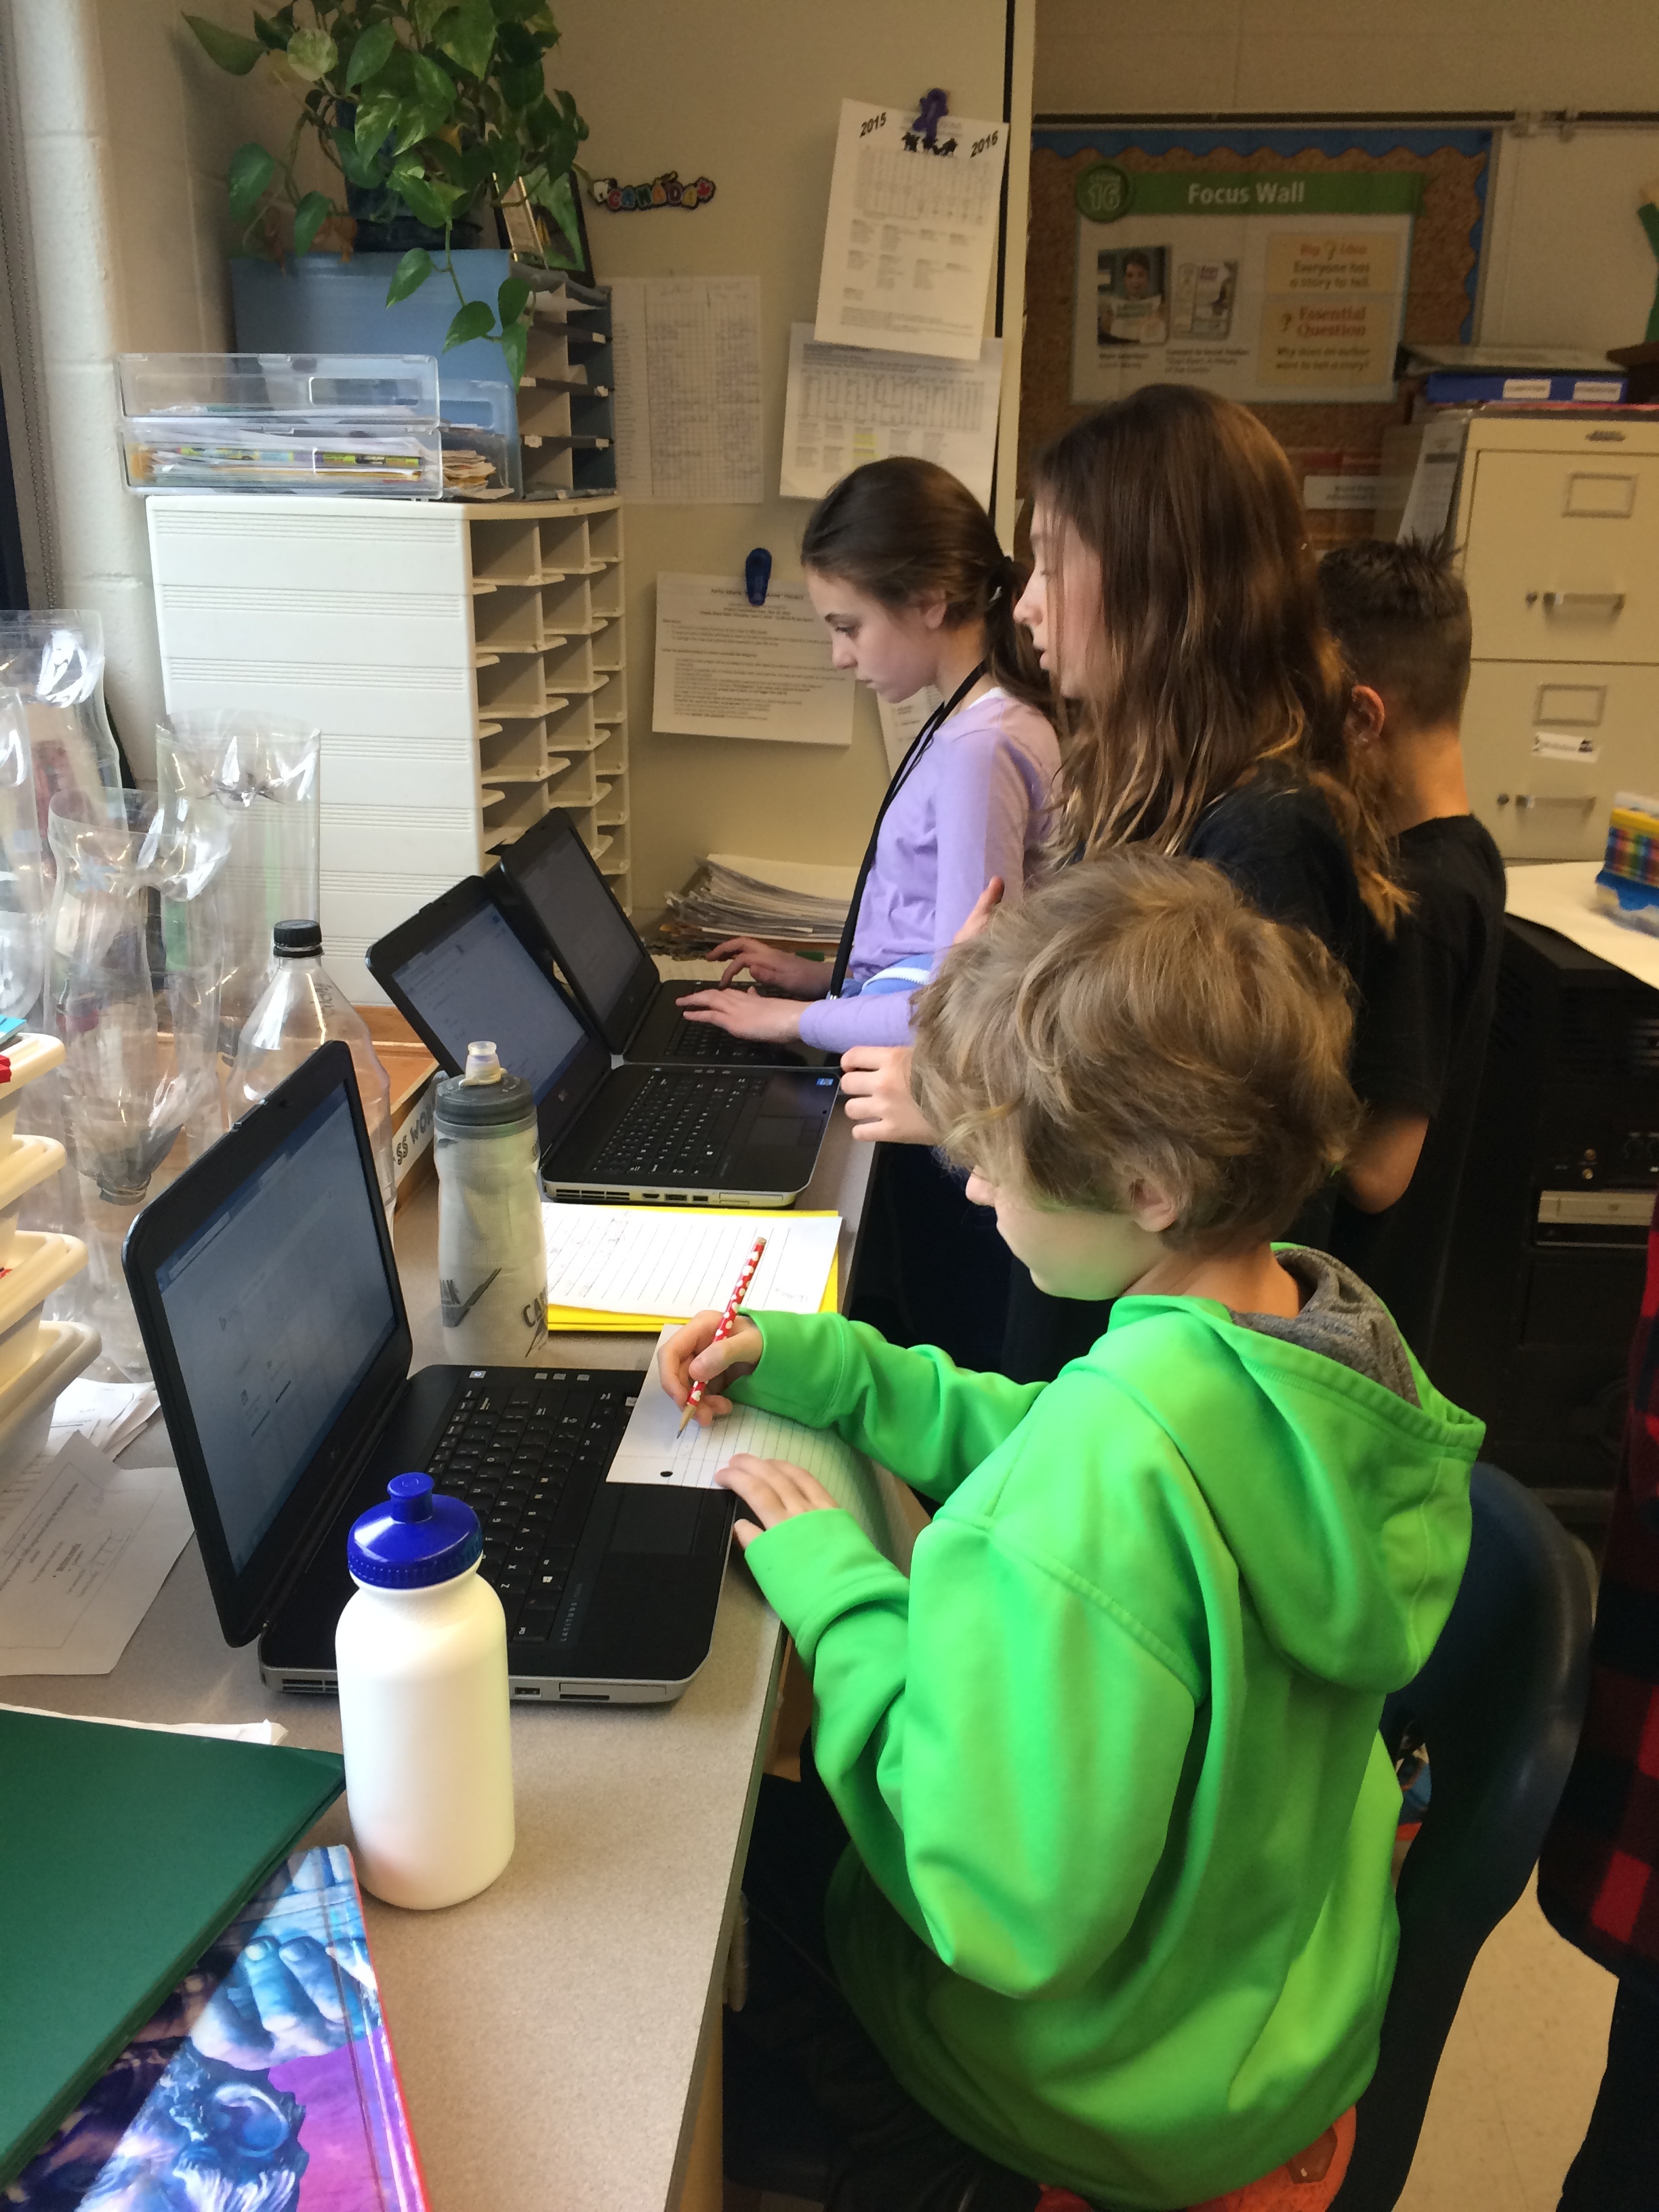
I am currently teaching fifth graders at Goodnoe Elementary School in Newtown, Pennsylvania. It’s my fifth year in fifth grade, after teaching second grade at the same school for eleven years. Additionally, I moderate a grades 5-6 STEM Club once a week during recess and lunch. The 5-6 STEM Club students are working on a variety of projects and are learning new skills such as computer programming and digital fabrication. Currently, our fifth graders are working on an interdisciplinary project. They are combining math, engineering, art, and some very much needed collaborative skills to create a “solid sculpture” that will be displayed on our hallway bulletin board.
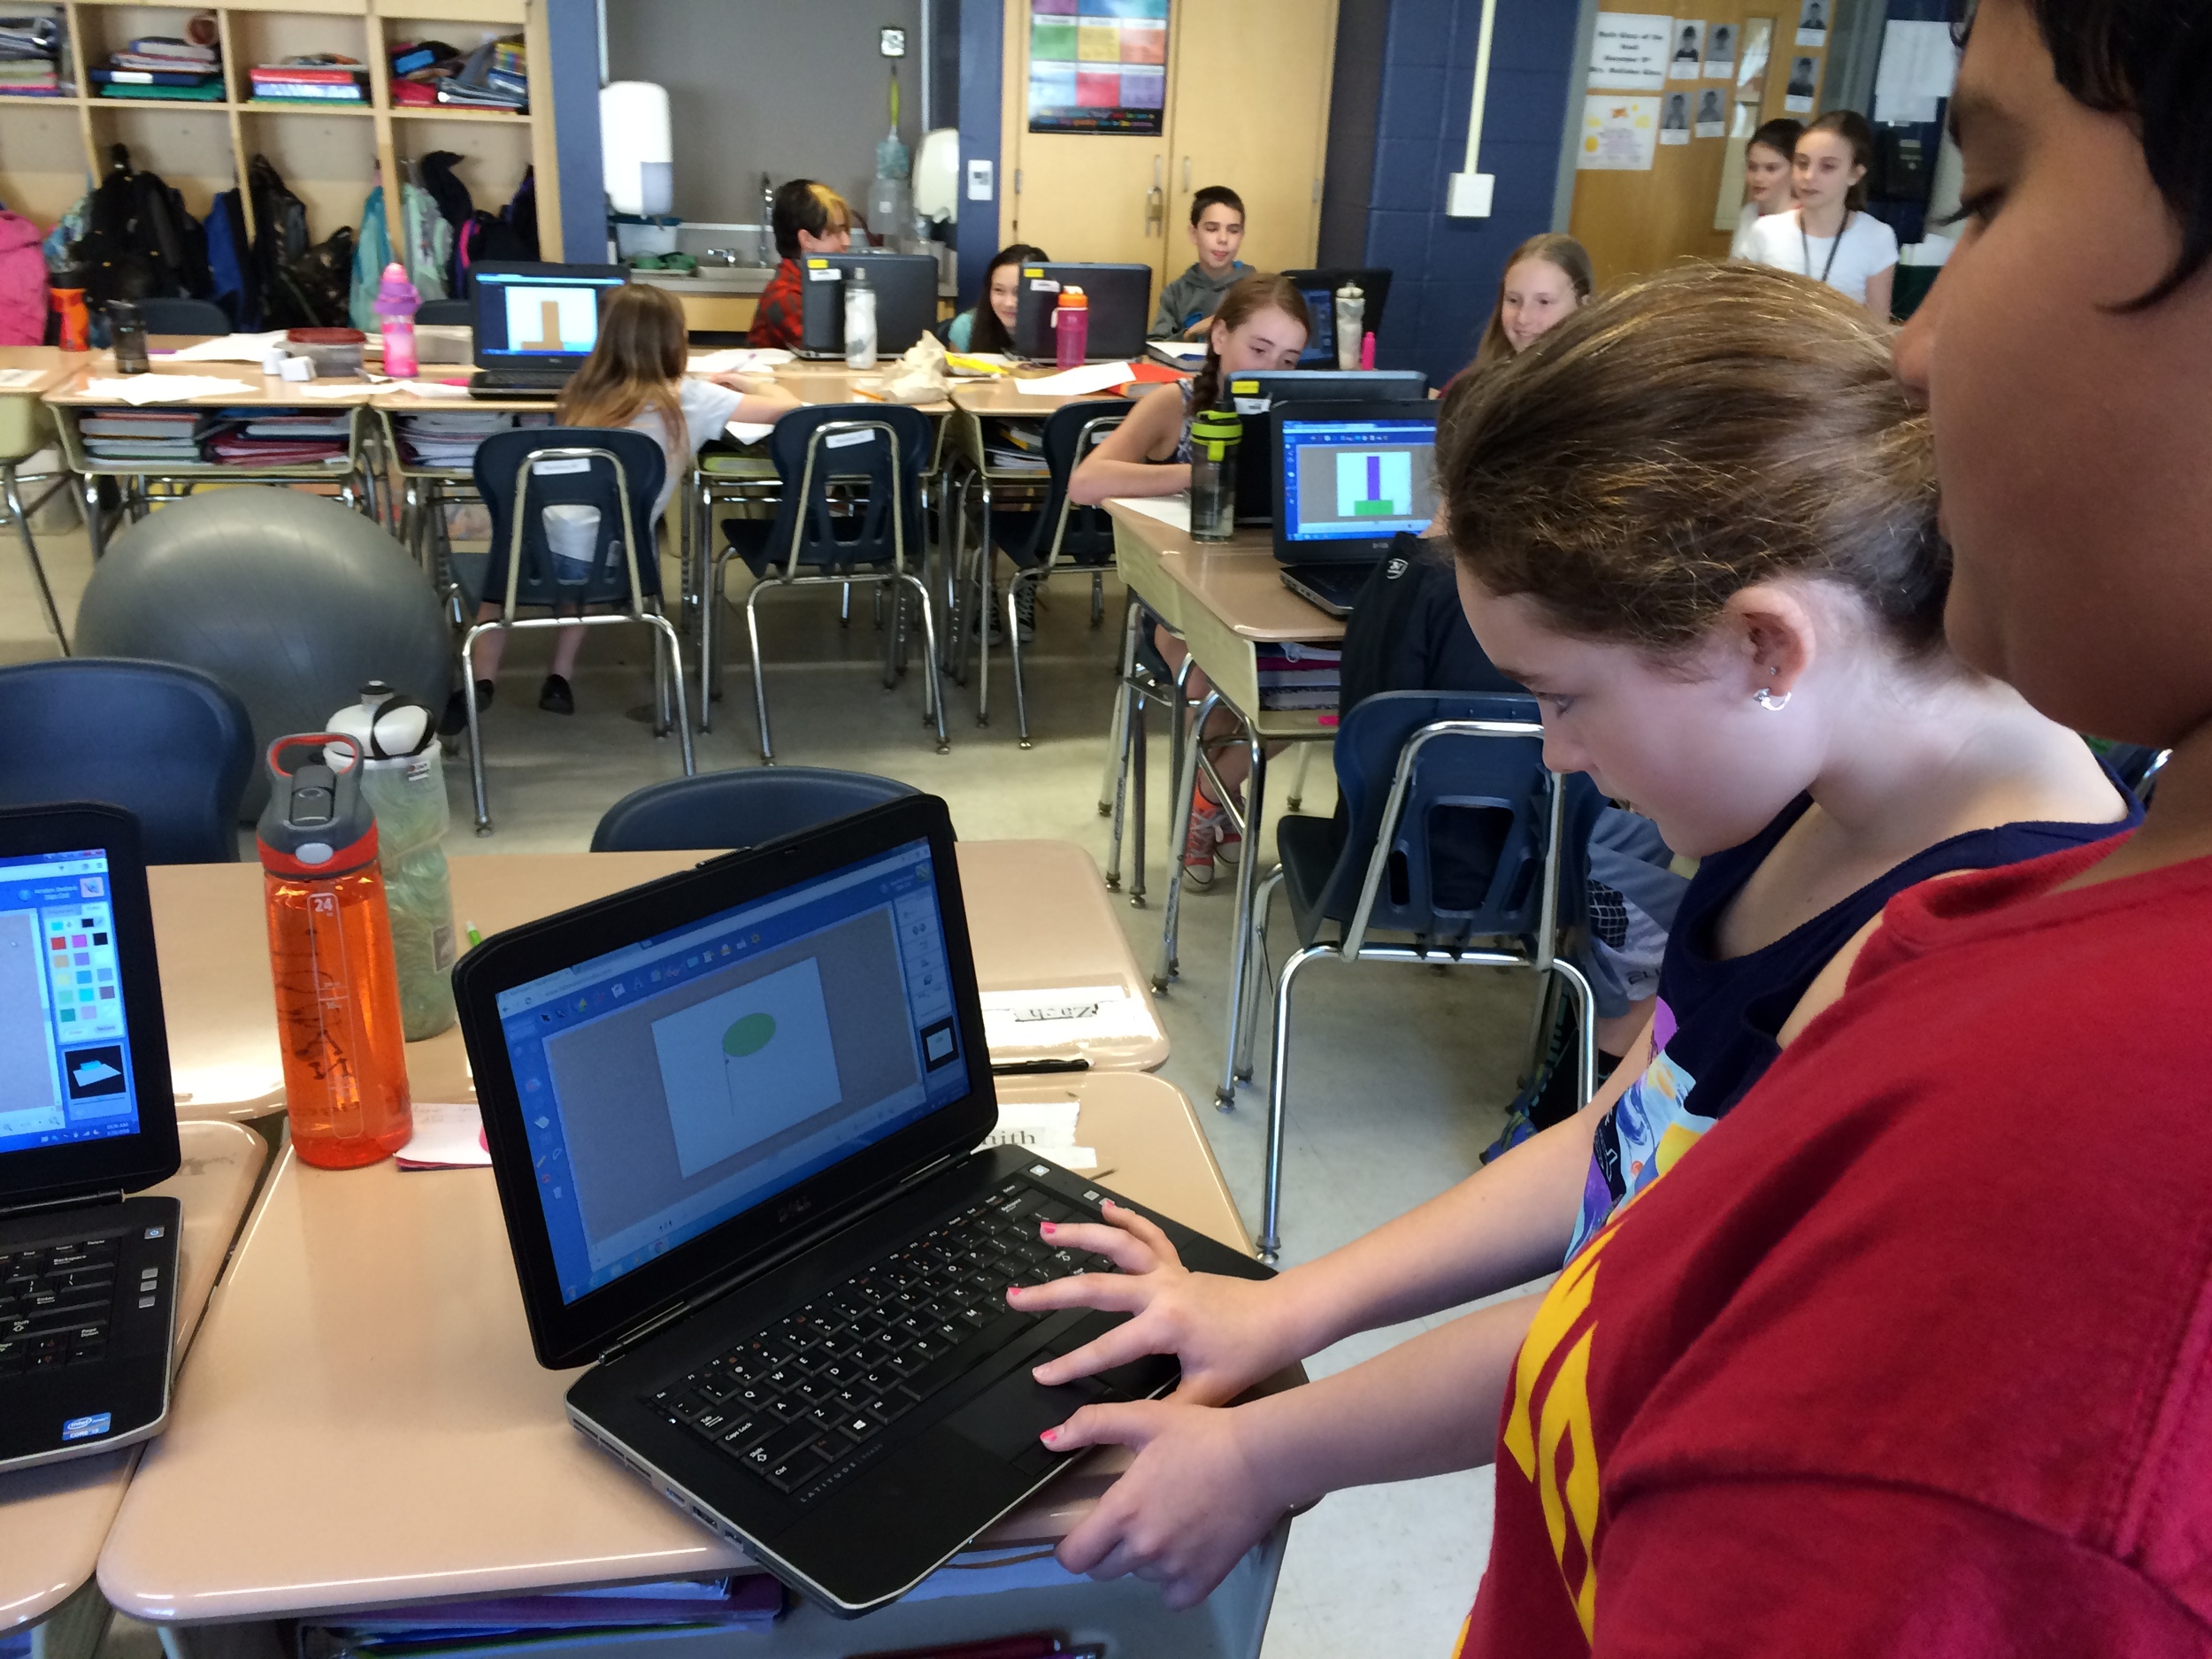
How are you using Fab@School Maker Studio into your classroom?
There are a couple of ways we are using Fab@School Maker Studio. First, my homeroom is working on their “solid sculptures.” Small groups have been given the challenge of collaborating to create an interesting sculpture that includes a cone, cube, two rectangular prisms, a cylinder, a square pyramid, and one other solid shape. The total volume of each sculpture needs to be between 60-250 cubic inches. The colors, patterns, and configuration of shapes is their creative choice. The small groups are working hard to learn how to use Fab@School, how to calculate volume, and how to design the various shapes. We began the project by assigning student trainers that took on the role of ‘team leader’, introducing their group members to the new program and guiding them on how to use it. Team leaders are also responsible for keeping the group organized, maintaining the design notes, and making sure everyone in the group is participating.
Students are also using Fab@School in our new “STEM Special”. This STEM Special has been put in place in lieu of our weekly computer lab block. Students work on independent digital projects, some of which involve electronics and cardboard, and many that include designs students are creating using Fab@School.
Finally, we also offer a weekly STEM Club to all students in a more informal setting. The students are just beginning to learn Fab@School and are so excited to start planning their projects!
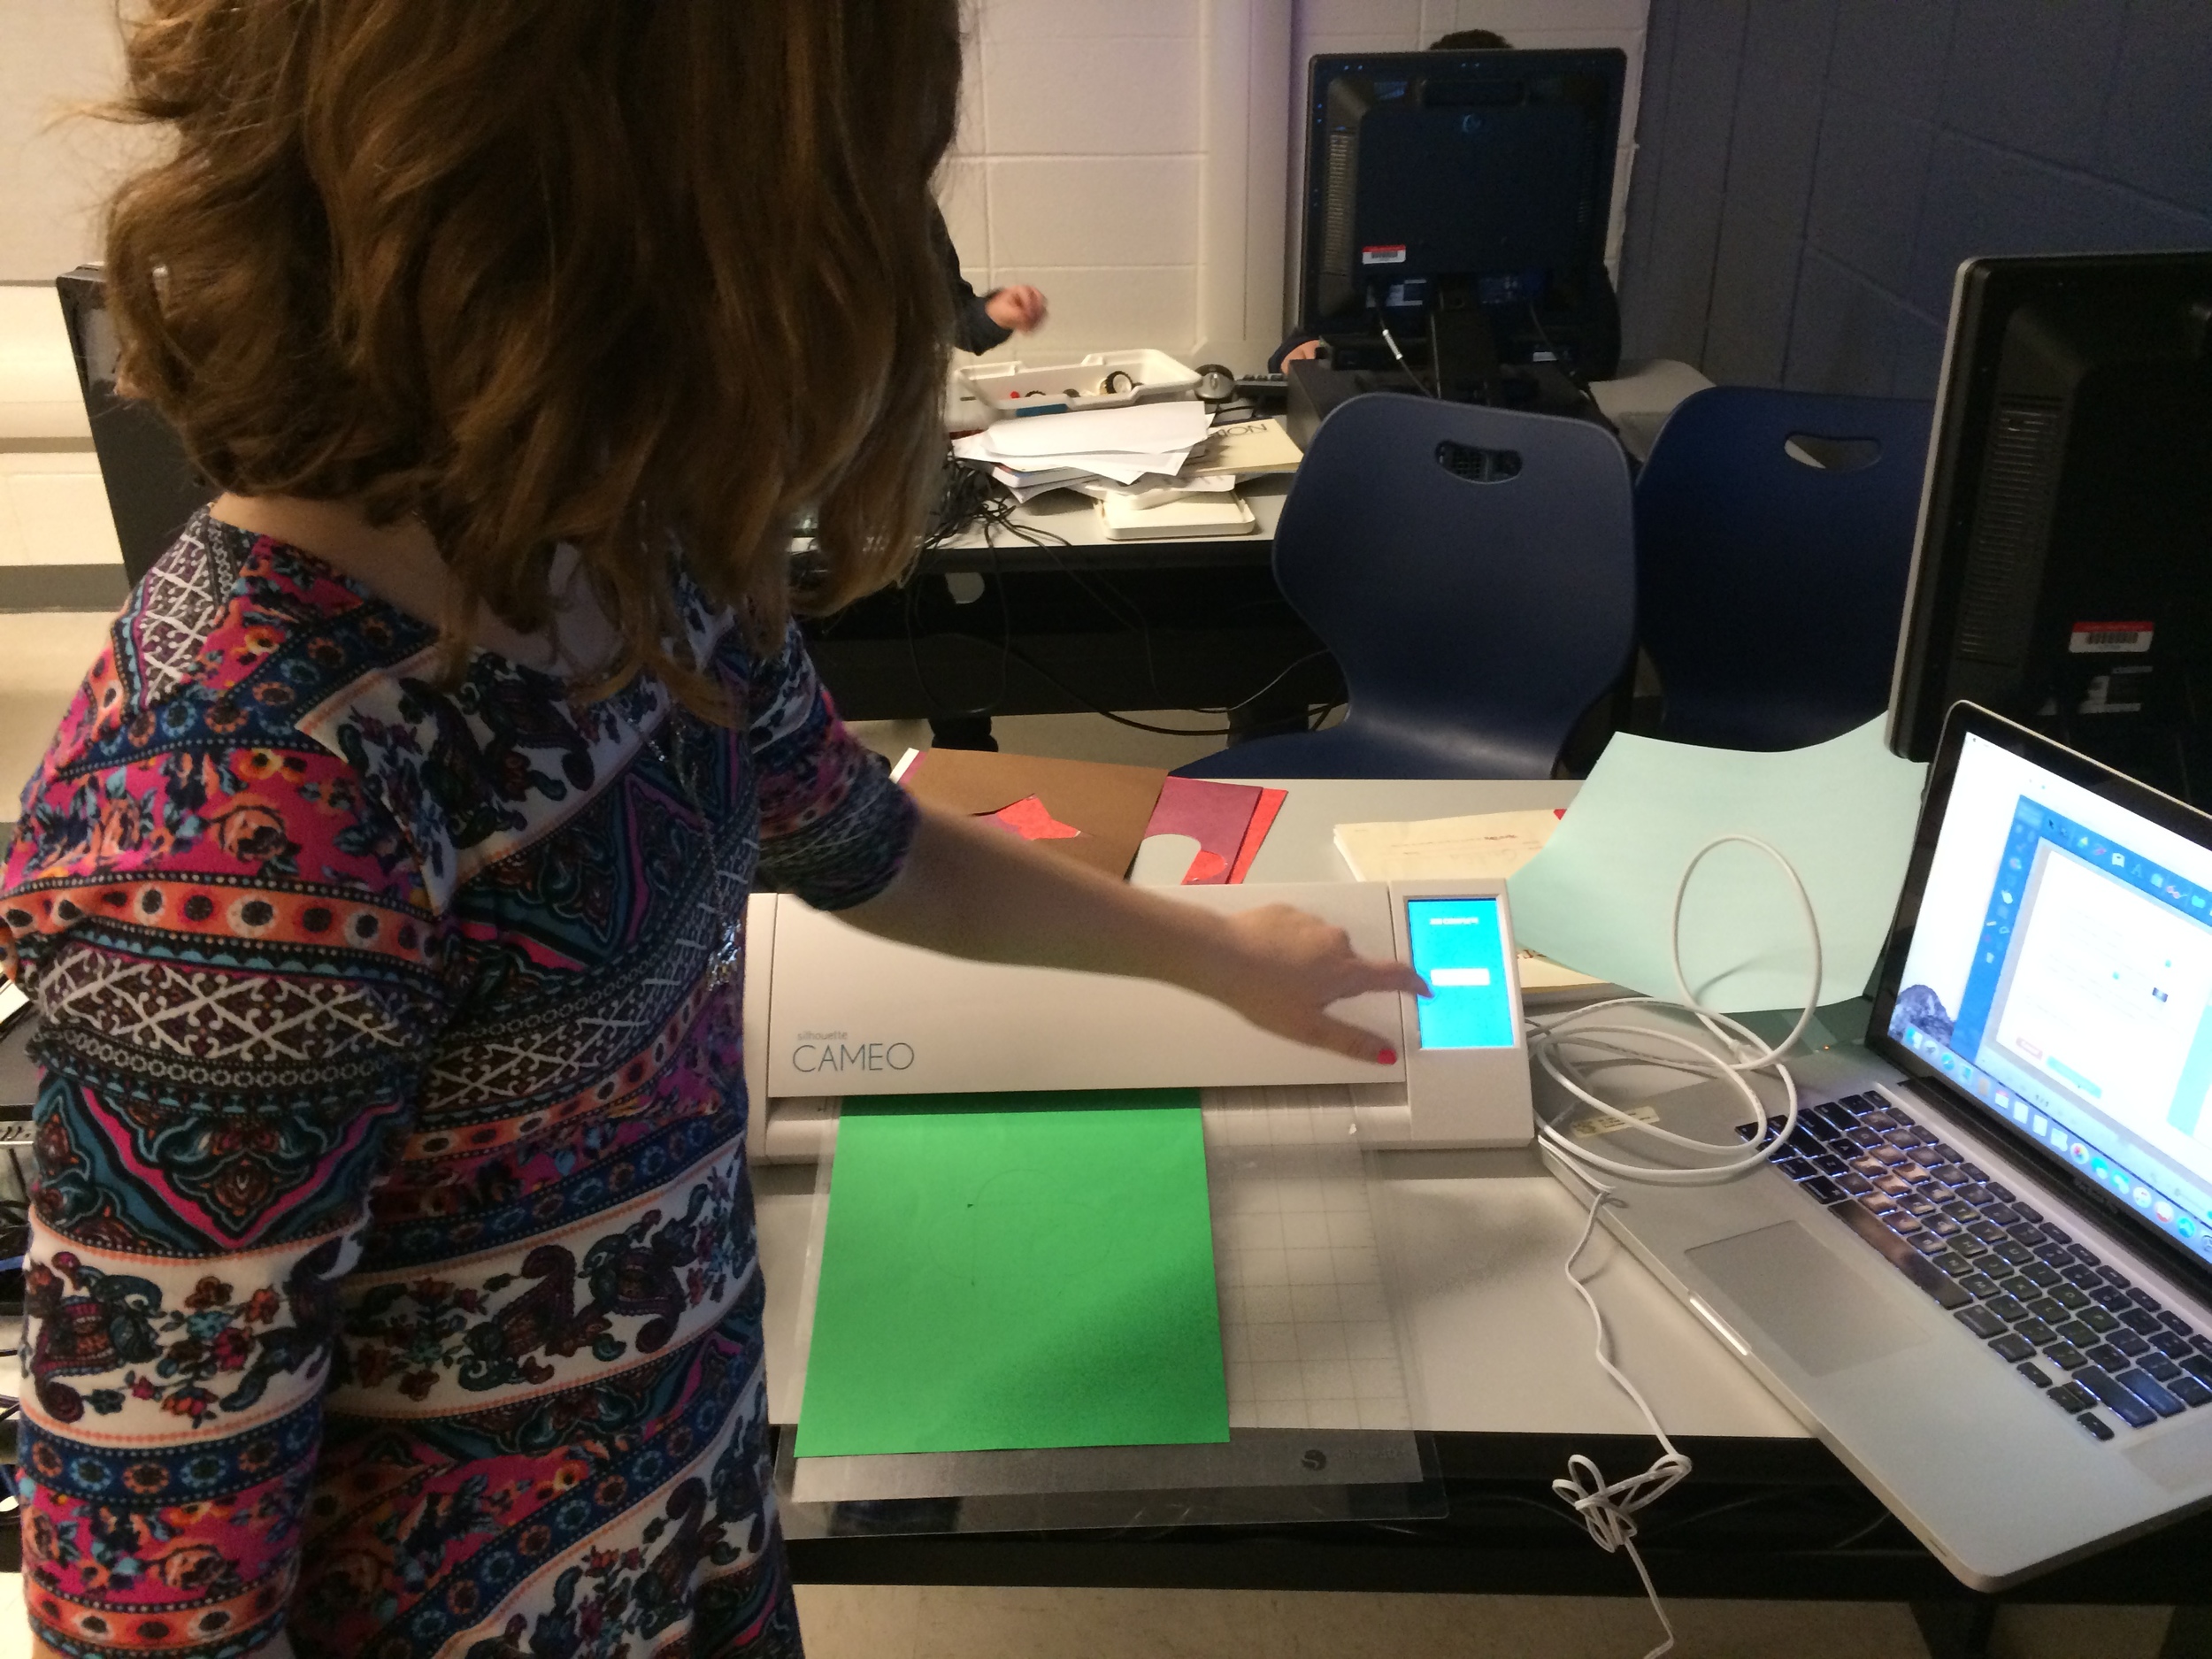
What are some of the challenges/lessons you are tackling with Maker Studio?
One of our primary challenges at the moment is setting up our hardware to work as effectively and efficiently as possible. As the class begins to learn and use Fab@School Maker Studio, we are working out how to get the printing and cutting process to work optimally using our current district hardware. We are learning what works best and what our major hurdles are so we can sort those out with our administration and tech support. We want to make the best choices in our setup so we can hopefully share the program with all of our students.
Can you share one wonderful aha teaching moment you’ve had this week?
Yes, a wonderful aha moment occurred when I first introduced Fab@School to my class and they began their Solid Sculpture project. The small groups busily assigned jobs, got some training on the program, and began researching volume formulas they would need for their solid shapes. After a little over an hour, time was up. As I instructed the students to clean up their materials, one student called out, “What, time’s up? We didn’t even do any math today!” After spending an hour focused on geometry and measurement, it was quite surprising that the students didn’t realize that they were, in fact, doing math. I took the opportunity to explain once again just what they were doing and its connection to our math program. Project-based learning is a great way to learn as it allows students to become fully invested in their work, so much so that they forget they are even doing “school work.” I can honestly say that the students are actively and happily engaged in mathematical conversations at a fifth grade level and more!